<?xml version="1.0" encoding="utf-8"?>
<feed xmlns="http://www.w3.org/2005/Atom">
  <title>zkk&#39;s blog</title>
  
  <subtitle>分享点滴学习，记录成长足迹</subtitle>
  <link href="https://note.zkk.me/atom.xml" rel="self"/>
  
  <link href="https://note.zkk.me/"/>
  <updated>2026-06-29T03:05:06.497Z</updated>
  <id>https://note.zkk.me/</id>
  
  <author>
    <name>zkk</name>
    
  </author>
  
  <generator uri="https://hexo.io/">Hexo</generator>
  
  <entry>
    <title>我被隔离的日子</title>
    <link href="https://note.zkk.me/0x0045.html"/>
    <id>https://note.zkk.me/0x0045.html</id>
    <published>2022-10-16T07:16:00.000Z</published>
    <updated>2026-06-29T03:05:06.497Z</updated>
    
    <content type="html"><![CDATA[<h2 id="前言"><a href="#前言" class="headerlink" title="前言"></a>前言</h2><p>2019年末新冠肺炎疫情爆发以来，全球经济与社会秩序受到不同程度的冲击。大到国家，小至个人，方方面面都受到影响。全球各地都采用或曾采用不同手段阻止疫病的扩散。</p><p>自从疫情发生以来，身边也有亲人、朋友被隔离，但是从没有听说谁确诊了。在本月之前，我从未被隔离过。我比较怕隔离，因为一旦隔离起来，首先没法正常去公司上班，其次生活习惯也会受到影响。为此，我今年年初春节都没回家过年，表面看是响应了政府的号召“就地过年”，其实是当时我所在的杭州有出现病例，担心回家后被隔离影响工作。</p><p>但是吧，意外总会出现。尽管我已经比较小心谨慎，但是十一假期结束后我还是被隔离了。事情要从十一假期开始说起。</p><h2 id="前后经过"><a href="#前后经过" class="headerlink" title="前后经过"></a>前后经过</h2><p>十一假期本来是10月1日到10月7日七天假期，我向公司请了9月30日一天假，所以我的假期就有了8天。</p><h4 id="9月30日"><a href="#9月30日" class="headerlink" title="9月30日"></a>9月30日</h4><p>我自驾从杭州返回老家河南周口；</p><h4 id="10月2日"><a href="#10月2日" class="headerlink" title="10月2日"></a>10月2日</h4><p>自驾从周口前往洛阳；</p><h4 id="10月4日"><a href="#10月4日" class="headerlink" title="10月4日"></a>10月4日</h4><p>自驾从洛阳返回周口；</p><h4 id="10月6日"><a href="#10月6日" class="headerlink" title="10月6日"></a>10月6日</h4><p>自驾从周口返回杭州，大约7日凌晨一点左右达到杭州。</p><h4 id="10月7日"><a href="#10月7日" class="headerlink" title="10月7日"></a>10月7日</h4><p>去了趟4S店做保养，又去了西湖玩耍，约了一顿饭。晚上去了趟机场。</p><h4 id="10月8日"><a href="#10月8日" class="headerlink" title="10月8日"></a>10月8日</h4><p>开工了，回公司上了一天班。一切正常。</p><h4 id="10月9日"><a href="#10月9日" class="headerlink" title="10月9日"></a>10月9日</h4><p>早晨来到公司门口，发现自己的健康码已变成黄码，进不去公司。我怀疑是因为我十一假期中去过洛阳，后来洛阳有确诊的。</p><p>开始向公司报备，并联系社区处理。社区电话打不通，一直是正在通话中，原因是打社区电话的人太多了。无奈我先自驾前往医院做核酸，医院的黄码人很多很多，有两个长长的队，都是先做流调，再核酸采样。</p><p>核酸采样完毕后社区的电话仍未打通，于是我直接前往社区。到达社区后，看到社区办公室内有两个人，一男一女两个工作人员，很忙，不停地接电话。经过询问后，工作人员告诉我9号需要我居家隔离一天，等9号做的核酸报告出来后10号就可以正常出行。于是我回家隔离去了，并向公司报备了情况。</p><h4 id="10月10日"><a href="#10月10日" class="headerlink" title="10月10日"></a>10月10日</h4><p>早晨起床发现仍是黄码，于是又给社区打电话，打了七八个电话后打通了。经过询问，告诉我说洛阳是中高风险地区，从洛阳回来的需要隔离7天，从4号离开洛阳开始算，需要隔离到11号，所以11号可以自由活动，10号仍需居家隔离。</p><p>好吧，再隔离一天。同时我向公司报备了最新情况，并申请了10号一天的远程办公权限。</p><p>中午，有个社区的人上门核酸采样。</p><p>下午，有两个人上门找到我，告诉我说要我从8号居家隔离到15号。我询问原因，但是他俩不进行解释，只是把隔离告知书送给我，并让我有疑问就打告知书上的电话。他俩走时在我家门口贴了两张红纸，上面写着居家观察到15号。</p><p>告知书上的电话也是打不通，于是我又打电话给社区。社区的解释是政策又变了，前一天（10号）刚下发的政策是不从离开中高风险的日期开始算，而是从到杭州开始算隔离7天。社区说但是我是7号到的杭州，所以应该居家隔离到14号，而不是告知书上写的15号，告知书写错了。</p><p>没办法，上面有政策，下面只能执行。于是，我又向公司报备最新情况，同时又申请了11号到14号一共四天的远程办公权限。</p><h4 id="10月11日"><a href="#10月11日" class="headerlink" title="10月11日"></a>10月11日</h4><p>继续居家办公，以为会是平静的一天，但是我错了。有个电话从河南打过来，告诉我说6号的时候我在高速上路过的四方湖服务区后面有个工作人员确诊了，我是密切接触者（密接）。</p><p>我也忘了我当时是否在四方湖服务区停靠了，因为我在高速上停靠了不止一个服务区。不过既然她能打电话找到我，想必我确实在四方湖服务区停靠了。</p><p>我意外成密接了，具体如何处理要等社区的电话。但是11号再没人找我。</p><h4 id="10月12日"><a href="#10月12日" class="headerlink" title="10月12日"></a>10月12日</h4><p>继续居家隔离办公。</p><p>中午社区给我打电话，告诉我说密接要去集中隔离。隔离到13号（从6号接触开始算，隔离7天到13号），13号之后再来3天的居家隔离，到16号。我表示现在给我拉去集中隔离的话13号又给我拉回来，就一天的话没有必要。社区的人听到我表示不愿意去后，又找了一个人联系我，态度明显强硬，告诉我就一天也要去。这个人可能是个类似于劝导员之类的，专门劝导有异议的人去隔离的。</p><p>我接受了集中隔离并再次向他确认13号可以从酒店回家。大约半个小时后有个车过来，把我接到了酒店，带到了指定的房间进行隔离。我的健康码也从黄色变成了红色。</p><p>酒店里有水、有电、有网，不影响远程办公，每天早晨六点多有人上门核酸采样，一日三餐定时送上门，伙食还不错。不收一分钱，在酒店住着还是挺舒服的。</p><h4 id="10月13日"><a href="#10月13日" class="headerlink" title="10月13日"></a>10月13日</h4><p>继续在酒店集中隔离远程办公。</p><p>上午十一点，管理人员在群里发布今天解除隔离的人员列表，列表里没有看到我。于是我在群里对管理人员说我今天应该解除集中隔离。管理人员表示经过街道研判，我不具备居家隔离条件，所以后面3天仍在酒店隔离。我问居家条件是啥，管理人员说要单人单间，并且不能是租的房，还要装门磁贴封条。</p><p>我一想在酒店住着环境条件啥的还不错，虽没有衣来伸手，但是有饭来张口，那就这样吧。</p><p>就是这样，每天都有新情况，每天都在变，唯一不变的是要我隔离。</p><h4 id="10月14日"><a href="#10月14日" class="headerlink" title="10月14日"></a>10月14日</h4><p>继续在酒店远程办公</p><h4 id="10月15日"><a href="#10月15日" class="headerlink" title="10月15日"></a>10月15日</h4><p>15日是周六，不需要办公，继续在酒店隔离。晚上，管理人员在微信群中发了16号解除隔离的人员名单，名单中看到了自己的名字，很高兴，终于到头了。</p><h4 id="10月16日"><a href="#10月16日" class="headerlink" title="10月16日"></a>10月16日</h4><p>依然早晨六点多做核酸采样，十点钟出核酸报告，阴性，十一点钟变为绿码，十二点钟在管理人员带领下离开酒店，自行回家，隔离结束。</p><p>到家后，一把扯下门口居家隔离到15日的红色提示，揉成一团，丢在垃圾桶里。</p><h2 id="集中隔离的日子"><a href="#集中隔离的日子" class="headerlink" title="集中隔离的日子"></a>集中隔离的日子</h2><p>我隔离的酒店是杭州联创街上的桔子水晶杭州未来科技城酒店，距离阿里巴巴不远。还有一个人跟我坐同一辆大巴车来酒店，是阿里巴巴的员工。他说他也是在高速上停靠了四方湖服务区才来集中隔离。这不巧了吗！</p><p>由于被作为集中隔离点使用，酒店已经不再对外开放，不过仍能在美团看到该酒店的信息，一个大床房的价格是395人民币。房间内除了毛巾浴巾变成一人份外，其他该有的物品都齐全。同时，房间内放了12瓶矿泉水，供被隔离的人饮用。</p><p>关于酒店的电视，我本想晚上下班后可以用电脑或手机投屏在电视上看电影。但是操作了一通，电视没有反应。我在微信群里找到酒店的后勤管理。由于当时不便进入到隔离人员的房间，所以他通过微信视频电话来一步一步让我操作。后面发现是电视的电源插头松了，插上去就好了。然而，打开电视后发现它没有联网，无法投屏，所以白折腾。</p><hr><p>在酒店集中隔离期间，每天的早、中、晚三顿饭会在固定时间送到门口。</p><p>早饭一般是三四个馒头、花卷、包子、烧麦混搭作为主食，一个水煮蛋，小半截水煮玉米或水煮红薯，一份油炸食品（通常是一根油条），一份咸菜，一碗米粥，外加一盒牛奶。牛奶的配料表里只有生牛乳一项，没有“科技与狠活”。</p><p>午饭和晚饭都是两荤两素，一个汤，一份米饭。中午会给个水果，晚饭会给一盒饮料。</p><p>饭菜的味道还是可以的。有不吃猪肉的少数民族在群里提出要求后，管理人员会去给他搞清真餐。</p><hr><p>让我不爽的一点是，每天核酸采样的时间是在早晨六点多。每天定个早晨六点多的闹钟，醒来后等待采样人员。听到门铃声后去房间门口采样，采样完接着睡。工作人员给出的解释是需要在八点前把样本送到疾控中心，时间点卡得比较死，所以需要六点多采样。</p><hr><p>隔离的工作人员拉了个微信群，里面是被隔离在桔子水晶酒店的人，防疫的工作人员，和酒店的后勤，总共有140人左右。工作人员每天会在群里发第二天需要核酸采样和解除隔离的名单。有任何问题也可以在群里反馈，工作人员响应还是很快的。</p><p>为了不打扰工作人员办公，有人自发拉了个闲聊群。群里在线斗地主、打麻将或者其他游戏。我因为在远程办公，所以就没有参与。</p><hr><p>在被隔离的日子，我不止一次感到这就像在养猪。同样都是把你圈起来，同样没有到处活动的自由，同样都是到时间就投喂吃的，吃什么取决于投什么。不需要猪干什么，老老实实在圈里待着就好。</p><p>有时我还想到一个之前在段子里刷到的问题。“有电有水有网有电脑，你能在一间房间里待多久？”我从没认真思考过这个问题。现在我在想如果还不用工作，那可以更久。</p><p>我还想到过某个电影里的情节。一个人被困在房间里，出不去，但是冰箱里的食物吃完后还可以再生，周而复始。这跟我被隔离有些相似。每次到点了就去门口看，饭菜已经放在那里了，从来不用你思考关于吃的问题。</p><hr><p><strong>希望疫情的阴霾尽快消散</strong></p>]]></content>


    <summary type="html">&lt;h2 id=&quot;前言&quot;&gt;&lt;a href=&quot;#前言&quot; class=&quot;headerlink&quot; title=&quot;前言&quot;&gt;&lt;/a&gt;前言&lt;/h2&gt;&lt;p&gt;2019年末新冠肺炎疫情爆发以来，全球经济与社会秩序受到不同程度的冲击。大到国家，小至个人，方方面面都受到影响。全球各地都采用或曾采用不同手</summary>


    <category term="生活" scheme="https://note.zkk.me/categories/%E7%94%9F%E6%B4%BB/"/>
    
    
  </entry>
  
  <entry>
    <title>【问答】What does a module mean in swift?</title>
    <link href="https://note.zkk.me/0x0044.html"/>
    <id>https://note.zkk.me/0x0044.html</id>
    <published>2022-08-26T07:28:00.000Z</published>
    <updated>2026-06-29T03:05:06.497Z</updated>
    
    <content type="html"><![CDATA[<h2 id="提问"><a href="#提问" class="headerlink" title="提问"></a>提问</h2><p>For example, I have two files called <code>file1.swift</code> and <code>file2.swift</code>.</p><p><code>file1.swift</code></p><div class="code-wrapper"><pre><code class="hljs swift"><span class="hljs-keyword">import</span> UIKit<span class="hljs-keyword">class</span> <span class="hljs-title class_">A</span> : <span class="hljs-title class_ inherited__">B</span> &#123;&#125;</code></pre></div><p><code>file2.swift</code></p><div class="code-wrapper"><pre><code class="hljs swift"><span class="hljs-keyword">import</span> UIKit<span class="hljs-keyword">class</span> <span class="hljs-title class_">C</span> : <span class="hljs-title class_ inherited__">A</span> &#123;&#125;</code></pre></div><p>I am reading that public class can not subclassed outside of module. Here I have subclass C. I am trying to understand what does module mean here. I imported to same module UIKit for both file. So the both files are of same module? So that I can subclassed. Or both files have different module even I import the same UIKit?Can anybody explain what is module?</p><p>Source:</p><p>Classes with public access, or any more restrictive access level, can be subclassed only within the module where they’re defined.</p><p>Class members with public access, or any more restrictive access level, can be overridden by subclasses only within the module where they’re defined.</p><h2 id="回答"><a href="#回答" class="headerlink" title="回答"></a>回答</h2><blockquote><p>A module is a single unit of code distribution—a framework or application that is built and shipped as a single unit and that can be imported by another module with Swift’s import keyword.</p></blockquote><blockquote><p>Each build target (such as an app bundle or framework) in Xcode is treated as a separate module in Swift. If you group together aspects of your app’s code as a stand-alone framework—perhaps to encapsulate and reuse that code across multiple applications—then everything you define within that framework will be part of a separate module when it’s imported and used within an app, or when it’s used within another framework.</p></blockquote><p>As the <a href=https://developer.apple.com/library/content/documentation/Swift/Conceptual/Swift_Programming_Language/AccessControl.html target='_blank'>docs</a> indicate, the module is an application or a framework (library). If you create a project with classes <code>A</code> and <code>B</code>, they are part of the same module. Any other class in the same project can inherit from those classes. If you however import that project to another project, classes from that another project won’t be able to subclass <code>A</code> nor <code>B</code>. For that you would have to add <code>open</code> indicator before their declarations.</p><p>Basically, if you work on a single app then you are working in one single module and unless declared as private or <code>fileprivate</code>, the classes can subclass each other.</p><p><strong>EDIT</strong>Let us have following class in module (project) <em>Module1</em>:</p><div class="code-wrapper"><pre><code class="hljs swift"><span class="hljs-keyword">class</span> <span class="hljs-title class_">A</span> &#123;&#125;</code></pre></div><p>Since this class is not <code>open</code>, it can be subclassed only within the same module. That means that following class:</p><div class="code-wrapper"><pre><code class="hljs swift"><span class="hljs-keyword">class</span> <span class="hljs-title class_">B</span> : <span class="hljs-title class_ inherited__">A</span> &#123;&#125;</code></pre></div><p>Can be written only in the same project, in <em>Module1</em>.</p><p>If you add Module1 as a dependency to project <em>Module2</em>, and try to do this:</p><div class="code-wrapper"><pre><code class="hljs swift"><span class="hljs-keyword">import</span> Module1<span class="hljs-keyword">class</span> <span class="hljs-title class_">C</span>: <span class="hljs-title class_ inherited__">A</span> &#123;&#125;</code></pre></div><p>It will not compile. That’s because class <code>A</code> is not open (in other words it has access public or less) and it does not belong to the same module as <code>C</code>. <code>A</code> belongs to <code>Module1</code>, <code>C</code> belongs to <em>Module2</em>.</p><p><strong>Note</strong></p><p><code>import</code> keyword imports a dependency module to your current module. If you write <code>import UIKit</code> in your project, you are telling the compiler that you want to use module <code>UIKit</code> in your module. <code>import</code> does not define current module. Current module is the current project.</p><p>Adding <code>import UIKit</code> at the beginning of the file does not change nor define to which module the file belongs. It just tells the compiler that in that file you want to use code from <code>UIKit</code> module.</p><hr><blockquote><p>REFERENCE</p><ul><li><a href=https://stackoverflow.com/questions/48426344/what-does-a-module-mean-in-swift target='_blank'>What does a module mean in swift?</a></li></ul></blockquote>]]></content>


    <summary type="html">&lt;h2 id=&quot;提问&quot;&gt;&lt;a href=&quot;#提问&quot; class=&quot;headerlink&quot; title=&quot;提问&quot;&gt;&lt;/a&gt;提问&lt;/h2&gt;&lt;p&gt;For example, I have two files called &lt;code&gt;file1.swift&lt;/code&gt; and &lt;cod</summary>


    <category term="学习" scheme="https://note.zkk.me/categories/%E5%AD%A6%E4%B9%A0/"/>
    
    
  </entry>
  
  <entry>
    <title>iOS-内存泄漏</title>
    <link href="https://note.zkk.me/0x0043.html"/>
    <id>https://note.zkk.me/0x0043.html</id>
    <published>2022-08-22T06:36:00.000Z</published>
    <updated>2026-06-29T03:05:06.497Z</updated>
    
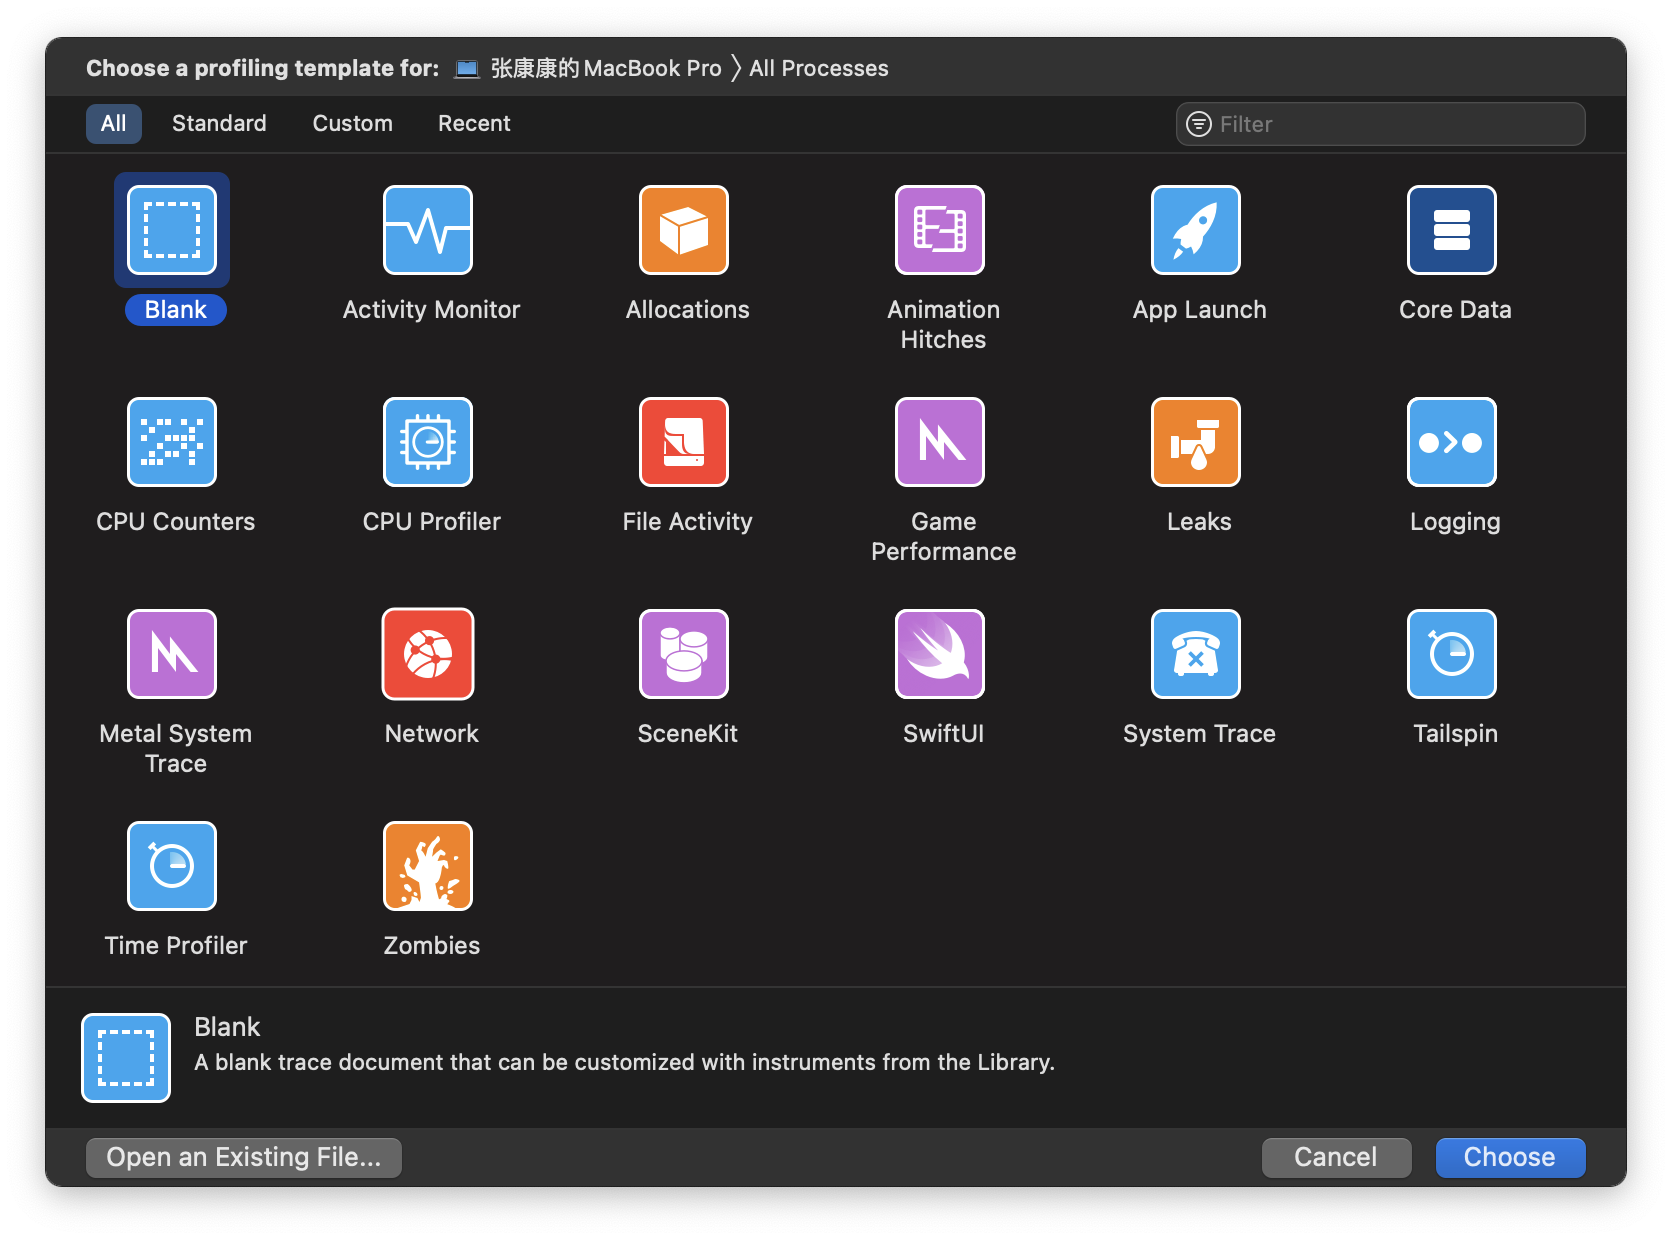
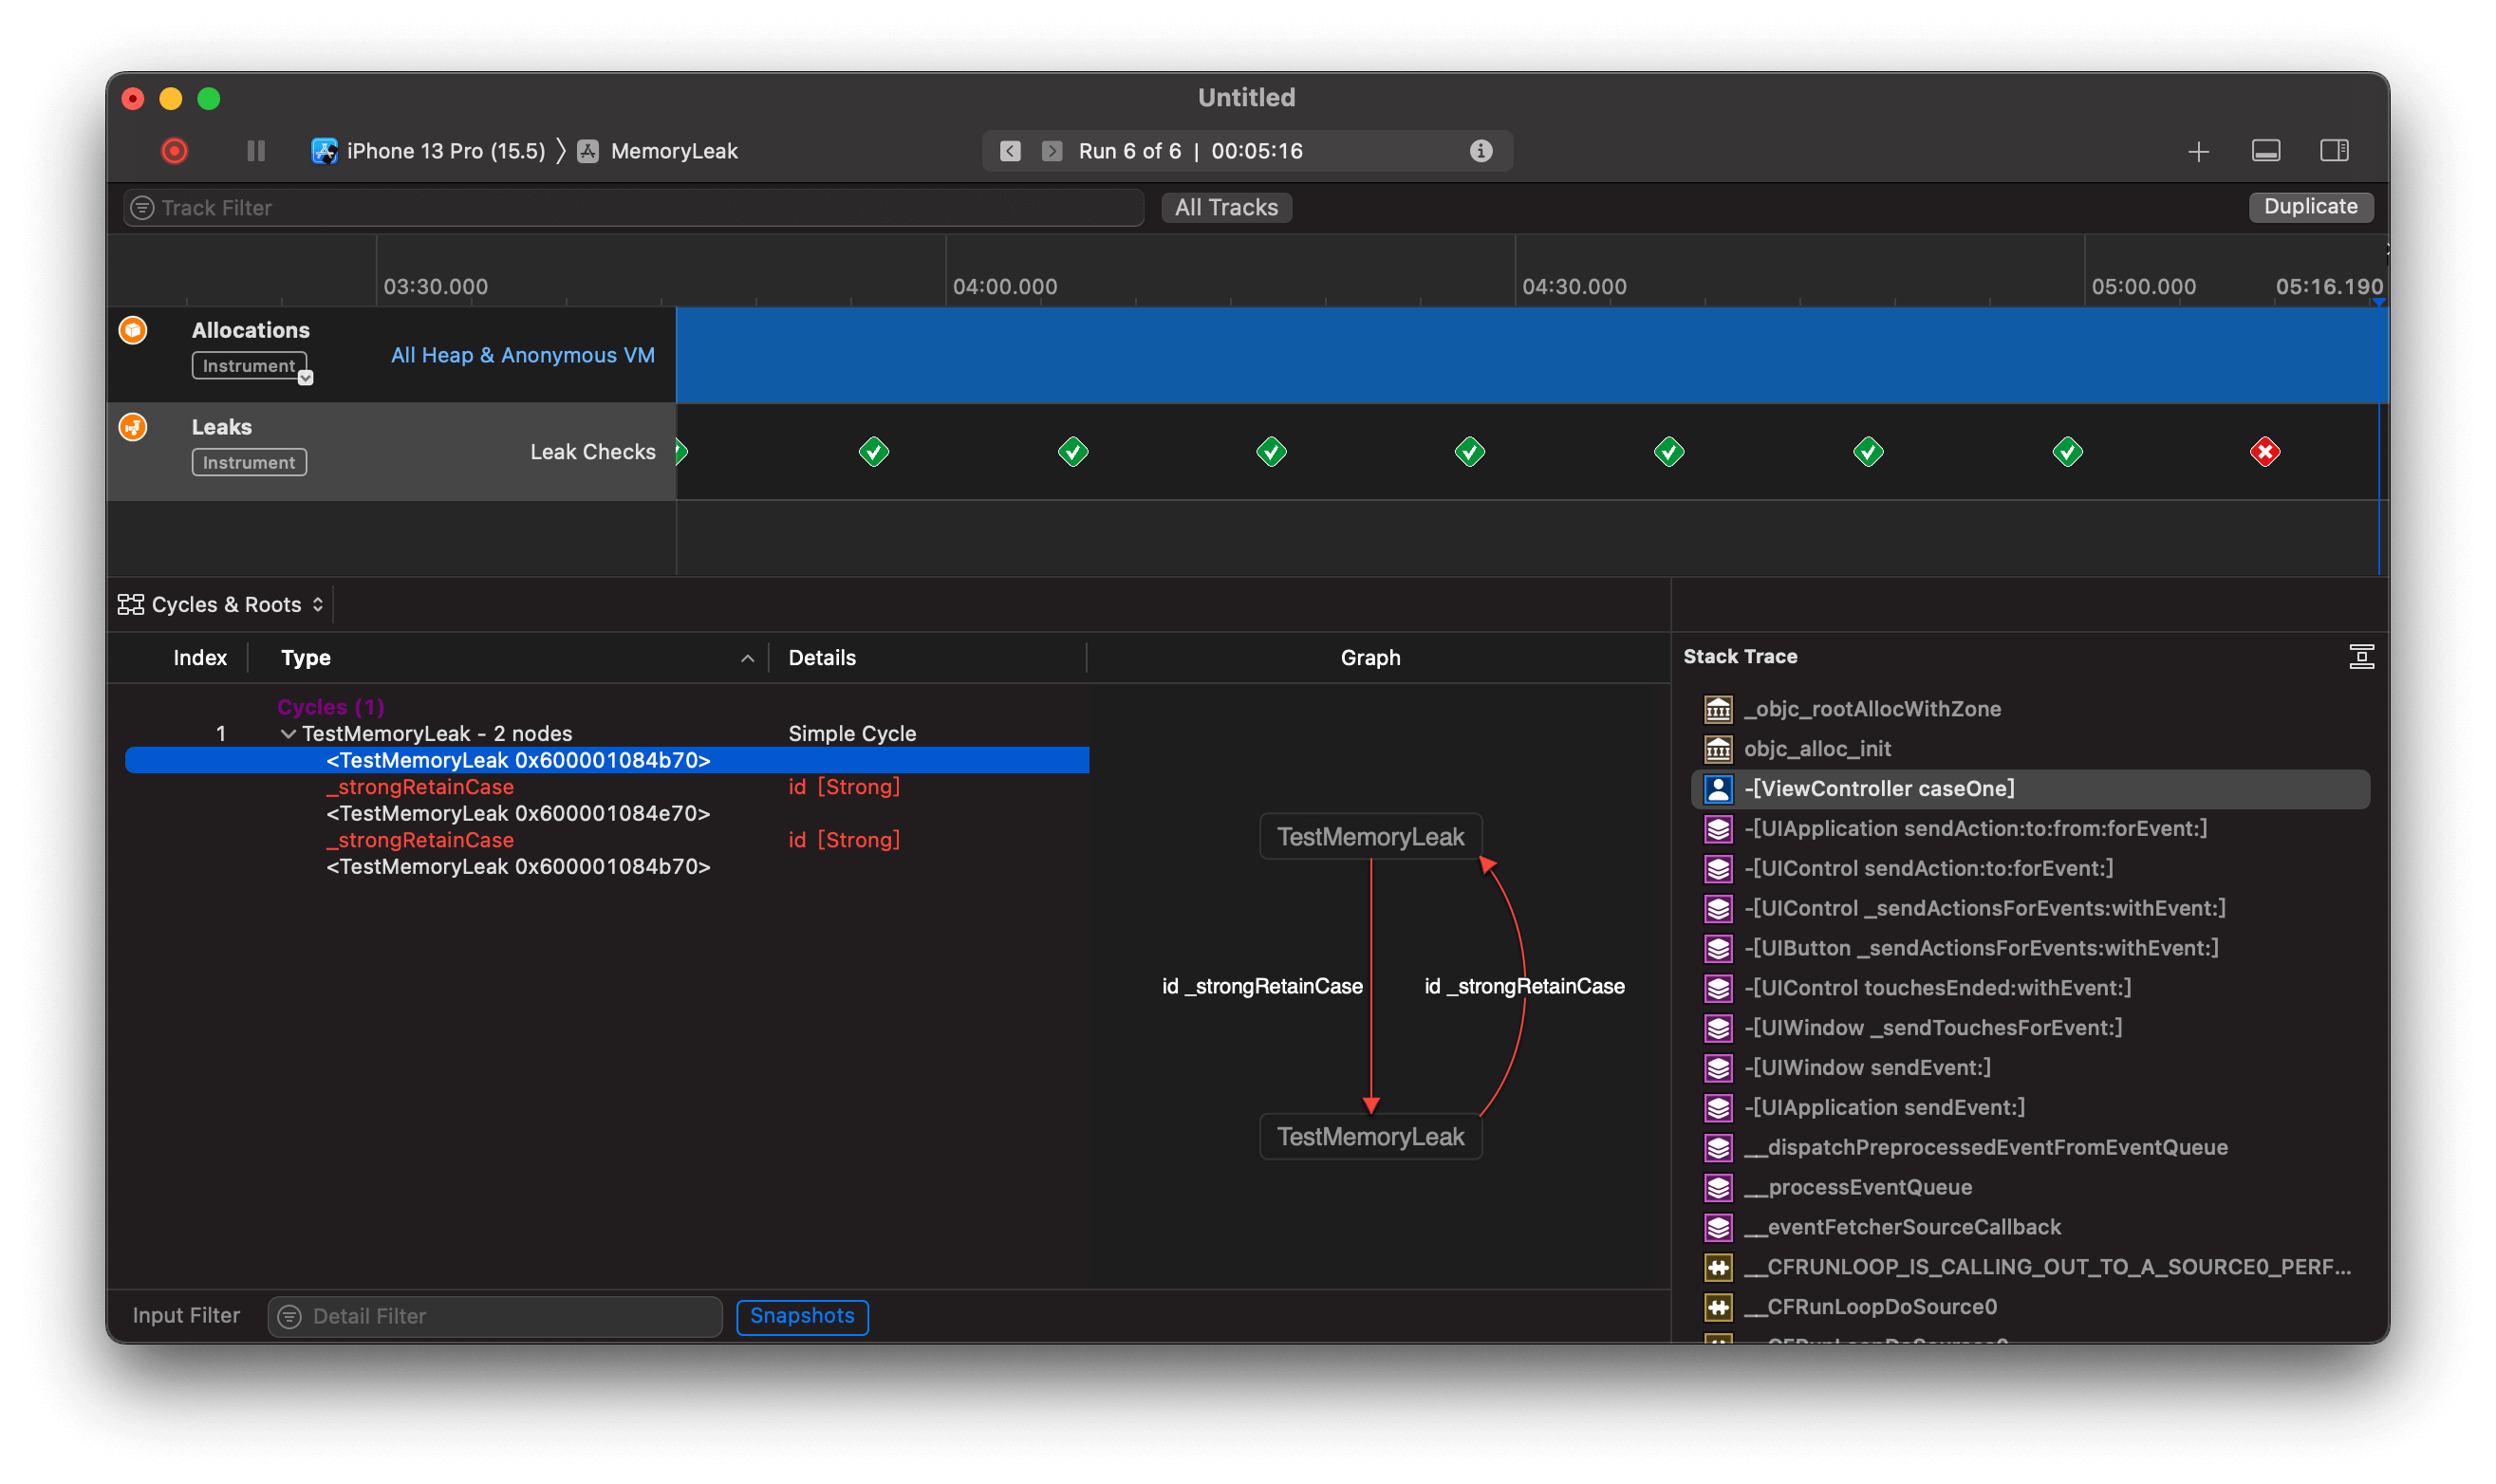
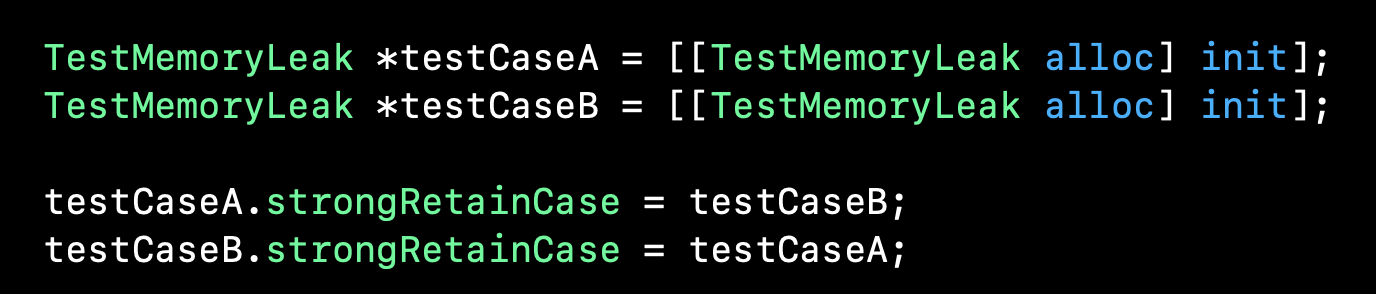
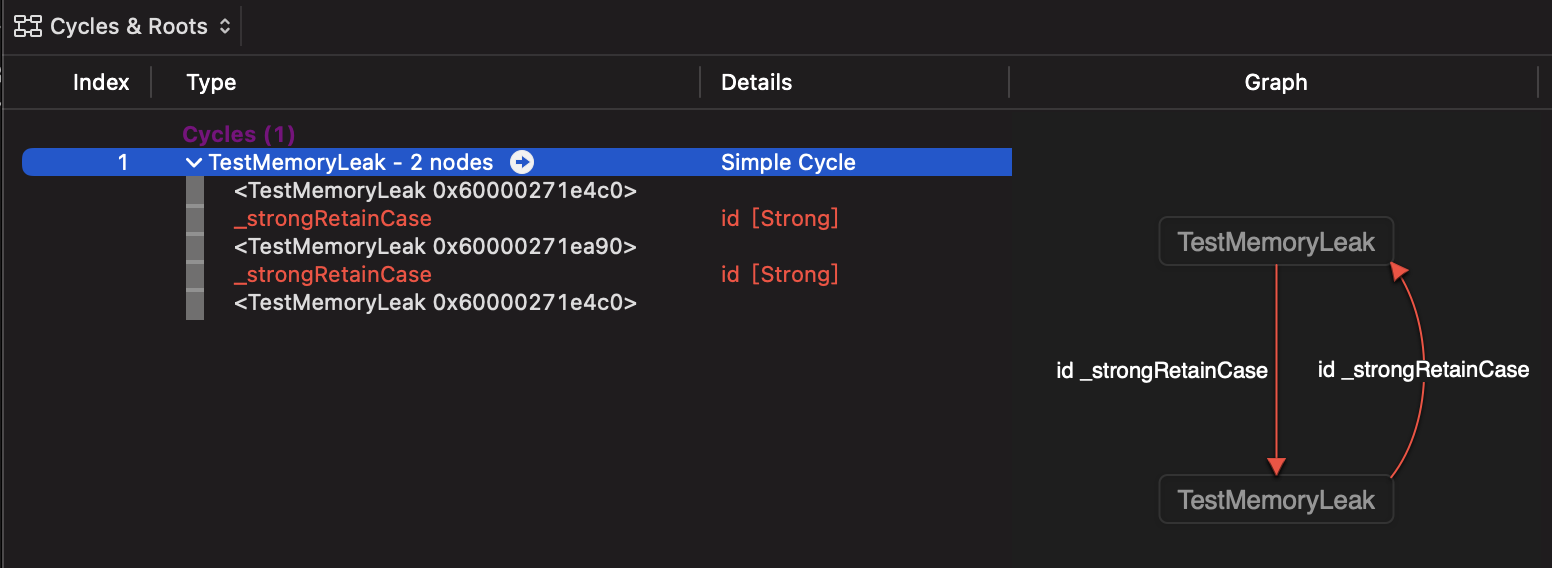
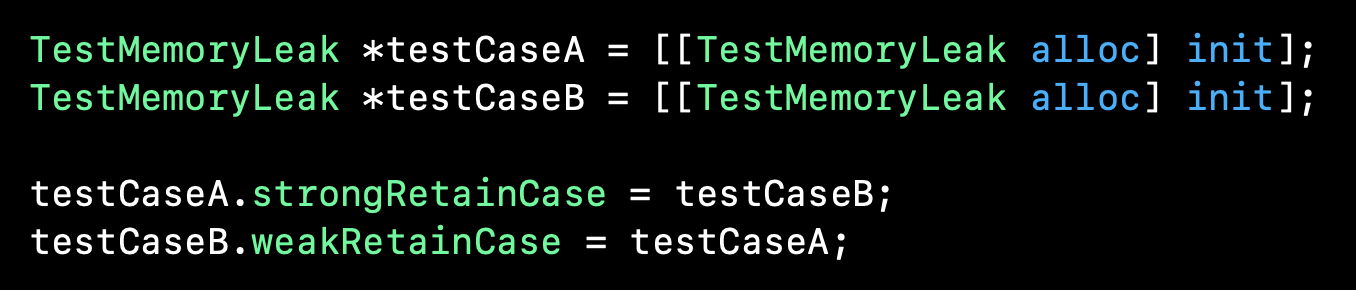
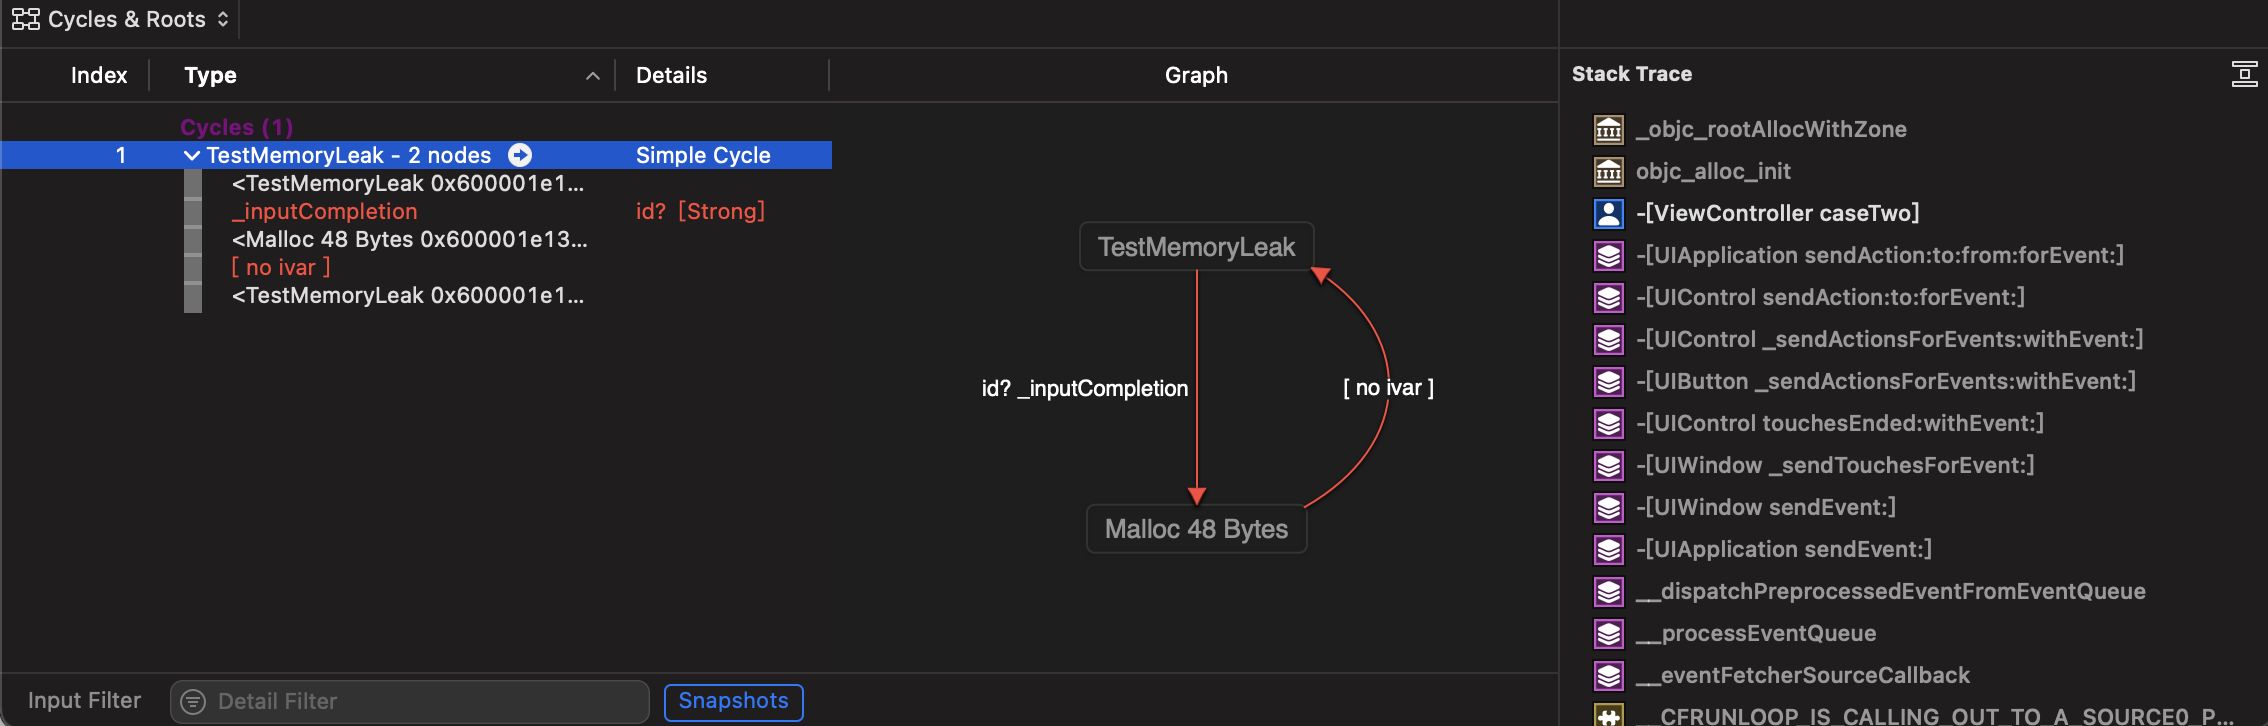
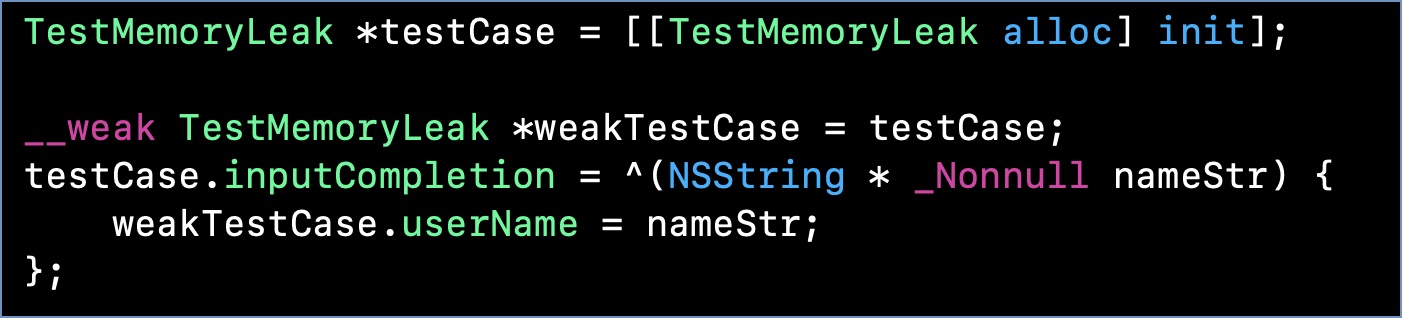
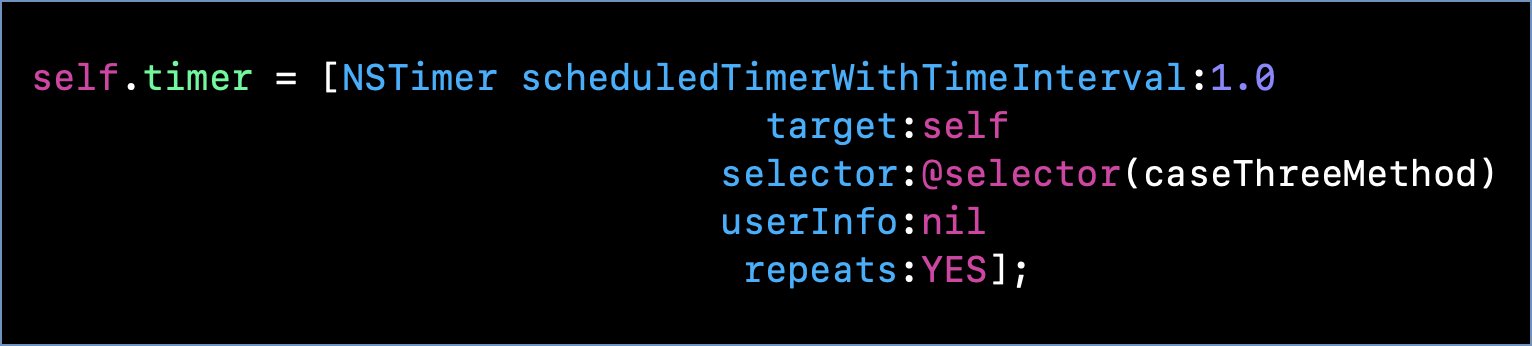
    <content type="html"><![CDATA[<p>花时间整理一下 iOS 开发中内存泄漏相关的知识，以备后续查阅。<span id="more"></span></p><h2 id="什么是内存泄漏"><a href="#什么是内存泄漏" class="headerlink" title="什么是内存泄漏"></a>什么是内存泄漏</h2><blockquote><p>是计算机科学中的一种资源泄漏，主因是计算机程序的内存管理失当，因而失去对一段已分配内存空间的控制，程序继续占用已不再使用的内存空间，或是存储器所存储之对象无法透过执行代码而访问，令内存资源空耗。  –WikiPekia</p></blockquote><h2 id="内存泄露的危害"><a href="#内存泄露的危害" class="headerlink" title="内存泄露的危害"></a>内存泄露的危害</h2><ul><li>增加了应用不必要的内存消耗</li><li>可用内存变小，甚至耗光</li><li>造成应用crash</li></ul><h2 id="如何发现内存泄漏"><a href="#如何发现内存泄漏" class="headerlink" title="如何发现内存泄漏"></a>如何发现内存泄漏</h2><p>iOS开发中造成内存泄漏的常见原因是循环引用，所以探测循环引用成为发现内存泄漏的主要方向。</p><h3 id="IDE提示循环引用"><a href="#IDE提示循环引用" class="headerlink" title="IDE提示循环引用"></a>IDE提示循环引用</h3><p><a href="/img/0043/0043-1.png" title="Xcdoe提示内存泄漏"><img src="/img/0043/0043-1.png" alt="Xcdoe提示内存泄漏" title="Xcdoe提示内存泄漏"></a></p><h3 id="Instruments工具检测"><a href="#Instruments工具检测" class="headerlink" title="Instruments工具检测"></a>Instruments工具检测</h3><p>Instruments 是 Xcode 自带的一个检测调试工具，可以分析应 App 运行时 CPU、内存、网络、能耗、渲染等使用或表现情况，有助于开发者调试问题原因、优化 App 性能表现。<a href="/img/0043/0043-2.png" title="Instruments"><img src="/img/0043/0043-2.png" alt="Instruments" title="Instruments"></a></p><p><a href="/img/0043/0043-3.png" title="Instruments调试循环引用"><img src="/img/0043/0043-3.png" alt="Instruments调试循环引用" title="Instruments调试循环引用"></a></p><h3 id="第三方SDK在运行时动态检测循环引用"><a href="#第三方SDK在运行时动态检测循环引用" class="headerlink" title="第三方SDK在运行时动态检测循环引用"></a>第三方SDK在运行时动态检测循环引用</h3><p>如 facebook 的 <a target="_blank" href="https://github.com/facebook/FBRetainCycleDetector">FBRetainCycleDetector</a></p><h2 id="常见的循环引用及避免"><a href="#常见的循环引用及避免" class="headerlink" title="常见的循环引用及避免"></a>常见的循环引用及避免</h2><h3 id="对象循环强引用"><a href="#对象循环强引用" class="headerlink" title="对象循环强引用"></a>对象循环强引用</h3><p><a href="/img/0043/0043-4.png" title="循环强引用"><img src="/img/0043/0043-4.png" alt="循环强引用" title="循环强引用"></a>上面这段代码运行后的 Instruments 检测结果循环引用如下<a href="/img/0043/0043-5.png" title="检测结果循环引用"><img src="/img/0043/0043-5.png" alt="检测结果循环引用" title="检测结果循环引用"></a></p><p>如何解决？<a href="/img/0043/0043-6.png" title="循环强引用的处理"><img src="/img/0043/0043-6.png" alt="对象循环强引用的处理" title="循环强引用的处理"></a></p><h3 id="block-循环引用"><a href="#block-循环引用" class="headerlink" title="block 循环引用"></a>block 循环引用</h3><p><a href="/img/0043/0043-10.png" title="block循环引用"><img src="/img/0043/0043-10.png" alt="block循环引用" title="block循环引用"></a>Instruments 分析循环引用如下<a href="/img/0043/0043-11.png" title="block循环引用结果"><img src="/img/0043/0043-11.png" alt="block循环引用结果" title="block循环引用结果"></a></p><p>可以使用弱引用<code>testCase</code>来打破循环引用<a href="/img/0043/0043-12.png" title="block循环引用解决"><img src="/img/0043/0043-12.png" alt="block循环引用解决" title="block循环引用解决"></a></p><h3 id="NSTimer-循环引用"><a href="#NSTimer-循环引用" class="headerlink" title="NSTimer 循环引用"></a>NSTimer 循环引用</h3><p><a href="/img/0043/0043-7.png" title="NSTimer循环引用"><img src="/img/0043/0043-7.png" alt="NSTimer循环引用" title="NSTimer循环引用"></a></p><p>为什么这个会循环引用？</p><p>根据苹果描述，<code>timer</code> 实例会对<code>target</code>参数强引用，又因为<code>self</code>强持有<code>timer</code>，所以构成了循环引用<a href="https://developer.apple.com/documentation/foundation/nstimer/1412416-scheduledtimerwithtimeinterval" title="NSTimer循环引用原因"><img src="/img/0043/0043-8.png" alt="NSTimer循环引用原因" title="NSTimer循环引用原因"></a></p><p>如何解决？可以通过NSProxy来解决，但是感觉有点麻烦，不如下面这个方法简单直观。通过换用另一个使用block作为参数的方法，在block中对<code>self</code>进行弱引用<a href="/img/0043/0043-9.png" title="避免NSTimer循环引用"><img src="/img/0043/0043-9.png" alt="避免NSTimer循环引用" title="避免NSTimer循环引用"></a></p><h2 id="Instruments看不到stack-trace"><a href="#Instruments看不到stack-trace" class="headerlink" title="Instruments看不到stack trace"></a>Instruments看不到stack trace</h2><blockquote><p>The issue was due to a .dSYM file generated by Xcode as part of the build. The file is used in debug mode to symbolicate method calls. Instruments doesn’t seem to be aware of its location. In order to fix that I had to do the following:</p></blockquote><ul><li>Before starting to record under Instruments, go to File-&gt;Symbols</li><li>Unfold your app item and select your app name</li><li>Click “Locate” in front of dSYM path</li><li>the dSYM file corresponding to the app should be under ~&#x2F;Library&#x2F;Developer&#x2F;Xcode&#x2F;DerivedData&#x2F;Build&#x2F;Products&#x2F;Debug-iphoneos&#x2F;[APP_NAME].app.dSYM.</li><li>A dialog should pop up asking you whether Instruments should always look for dSYM files under that location; that’s what you want</li><li>Start recording; your method calls should now display properly</li></ul><p><a target="_blank" href="https://developer.apple.com/forums/thread/9377">Absent Method Calls in Instruments Stack Trace</a></p><h2 id="最后"><a href="#最后" class="headerlink" title="最后"></a>最后</h2><p>判断是否存在循环引用就要看能否找出循环引用链，能找到即是存在。</p><p>循环引用的情况有很多，解决起来无非就一个原则，找出循环引用链，然后打破这个循环引用链即可。</p><p>未完待续。。。</p>]]></content>

    
    
    <summary type="html">&lt;p&gt;花时间整理一下 iOS 开发中内存泄漏相关的知识，以备后续查阅。</summary>


    <category term="iOS" scheme="https://note.zkk.me/categories/iOS/"/>
    
    
  </entry>
  
  <entry>
    <title>提供查看本机公网IP服务的网站</title>
    <link href="https://note.zkk.me/0x0042.html"/>
    <id>https://note.zkk.me/0x0042.html</id>
    <published>2022-08-10T04:17:00.000Z</published>
    <updated>2026-06-29T03:05:06.496Z</updated>
    
    <content type="html"><![CDATA[<p>有时需要查看本机的公网IP地址，总是需要去搜索一下有哪些网站提供显示公网IP地址服务，这里就记录一些这样的网站。(Linux 查看公网IP，Windows也可以在CMD中通过curl查看)<span id="more"></span></p><h2 id="单IP地址"><a href="#单IP地址" class="headerlink" title="单IP地址"></a>单IP地址</h2><div class="code-wrapper"><pre><code class="hljs shell">curl ifconfig.mecurl icanhazip.comcurl ident.me</code></pre></div><h2 id="包含关于-IP-的更多信息"><a href="#包含关于-IP-的更多信息" class="headerlink" title="包含关于 IP 的更多信息"></a>包含关于 IP 的更多信息</h2><div class="code-wrapper"><pre><code class="hljs shell">curl cip.cccurl ipinfo.iocurl myip.ipip.net</code></pre></div>]]></content>
    
    
    <summary type="html">&lt;p&gt;有时需要查看本机的公网IP地址，总是需要去搜索一下有哪些网站提供显示公网IP地址服务，这里就记录一些这样的网站。(Linux 查看公网IP，Windows也可以在CMD中通过curl查看)</summary>


    <category term="网络" scheme="https://note.zkk.me/categories/%E7%BD%91%E7%BB%9C/"/>
    
    
  </entry>
  
  <entry>
    <title>Siri 语音控制小夜灯</title>
    <link href="https://note.zkk.me/0x0041.html"/>
    <id>https://note.zkk.me/0x0041.html</id>
    <published>2022-01-08T09:07:00.000Z</published>
    <updated>2026-06-29T03:05:06.496Z</updated>
    
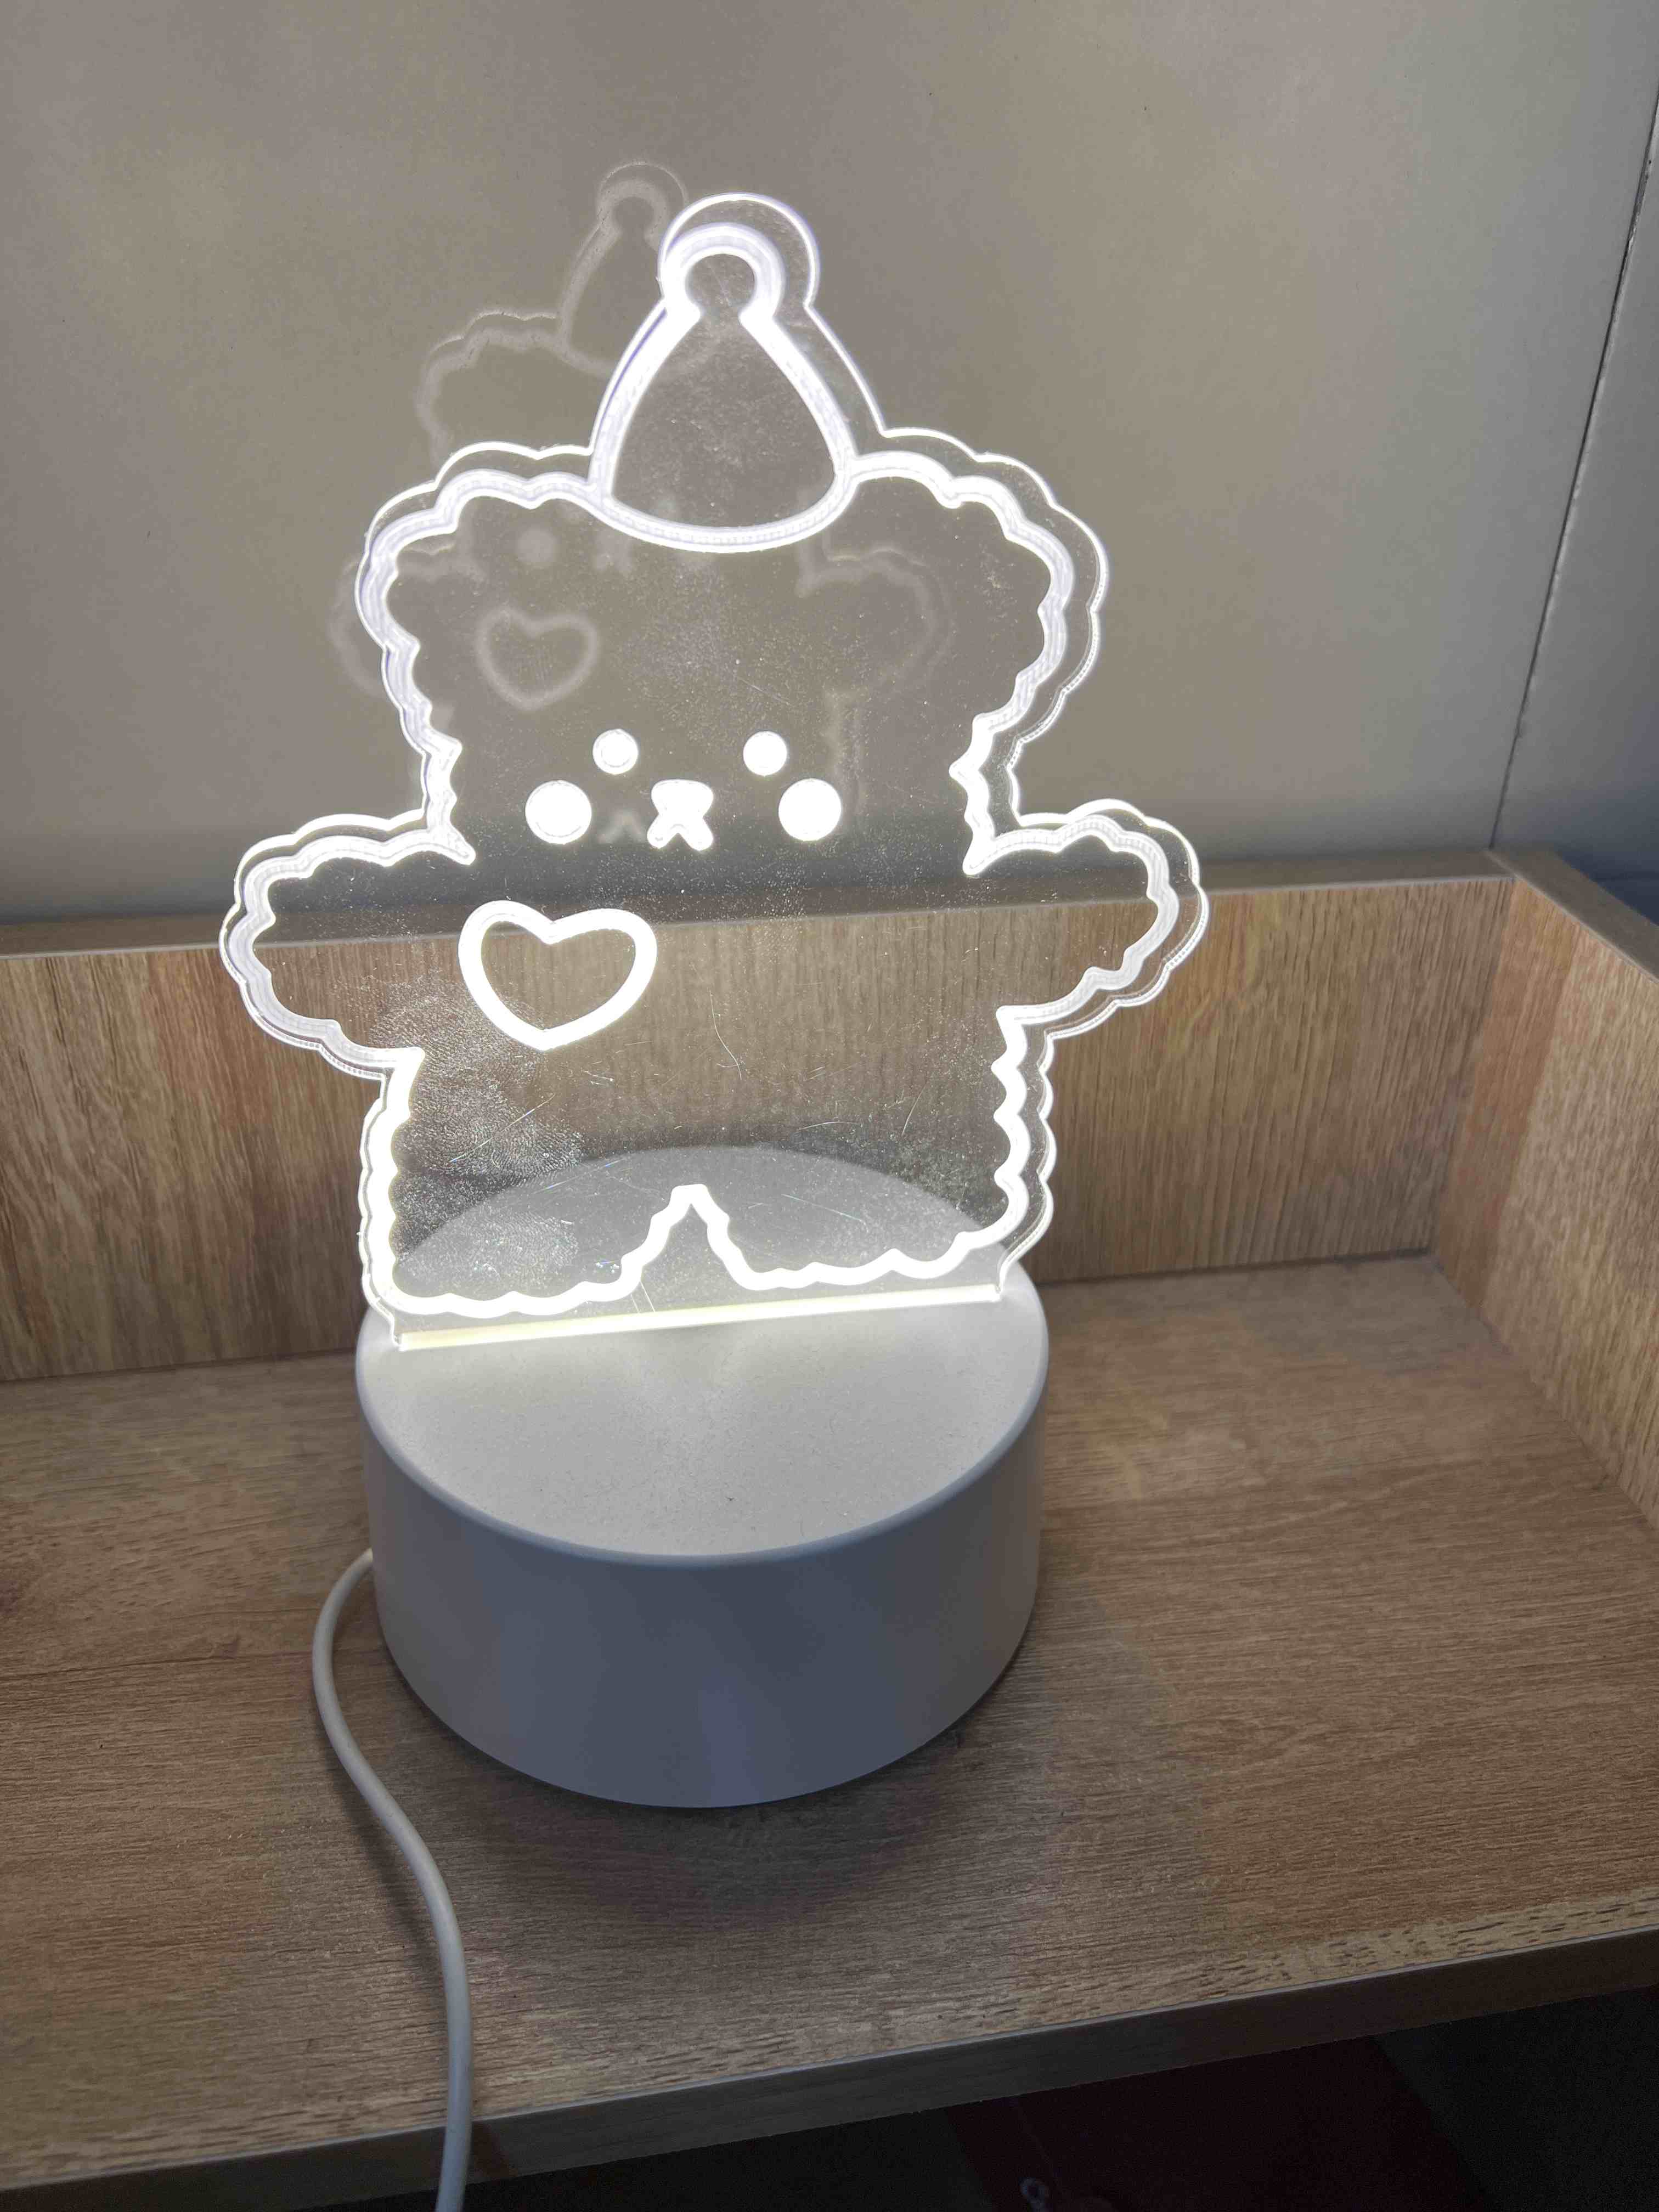
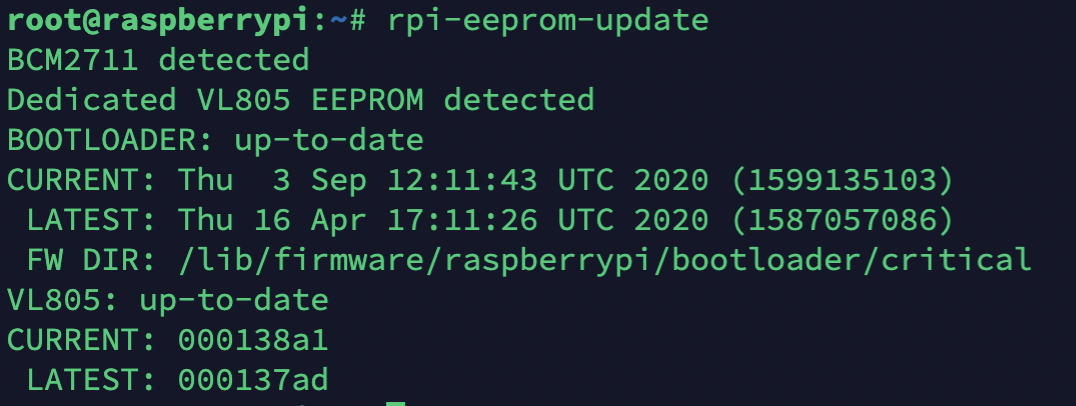
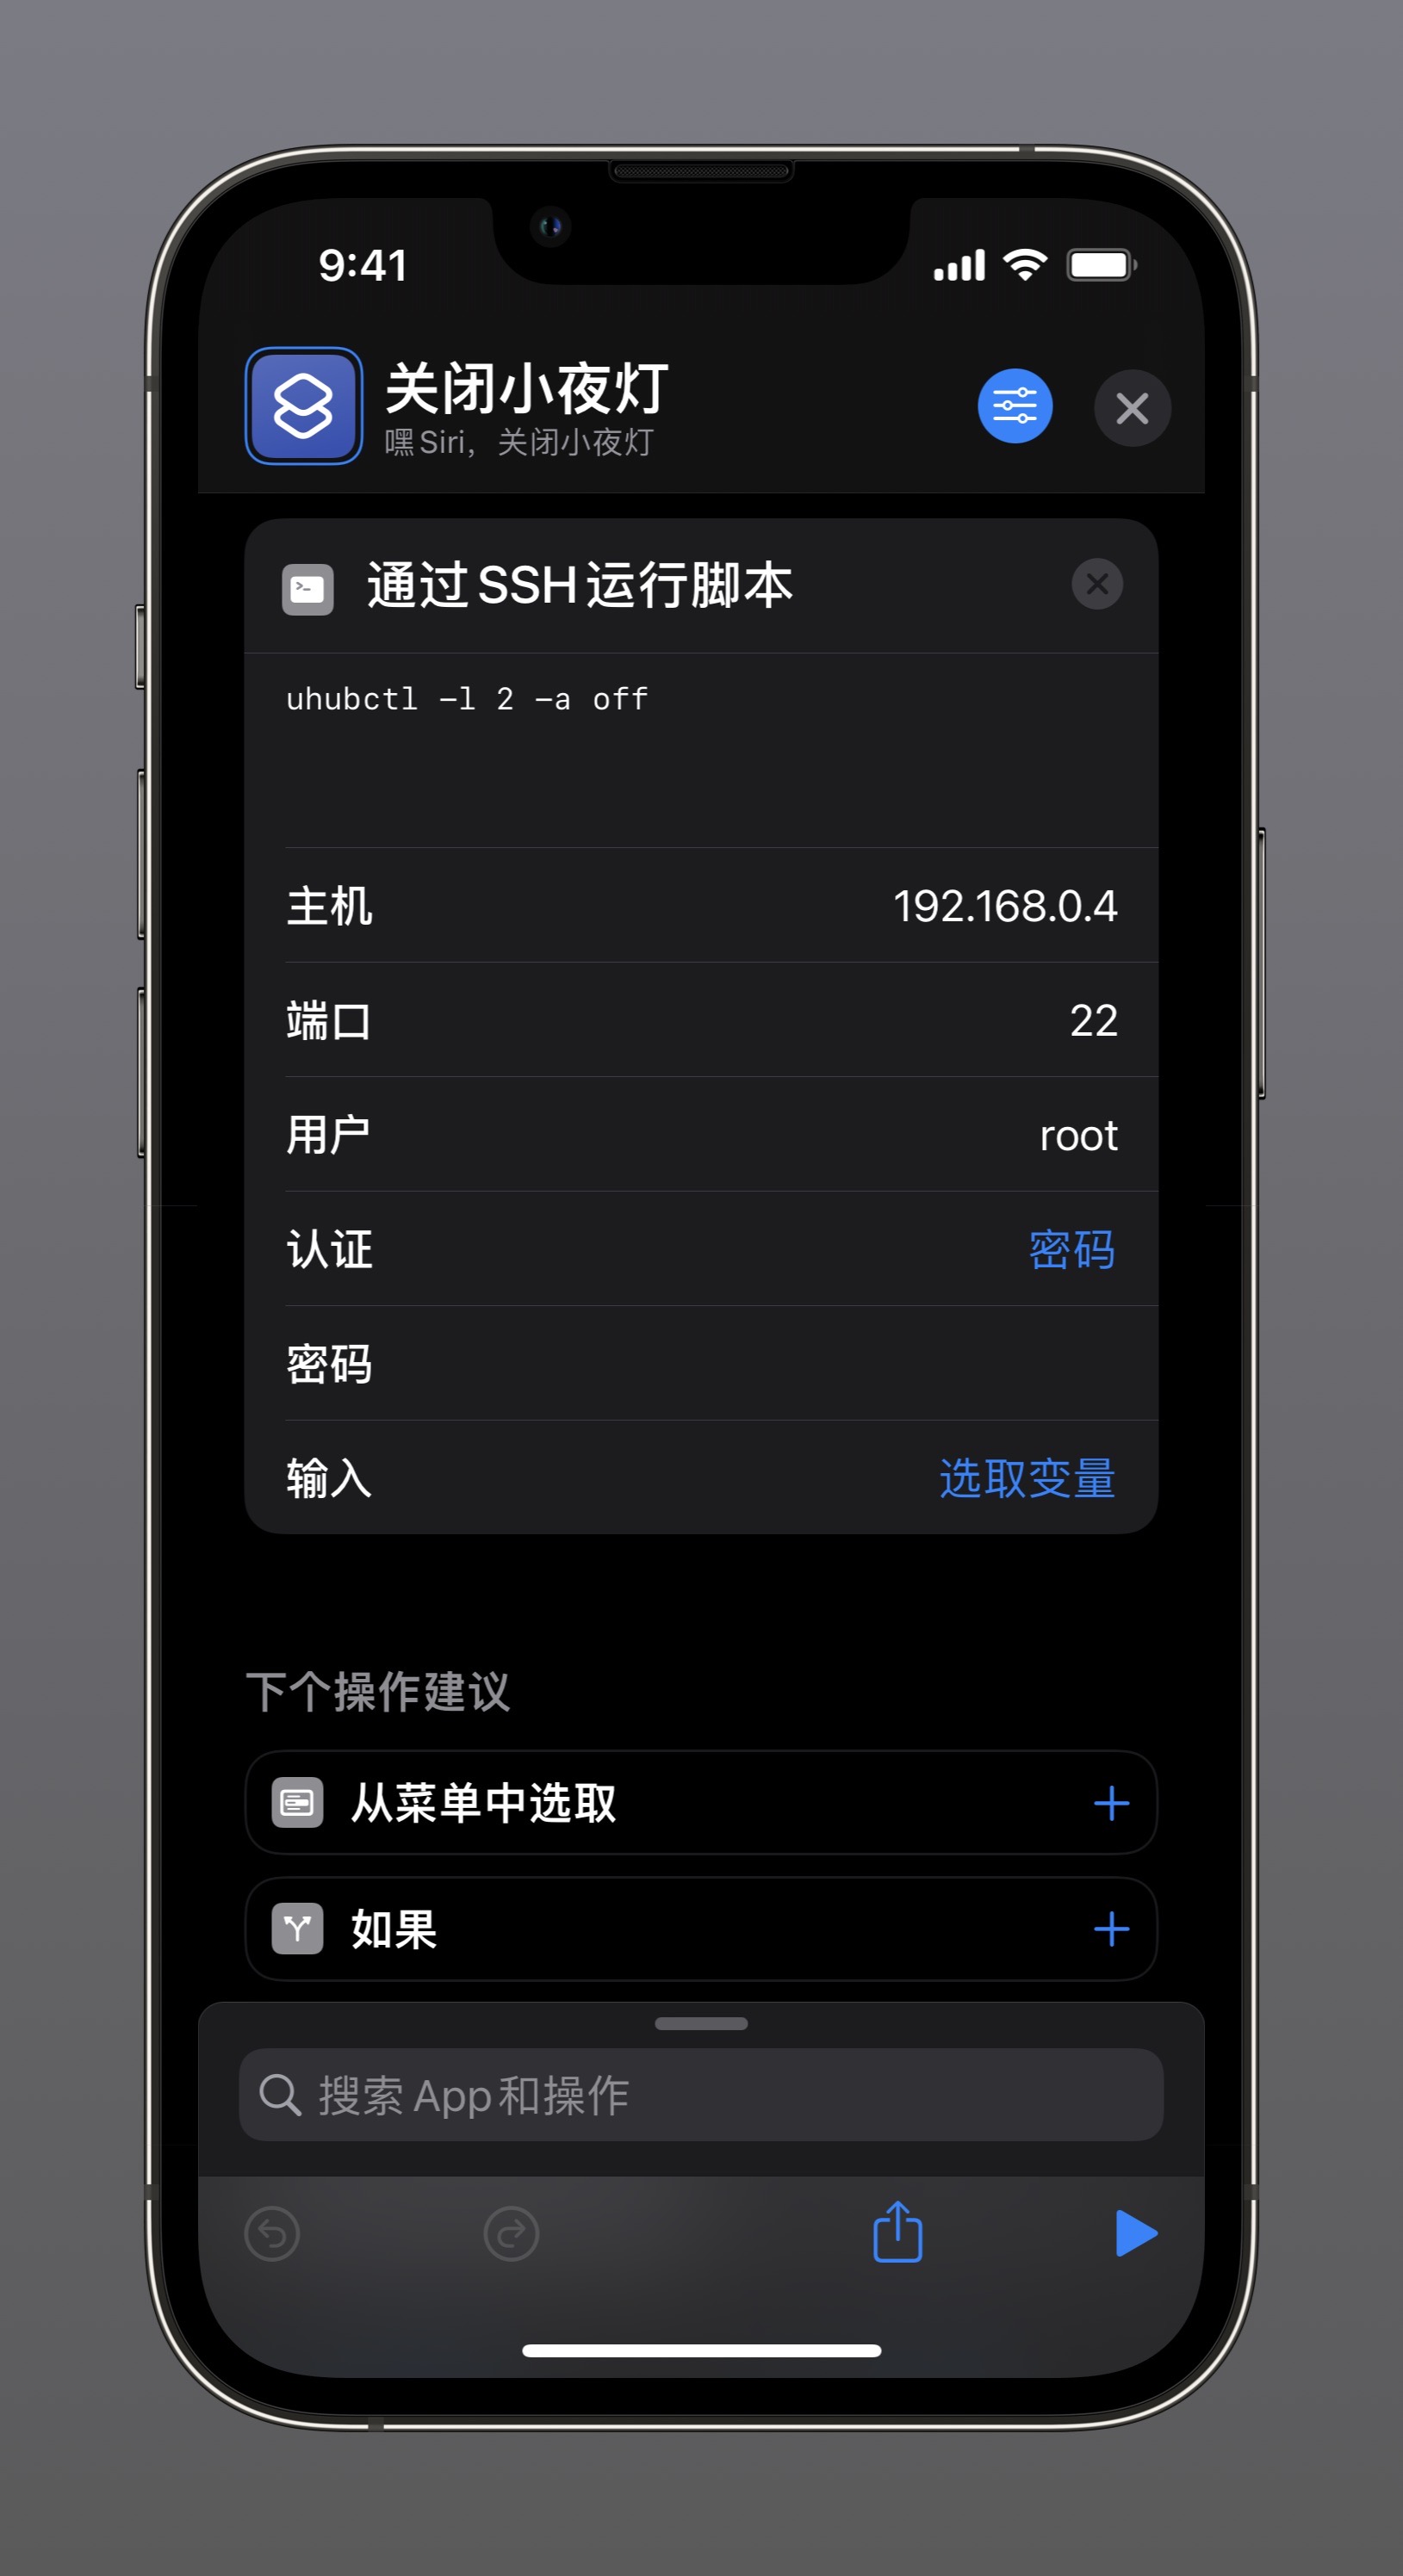
    <content type="html"><![CDATA[<p>long long ago，我在某多多花了1分钱买了个普普通通小夜灯。订单里它长这样</p><p><a href="/img/0041/0041-0.jpg" title="小夜灯订单"><img src="/img/0041/0041-0.jpg" alt="小夜灯订单" title="小夜灯订单"></a></p><p>等小夜灯送过来一看，嘿，它的确长这样，真是出乎我的意料。<span id="more"></span><a href="/img/0041/0041-1.jpg" title="小夜灯"><img src="/img/0041/0041-1.jpg" alt="小夜灯" title="小夜灯"></a></p><p>不过现在我不是要夸奖商家是多么的童叟无欺，看一下标题，我要介绍一下怎么用苹果设备上的 Siri 来通过语音控制这个小夜灯的开关。</p><h2 id="第一阶段（手动控制）"><a href="#第一阶段（手动控制）" class="headerlink" title="第一阶段（手动控制）"></a>第一阶段（手动控制）</h2><p>这个小灯只暴露了一根USB接口线来作为电源输入方式，没有电池，本身也没有控制小夜灯的开关。使用方式为USB线接上电就亮，断开就不亮，逻辑很简单。每当夜幕降临，拿出我祖传的“五福一安”充电器，插在寸土寸金的插板上，把小夜灯的 USB 线插在充电器上，然后小熊亮了。许久以后，我困了，不想耍手机了，要睡了，就得从床上爬起来，把小夜灯的 USB 线断开，然后去睡觉。</p><p>麻烦！但我很长时间以来都是这么用的。</p><h2 id="第二阶段（Siri控制）"><a href="#第二阶段（Siri控制）" class="headerlink" title="第二阶段（Siri控制）"></a>第二阶段（Siri控制）</h2><p>当我说出通过 Siri 语音控制小夜灯的时候，你们一定好奇一个点，那就是 Siri 跟小夜灯怎么进行交互？我也不卖关子，就是通过树莓派（Raspberry Pi）。</p><p>某天我想开小夜灯的时候，看着小夜灯的USB线突发奇想，我还有一台吃灰的树莓派啊，能不能把它利用起来更加方便地控制小夜灯？也就是在同一瞬间，一个解决方案浮现在脑海，这个解决方案最终达到的效果是可以通过苹果设备的Siri直接语音控制小夜灯的开关。通过Siri控制小夜灯的开和关，需要先把小夜灯的USB线插在树莓派上，并且树莓派要连上网。我设想的具体流程是这样的。</p><blockquote></blockquote><ol><li>对苹果设备说“Hey Siri，打开小夜灯”</li><li>Siri 被唤起，并根据“打开小夜灯”指令匹配到事先添加好的快捷指令</li><li>苹果设备执行“打开小夜灯”快捷指令，这个快捷指令只有一个操作，就是通过网络连接到树莓派，并向树莓派发送一个指令</li><li>树莓派通过执行收到的指令来控制其USB口电源的开关，这样就做到了小夜灯电源的开关。</li></ol><p>以上这4个步骤中，1、2、3没有问题，之前做过，我知道链路是通的。关键就在于第4步，之前没了解过树莓派是否可以控制其USB口的电源开关，但我还是持有乐观态度，我认为八成可以。</p><h4 id="树莓派控制USB口电源"><a href="#树莓派控制USB口电源" class="headerlink" title="树莓派控制USB口电源"></a>树莓派控制USB口电源</h4><p>经过网上冲浪，我找到了通过<code>uhubctl</code>来控制树莓派USB口电源的方法。以下操作均在我的树莓派4B(Debian 10)中执行，其他型号的树莓派请自行确认是否适用。</p><ol><li>检查4B的EEPROM固件版本，固件版本不能低于<code>000137ad</code><div class="code-wrapper"><pre><code class="hljs shell">sudo rpi-eeprom-update</code></pre></div><a href="/img/0041/0041-2.png" title="固件版本"><img src="/img/0041/0041-2.png" alt="固件版本" title="固件版本"></a></li><li>安装 <code>uhubctl</code>，版本最好不低于2.4.0。一开始我通过apt-get安装的，版本并不是最新的，导致控制失败（失败的现象是USB电源切断后又迅速恢复）。后来我找到了<code>uhubctl</code>的<a href="https://github.com/mvp/uhubctl" target="_blank">github仓库</a>，然后通过源码编译安装最新版。编译安装前需要先安装<code>libusb-1.0</code><div class="code-wrapper"><pre><code class="hljs shell">sudo apt-get install libusb-1.0-0-dev</code></pre></div>然后获取源码并编译<div class="code-wrapper"><pre><code class="hljs shell">git clone https://github.com/mvp/uhubctlcd uhubctlmake</code></pre></div>安装在<code>/usr/sbin/uhubctl</code><div class="code-wrapper"><pre><code class="hljs shell">sudo make install</code></pre></div><strong>据说安装完需要重启一下树莓派，但是我没有重启也没问题。</strong></li><li><code>uhubctl</code>安装完毕，来试一下它是否好用。把小夜灯插在树莓派的任意USB口中。刚插上去后小夜灯亮了，说明USB供上电了。我们来关闭试一下<div class="code-wrapper"><pre><code class="hljs shell">sudo uhubctl -l 2 -a off</code></pre></div>执行指令后看到小夜灯关闭了，说明USB口电源被切断了。由于树莓派的USB拓扑结构，4个USB端口的供电是统一控制的，上面这个指令关闭了4个USB端口的电源。我们再来打开试一下<div class="code-wrapper"><pre><code class="hljs shell">sudo uhubctl -l 2 -a on</code></pre></div>可以看到小夜灯又亮了。成功！</li><li>还剩最后一步，在苹果设备上创建2个快捷指令，一个叫“打开小夜灯”，一个叫“关闭小夜灯”，每个快捷指令里分别有个“通过SSH运行脚本”的操作。配置方式如图（请确保在系统设置里给快捷指令“允许运行脚本”的权限）<a href="/img/0041/0041-3.JPEG" title="配置快捷指令"><img src="/img/0041/0041-3.JPEG" alt="配置快捷指令" title="配置快捷指令"></a>由于我配置的主机地址为局域网ip，所以需要将苹果设备与树莓派连接在同一个局域网下才能进行控制。当然也可以通过其他手段（公网ip接入、内网穿透）来实现通过公网控制，就不必在同一个局域网下了。</li><li>完成以上步骤，就可以通过“Hey Siri，打开小夜灯”和“Hey Siri，关闭小夜灯”来打开和关闭小夜灯了。比原先方便多了。</li></ol><h2 id="改进方向"><a href="#改进方向" class="headerlink" title="改进方向"></a>改进方向</h2><p>后续可以改进小夜灯的供电接口，以通过树莓派的GPIO引脚进行控制，毕竟通过切换树莓派的4个USB口电源来控制小夜灯不那么优雅。不过由于USB口暂时只有这一个小夜灯在用，所以还可以，问题不大。</p><hr><blockquote><p>REFERENCE</p><ul><li><a href="https://blog.csdn.net/weixin_29107819/article/details/113026334" target="_blank">ctl命令 usb_通过命令行控制树莓配4B的USB口电源以实现USB设备的复位操作</a></li></ul></blockquote>]]></content>
    
    
    <summary type="html">&lt;p&gt;long long ago，我在某多多花了1分钱买了个普普通通小夜灯。订单里它长这样&lt;/p&gt;
&lt;p&gt;&lt;a href=&quot;/img/0041/0041-0.jpg&quot; title=&quot;小夜灯订单&quot;&gt;&lt;img src=&quot;/img/0041/0041-0.jpg&quot; alt=&quot;小夜灯订单&quot; title=&quot;小夜灯订单&quot;&gt;&lt;/a&gt;&lt;/p&gt;
&lt;p&gt;等小夜灯送过来一看，嘿，它的确长这样，真是出乎我的意料。</summary>


    <category term="iOS" scheme="https://note.zkk.me/categories/iOS/"/>
    
    
  </entry>
  
  <entry>
    <title>linux 安装 Swift 开发环境</title>
    <link href="https://note.zkk.me/0x0040.html"/>
    <id>https://note.zkk.me/0x0040.html</id>
    <published>2021-07-14T06:25:00.000Z</published>
    <updated>2026-06-29T03:05:06.496Z</updated>
    
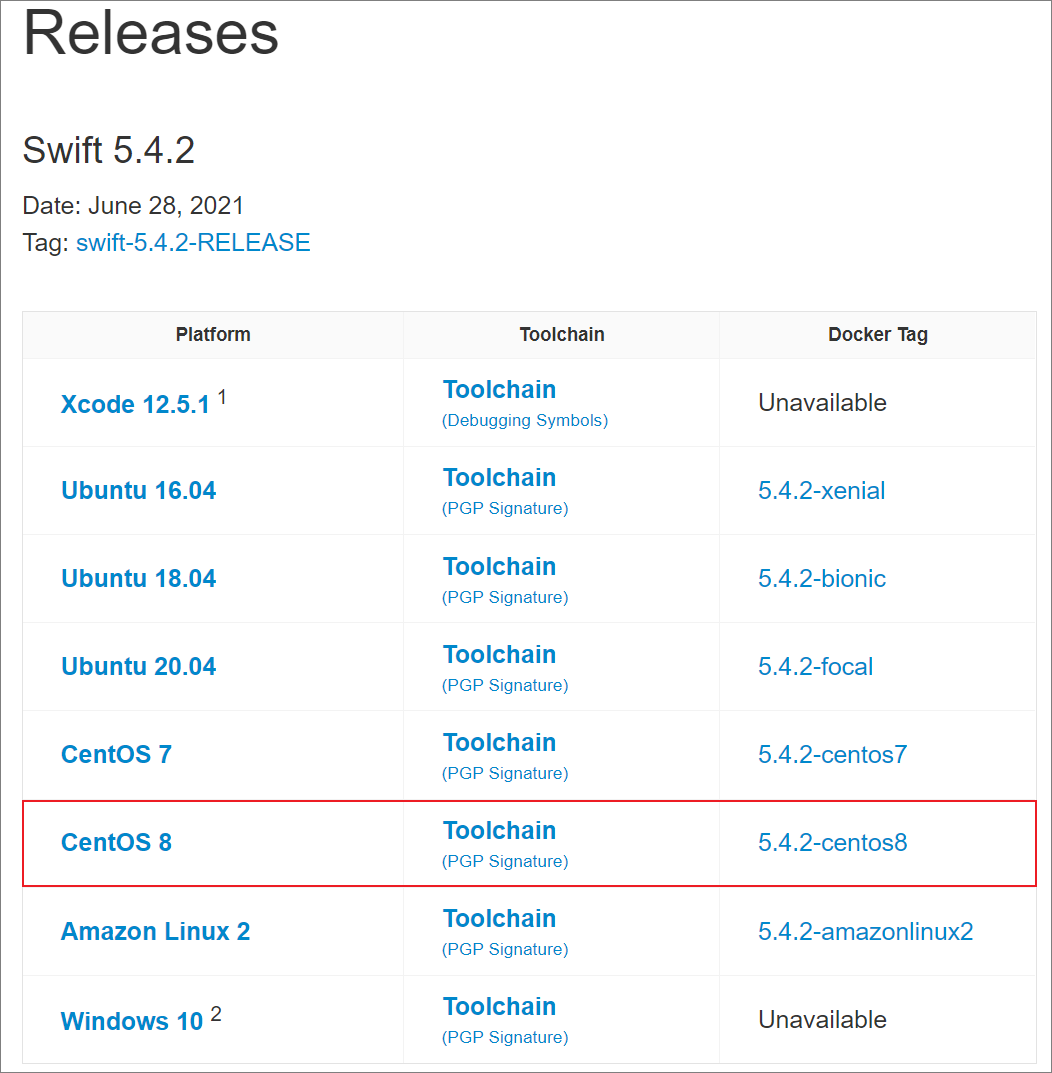
    <content type="html"><![CDATA[<p>本人 Swift 新手，在学习 Swift 的过程中看到了 <code>Swift Package Manager</code>这个东西，于是去了解了一下。看了一下<a href="https://juejin.cn/post/6871489791213436941" target="_blank">Swift Package Manager 使用</a>这篇文章，知道了原来这是一个类似于<code>Cocoapods</code>的工具。<span id="more"></span></p><hr><p>在学习的过程中看到了<code>Swift脚本</code>一词。嗯？Swift可以写脚本？<a href="/img/ImgExpression/IE-think.jpg" title="思考.jpg"><img src="/img/ImgExpression/IE-think.jpg" alt="思考.jpg" title="思考.jpg"></a>于是我又去了解了一下，然后又在我的 Mac 上试了一下，发现 Swift 还真可以以脚本的形式运行。那么问题又来了，在 Mac 电脑上运行 Swift 脚本没问题，那我该怎么在 Linux 电脑上编写和运行 Swift 脚本呢？</p><hr><p>于是我又找了一些文章，下面记录一下我在 CentOS 8 系统上部署 Swift 开发环境的过程。</p><ol><li>首先创建一个存放 Swift 开发环境的目录<div class="code-wrapper"><pre><code class="hljs shell">mkdir /usr/local/swift</code></pre></div></li><li>去<a href="https://swift.org/download/#snapshots" title="这里">这里</a>找对应系统上的 Swift 开发环境包。<a href="/img/0040/0040-0.png" title="下载对应的Swift开发环境包"><img src="/img/0040/0040-0.png" alt="下载对应的Swift开发环境包" title="下载对应的Swift开发环境包"></a>找到后下载下来并解压我下载的是 CentOS 8 版本的。<div class="code-wrapper"><pre><code class="hljs shell">cd /usr/local/swiftwget https://swift.org/builds/swift-5.4.2-release/centos8/swift-5.4.2-RELEASE/swift-5.4.2-RELEASE-centos8.tar.gztar -zxvf swift-5.4.2-RELEASE-centos8.tar.gzrm -f swift-5.4.2-RELEASE-centos8.tar.gz</code></pre></div>注意替换文件名。你也可以把它放到别的地方。</li><li>然后编辑环境变量<div class="code-wrapper"><pre><code class="hljs shell">vim ~/.bashrc</code></pre></div>在文件中追加这么一句，请注意替换为你的实际路径<div class="code-wrapper"><pre><code class="hljs shell">export PATH=&quot;/usr/local/swift/swift-5.4.2-RELEASE-centos8/usr/bin:$PATH&quot;</code></pre></div></li><li>编辑完环境变量让其生效<div class="code-wrapper"><pre><code class="hljs shell">source ~/.bashrc</code></pre></div></li><li>查看 Swift 环境<div class="code-wrapper"><pre><code class="hljs shell">[root@yun ~]# swift --versionSwift version 5.4.2 (swift-5.4.2-RELEASE)Target: x86_64-unknown-linux-gnu</code></pre></div>看， Swift 环境可用了。</li><li>写个 Swift 脚本运行一下试试<div class="code-wrapper"><pre><code class="hljs shell">echo &quot;print(\&quot;Hello World\&quot;)&quot; &gt; hello.swiftswift hello.swift</code></pre></div>然后输出了<div class="code-wrapper"><pre><code class="hljs shell">Hello World</code></pre></div>奈斯！</li><li>创建一个 Swift Package 并运行试试<div class="code-wrapper"><pre><code class="hljs shell">mkdir MyPackagecd MyPackageswift package init --type executableswift buildswift run</code></pre></div>然后也输出了<div class="code-wrapper"><pre><code class="hljs shell">Hello, world!</code></pre></div><a href="/img/ImgExpression/IE-niupi.jpg" title="牛批.jpg"><img src="/img/ImgExpression/IE-niupi.jpg" alt="牛批.jpg" title="牛批.jpg"></a></li></ol><hr><blockquote><p>REFERENCE</p><ul><li><a href="https://juejin.cn/post/6871489791213436941" target="_blank">Swift Package Manager 使用</a></li><li><a href="https://www.raywenderlich.com/8325890-a-complete-guide-to-swift-development-on-linux" target="_blank">A Complete Guide to Swift Development on Linux</a></li><li><a href="https://www.jianshu.com/p/7e57cd8aea69" target="_blank">swift 脚本</a></li></ul></blockquote>]]></content>
    
    
    <summary type="html">&lt;p&gt;本人 Swift 新手，在学习 Swift 的过程中看到了 &lt;code&gt;Swift Package Manager&lt;/code&gt;这个东西，于是去了解了一下。看了一下&lt;a href=&quot;https://juejin.cn/post/6871489791213436941&quot; target=&quot;_blank&quot;&gt;Swift Package Manager 使用&lt;/a&gt;这篇文章，知道了原来这是一个类似于&lt;code&gt;Cocoapods&lt;/code&gt;的工具。</summary>


    <category term="学习" scheme="https://note.zkk.me/categories/%E5%AD%A6%E4%B9%A0/"/>
    
    
  </entry>
  
  <entry>
    <title>iOS开发UIScrollView单边回弹效果</title>
    <link href="https://note.zkk.me/0x003f.html"/>
    <id>https://note.zkk.me/0x003f.html</id>
    <published>2021-06-07T09:13:00.000Z</published>
    <updated>2026-06-29T03:05:06.496Z</updated>
    
    <content type="html"><![CDATA[<p>最近在实现一个需求，实现方案需要让UIScrollView支持单边回弹效果，也就是只有顶部支持下拉回弹，同时底部不能有回弹效果。<span id="more"></span>一开始我想的是在<code>UIScrollViewDelegate</code>的代理方法<code>scrollViewDidScroll:</code>中添加处理逻辑，当scrollView划到底部时就把回弹属性<code>bounces</code>设为<code>NO</code>，但实践发现效果不佳。</p><hr><p>最后在<a href="https://stackoverflow.com/questions/14084657/uiscrollview-disable-vertical-bounce-only-at-bottom" title="stackoverflow.com">stackoverflow.com</a>找到一个不错的解决方法。这个方法比较简单而且效果完美。这里记录一下。方法的思想就是当scrollView划到底部或者更往下时把scrollView的偏移量<code>contentOffset</code>设置到正好底部位置，用户是不会察觉到这个过程的。</p><div class="code-wrapper"><pre><code class="hljs objective-c">- (void)scrollViewDidScroll:(UIScrollView *)scrollView &#123;    if (scrollView.contentOffset.y + scrollView.frame.size.height &gt;= scrollView.contentSize.height) &#123;        [scrollView setContentOffset:CGPointMake(scrollView.contentOffset.x, scrollView.contentSize.height - scrollView.frame.size.height)];    &#125;&#125;</code></pre></div><p>设置其他三个边单边回弹的方法类似。</p>]]></content>
    
    
    <summary type="html">&lt;p&gt;最近在实现一个需求，实现方案需要让UIScrollView支持单边回弹效果，也就是只有顶部支持下拉回弹，同时底部不能有回弹效果。</summary>


    <category term="iOS" scheme="https://note.zkk.me/categories/iOS/"/>
    
    
  </entry>
  
  <entry>
    <title>MacOS彩色终端</title>
    <link href="https://note.zkk.me/0x003e.html"/>
    <id>https://note.zkk.me/0x003e.html</id>
    <published>2021-05-12T05:18:00.000Z</published>
    <updated>2026-06-29T03:05:06.496Z</updated>
    
    <content type="html"><![CDATA[<p>彩色的终端能帮助我更快地看清楚目录结构，怎么设置彩色的终端？<span id="more"></span></p><h2 id="bash"><a href="#bash" class="headerlink" title="bash"></a>bash</h2><p>1.先切换到bash</p><div class="code-wrapper"><pre><code class="hljs shell">chsh -s /bin/bash</code></pre></div><p>2.更改.bash_profile配置文件</p><div class="code-wrapper"><pre><code class="hljs shell">vim ~/.bash_profile</code></pre></div><p>添加以下内容</p><div class="code-wrapper"><pre><code class="hljs shell">export CLICOLOR=1export LSCOLORS=ExGxBxDxCxEgEdxbxgxcxd</code></pre></div><p><code>LSCOLORS</code>颜色配置方法请参考<a href="https://geoff.greer.fm/lscolors/" title="Geoff.Greer.fm">Geoff.Greer.fm</a></p><p>更改完成后使其生效</p><div class="code-wrapper"><pre><code class="hljs shell">source ~/.bash_profile</code></pre></div><h2 id="zch"><a href="#zch" class="headerlink" title="zch"></a>zch</h2><p>请参考<a href="https://wiki.archlinux.org/title/Zsh" title="Zsh">Zsh</a></p>]]></content>
    
    
    <summary type="html">&lt;p&gt;彩色的终端能帮助我更快地看清楚目录结构，怎么设置彩色的终端？</summary>


    <category term="实用" scheme="https://note.zkk.me/categories/%E5%AE%9E%E7%94%A8/"/>
    
    
  </entry>
  
  <entry>
    <title>iOS开发暗黑模式适配</title>
    <link href="https://note.zkk.me/0x003d.html"/>
    <id>https://note.zkk.me/0x003d.html</id>
    <published>2021-05-11T06:07:00.000Z</published>
    <updated>2026-06-29T03:05:06.496Z</updated>
    
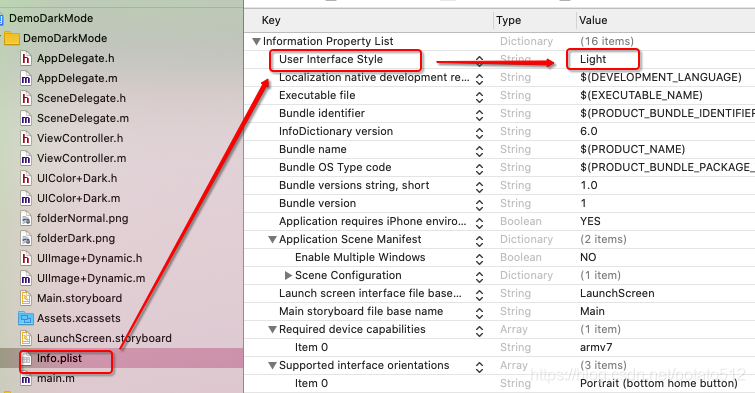
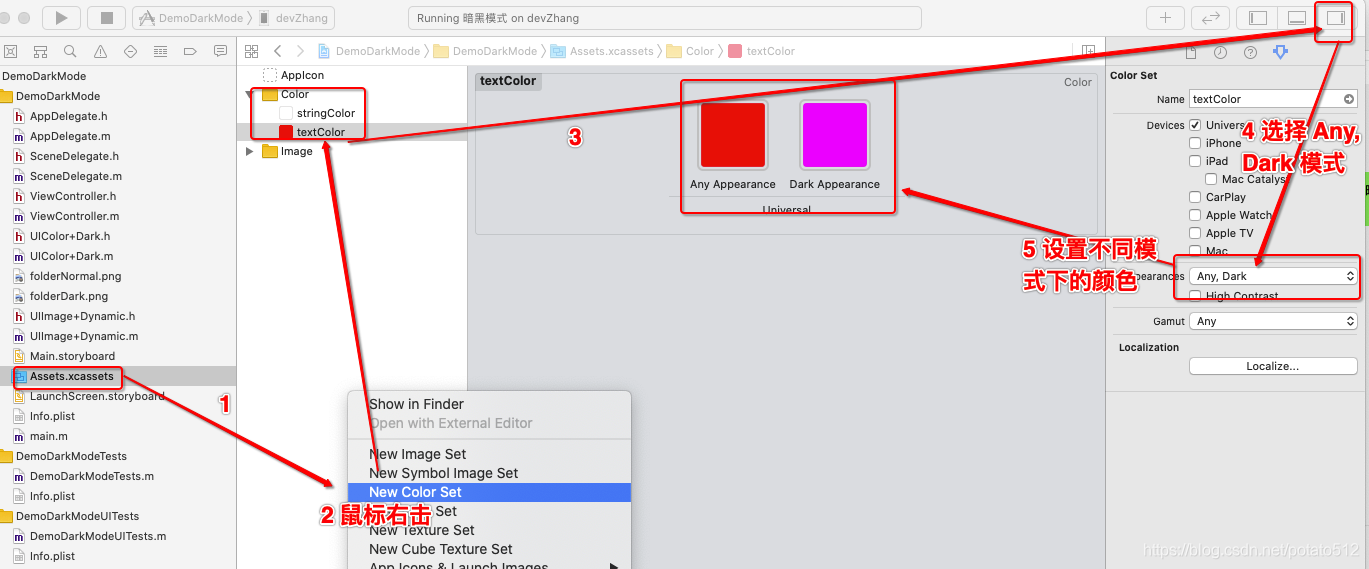
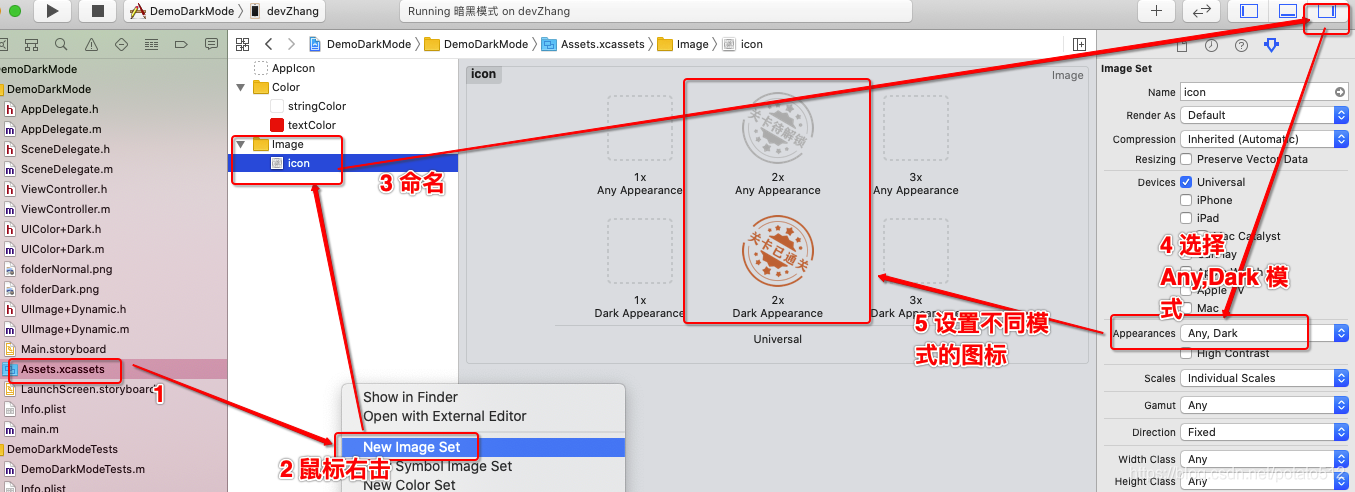
    <content type="html"><![CDATA[<blockquote><p>本文转载自<a href="https://blog.csdn.net/potato512/article/details/104805528" title="iOS 13适配——暗黑模式  -- 番薯大佬">iOS 13适配——暗黑模式  – 番薯大佬</a>，有改动</p></blockquote><h2 id="iOS13有什么亮点？"><a href="#iOS13有什么亮点？" class="headerlink" title="iOS13有什么亮点？"></a>iOS13有什么亮点？</h2><p>iOS 13.0正式版发布以来，最大的亮点还是新增的支持Dark Mode（暗黑模式）。<span id="more"></span></p><h2 id="App-要做暗黑的适配吗？"><a href="#App-要做暗黑的适配吗？" class="headerlink" title="App 要做暗黑的适配吗？"></a>App 要做暗黑的适配吗？</h2><p>首先，目前iPhone自带软件基本上适配了暗黑模式，开启暗黑模式后，打开软件都是黑底白字。其次，对于开发者而言，苹果也提供了相应的 API 接口，以供开发者使用。最后，貌似没有强制要求，建议开发者根据自己的APP 类型来选择是否兼容暗黑模式。</p><h2 id="如果自己的-App不想适配暗黑模式，要怎么做？"><a href="#如果自己的-App不想适配暗黑模式，要怎么做？" class="headerlink" title="如果自己的 App不想适配暗黑模式，要怎么做？"></a>如果自己的 App不想适配暗黑模式，要怎么做？</h2><p>如果要使app一直保持黑色或者白色模式，可以在<code>info.plist</code>文件里面设置属性<code>User Interface Style</code>值为<code>Light</code>或者<code>Dark</code>。<a href="/img/003d/003d-1.png" title="设置info.plist"><img src="/img/003d/003d-1.png" alt="设置info.plist" title="设置info.plist"></a></p><blockquote><p>注意：属性值<code>Light</code>或<code>Dark</code>需要<code>首字母大写</code>，否则无效。</p></blockquote><h2 id="App暗黑模式的适配怎么做？"><a href="#App暗黑模式的适配怎么做？" class="headerlink" title="App暗黑模式的适配怎么做？"></a>App暗黑模式的适配怎么做？</h2><p>适配包含两方面，颜色适配和图片适配。</p><h2 id="颜色适配要怎么做？"><a href="#颜色适配要怎么做？" class="headerlink" title="颜色适配要怎么做？"></a>颜色适配要怎么做？</h2><p>方法1使用系统颜色<code>systemBackgroundColor</code>，浅色模式下显示白色，深色模式下显示黑色；存在问题，只能显示白色或黑色。</p><div class="code-wrapper"><pre><code class="hljs objective-c">self.view.backgroundColor = UIColor.systemBackgroundColor;</code></pre></div><p>或使用系统颜色<code>labelColor</code>，浅色模式下显示黑色，深色模式下显示白色；存在问题，只能显示黑色或白色。</p><div class="code-wrapper"><pre><code class="hljs objective-c">label.textColor = UIColor.labelColor;</code></pre></div><blockquote><p>常用的系统动态模式颜色：文本颜色<code>labelColor</code>、辅助内容的文本标签颜色<code>secondaryLabelColor</code>、三级<code>tertiaryLabelColor</code>、超链接标签颜色<code>linkColor</code>、分隔符（细边框或者分割线）<code>separatorColor</code>或<code>opaqueseparatorColor</code>、界面背景色<code>systembackgroundColor</code>等。</p></blockquote><p>方法2根据模式，实时显示自定义颜色。iOS13系统已经提供了相应的 API用于处理颜色，如下所示：</p><div class="code-wrapper"><pre><code class="hljs objective-c">+ (UIColor *)colorWithDynamicProvider:(UIColor * (^)(UITraitCollection *))dynamicProvider;- (UIColor *)initWithDynamicProvider:(UIColor * (^)(UITraitCollection *))dynamicProvider;</code></pre></div><div class="code-wrapper"><pre><code class="hljs objective-c">// 设置自定义颜色UIColor *textColor = UIColor.greenColor;if (@available(iOS 13.0, *)) &#123;textColor = [UIColor colorWithDynamicProvider:^UIColor *(UITraitCollection *traitCollection) &#123;if (traitCollection.userInterfaceStyle == UIUserInterfaceStyleDark) &#123;return UIColor.orangeColor;&#125;return UIColor.greenColor;&#125;];&#125;// 显示自定义颜色label.textColor = textColor;</code></pre></div><p>方法3根据模式，实时监听修改颜色</p><div class="code-wrapper"><pre><code class="hljs objective-c">- (void)traitCollectionDidChange:(UITraitCollection *)previousTraitCollection&#123;  [super traitCollectionDidChange:previousTraitCollection];    if (@available(iOS 13.0, *)) &#123;    if ([self.traitCollection hasDifferentColorAppearanceComparedToTraitCollection:previousTraitCollection]) &#123;            if (self.traitCollection.userInterfaceStyle == UIUserInterfaceStyleDark) &#123;        // iOS13 暗黑模式        self.view.layer.backgroundColor = UIColor.redColor.CGColor;      &#125; else &#123;        // iOS13 普通模式        self.view.layer.backgroundColor = UIColor.yellowColor.CGColor;      &#125;    &#125;  &#125;  &#125;</code></pre></div><h2 id="除了代码实现，其他方式实现颜色的暗黑适配"><a href="#除了代码实现，其他方式实现颜色的暗黑适配" class="headerlink" title="除了代码实现，其他方式实现颜色的暗黑适配"></a>除了代码实现，其他方式实现颜色的暗黑适配</h2><p>前面3种方法都是直接通过代码来实现，还有第4种方法是通过在<code>Assets.xcassets</code>里定义颜色来实现。方法4步骤1：选择<code>Assets.xcassets</code>，显示后鼠标点击右键出现菜单，选择<code>New Color Set</code>步骤2：创建后，选中并重命名，如<code>textColor</code>，后进行操作显示<code>Appearances</code>，选择属性<code>Any, Dark</code>，最后分别设置两种颜色步骤3：通过函数<code>+ (nullable UIColor *)colorNamed:(NSString *)name</code>获取颜色，并进行赋值使用</p><div class="code-wrapper"><pre><code class="hljs objective-c">label.textColor = [UIColor colorNamed:@&quot;textColor&quot;];</code></pre></div><p>设置如图示<a href="/img/003d/003d-2.png" title="设置颜色"><img src="/img/003d/003d-2.png" alt="设置颜色" title="设置颜色"></a><code>Apperances</code>设置方法：选中该资源文件， 打开 Xcode -&gt;View -&gt;Inspectors -&gt;Show Attributes Inspectors （或者Option+Command+4）视图，将 Apperances 选项 改为Any，Dark</p><h2 id="我的-App-适配了暗黑模式，但是我想App-里的有些界面不要暗黑模式的适配，有什么办法吗？"><a href="#我的-App-适配了暗黑模式，但是我想App-里的有些界面不要暗黑模式的适配，有什么办法吗？" class="headerlink" title="我的 App 适配了暗黑模式，但是我想App 里的有些界面不要暗黑模式的适配，有什么办法吗？"></a>我的 App 适配了暗黑模式，但是我想App 里的有些界面不要暗黑模式的适配，有什么办法吗？</h2><p>若想要某个UI 保持白色模式，或黑色模式，可以设置属性<code>overrideUserInterfaceStyle</code>的值为<code>UIUserInterfaceStyleLight</code>或值为<code>UIUserInterfaceStyleDark</code>。</p><h2 id="前面告诉了我颜色的暗黑模式适配，那图片适配的暗黑模式适配又是怎么实现的？"><a href="#前面告诉了我颜色的暗黑模式适配，那图片适配的暗黑模式适配又是怎么实现的？" class="headerlink" title="前面告诉了我颜色的暗黑模式适配，那图片适配的暗黑模式适配又是怎么实现的？"></a>前面告诉了我颜色的暗黑模式适配，那图片适配的暗黑模式适配又是怎么实现的？</h2><p>方法1通过代码实现</p><blockquote><p>注意：图标资源可以保存在<code>Assets.xcassets</code>，也可以直接在项目中创建资源目录保存。</p></blockquote><div class="code-wrapper"><pre><code class="hljs objective-c">// 定义不同模式的图标UIImage *image = [UIImage imageNamed:@&quot;lightName&quot;];if (@available(iOS 13.0, *)) &#123;UIImage *imgs = [UIImage imageNamed:@&quot;lightName&quot; inBundle:nil compatibleWithTraitCollection:[UITraitCollection traitCollectionWithUserInterfaceStyle:UIUserInterfaceStyleLight]];[imgs.imageAsset registerImage:[UIImage imageNamed:@&quot;darkName&quot;] withTraitCollection:[UITraitCollection traitCollectionWithUserInterfaceStyle:UIUserInterfaceStyleDark]];image = [imgs.imageAsset imageWithTraitCollection:UITraitCollection.currentTraitCollection];&#125;// 获取并使用图标</code></pre></div><p>方法2通过设置<code>Assets.xcassets</code>实现注意：该方法时，图标资源必须保存在<code>Assets.xcassets</code>。步骤1 设置图标，并重命名为<code>icon</code>，如图示<a href="/img/003d/003d-3.png" title="图片"><img src="/img/003d/003d-3.png" alt="图片" title="图片"></a></p><p>步骤2 使用</p><div class="code-wrapper"><pre><code class="hljs objective-c">imageView.image = [UIImage imageNamed:@&quot;icon&quot;];</code></pre></div><h2 id="图片在暗黑模式下的适配的总结"><a href="#图片在暗黑模式下的适配的总结" class="headerlink" title="图片在暗黑模式下的适配的总结"></a>图片在暗黑模式下的适配的总结</h2><p>既是总结，也是强调，在暗黑模式的适配过程中的注意事项：1、<code>layer</code>颜色的适配，只能使用回调方法<code>- (void)traitCollectionDidChange:(UITraitCollection *)previousTraitCollection</code>监听处理；2、可以在<code>Info.plist</code>添加属性<code>User Interface Style</code>并设值为<code>Light</code>或<code>Dark</code>，使 app 保持白色模式，或黑色模式；3、可以使用设置属性<code>overrideUserInterfaceStyle</code>值为<code>UIUserInterfaceStyleLight</code>或<code>UIUserInterfaceStyleDark</code>，使某个 UI 保持为白色模式，或黑色模式；</p><p>另外，补充下开发中可以通过调用<code>UITraitCollection.currentTraitCollection.userInterfaceStyle</code>获取当前模式，以便可以根据不同的模式执行不同的操作。如：</p><div class="code-wrapper"><pre><code class="hljs objective-c">if (UITraitCollection.currentTraitCollection.userInterfaceStyle == UIUserInterfaceStyleDark) &#123; NSLog(@&quot;DarkMode&quot;);&#125; else &#123; NSLog(@&quot;LightMode&quot;);&#125;</code></pre></div><hr><blockquote><p>REFERENCE</p><ul><li><a href="https://blog.csdn.net/potato512/article/details/104805528" title="iOS 13适配——暗黑模式  -- 番薯大佬">iOS 13适配——暗黑模式  – 番薯大佬</a></li></ul></blockquote>]]></content>
    
    
    <summary type="html">&lt;blockquote&gt;
&lt;p&gt;本文转载自&lt;a href=&quot;https://blog.csdn.net/potato512/article/details/104805528&quot; title=&quot;iOS 13适配——暗黑模式  -- 番薯大佬&quot;&gt;iOS 13适配——暗黑模式  – 番薯大佬&lt;/a&gt;，有改动&lt;/p&gt;
&lt;/blockquote&gt;
&lt;h2 id=&quot;iOS13有什么亮点？&quot;&gt;&lt;a href=&quot;#iOS13有什么亮点？&quot; class=&quot;headerlink&quot; title=&quot;iOS13有什么亮点？&quot;&gt;&lt;/a&gt;iOS13有什么亮点？&lt;/h2&gt;&lt;p&gt;iOS 13.0正式版发布以来，最大的亮点还是新增的支持Dark Mode（暗黑模式）。</summary>


    <category term="iOS" scheme="https://note.zkk.me/categories/iOS/"/>
    
    
  </entry>
  
  <entry>
    <title>iOS开发制作pod库</title>
    <link href="https://note.zkk.me/0x003c.html"/>
    <id>https://note.zkk.me/0x003c.html</id>
    <published>2021-05-08T22:52:00.000Z</published>
    <updated>2026-06-29T03:05:06.496Z</updated>
    
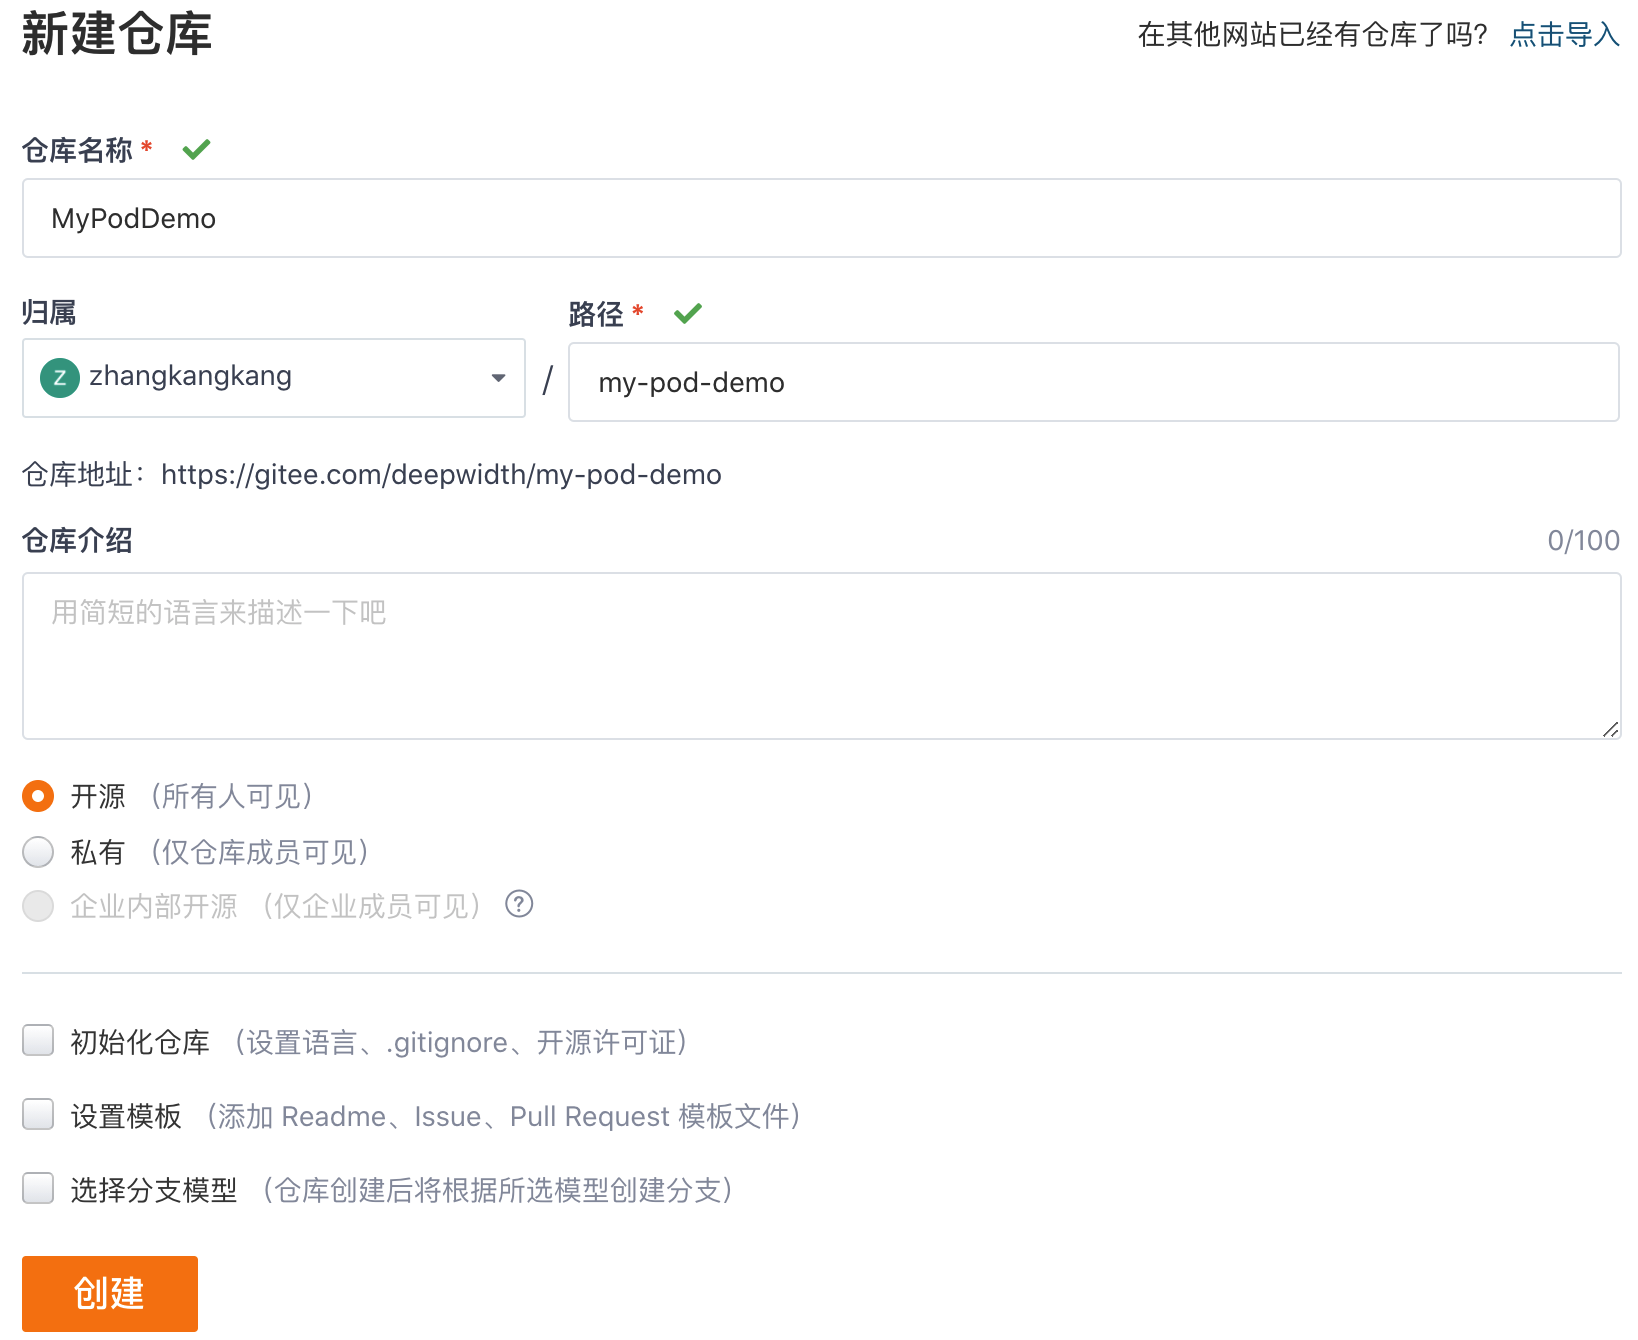
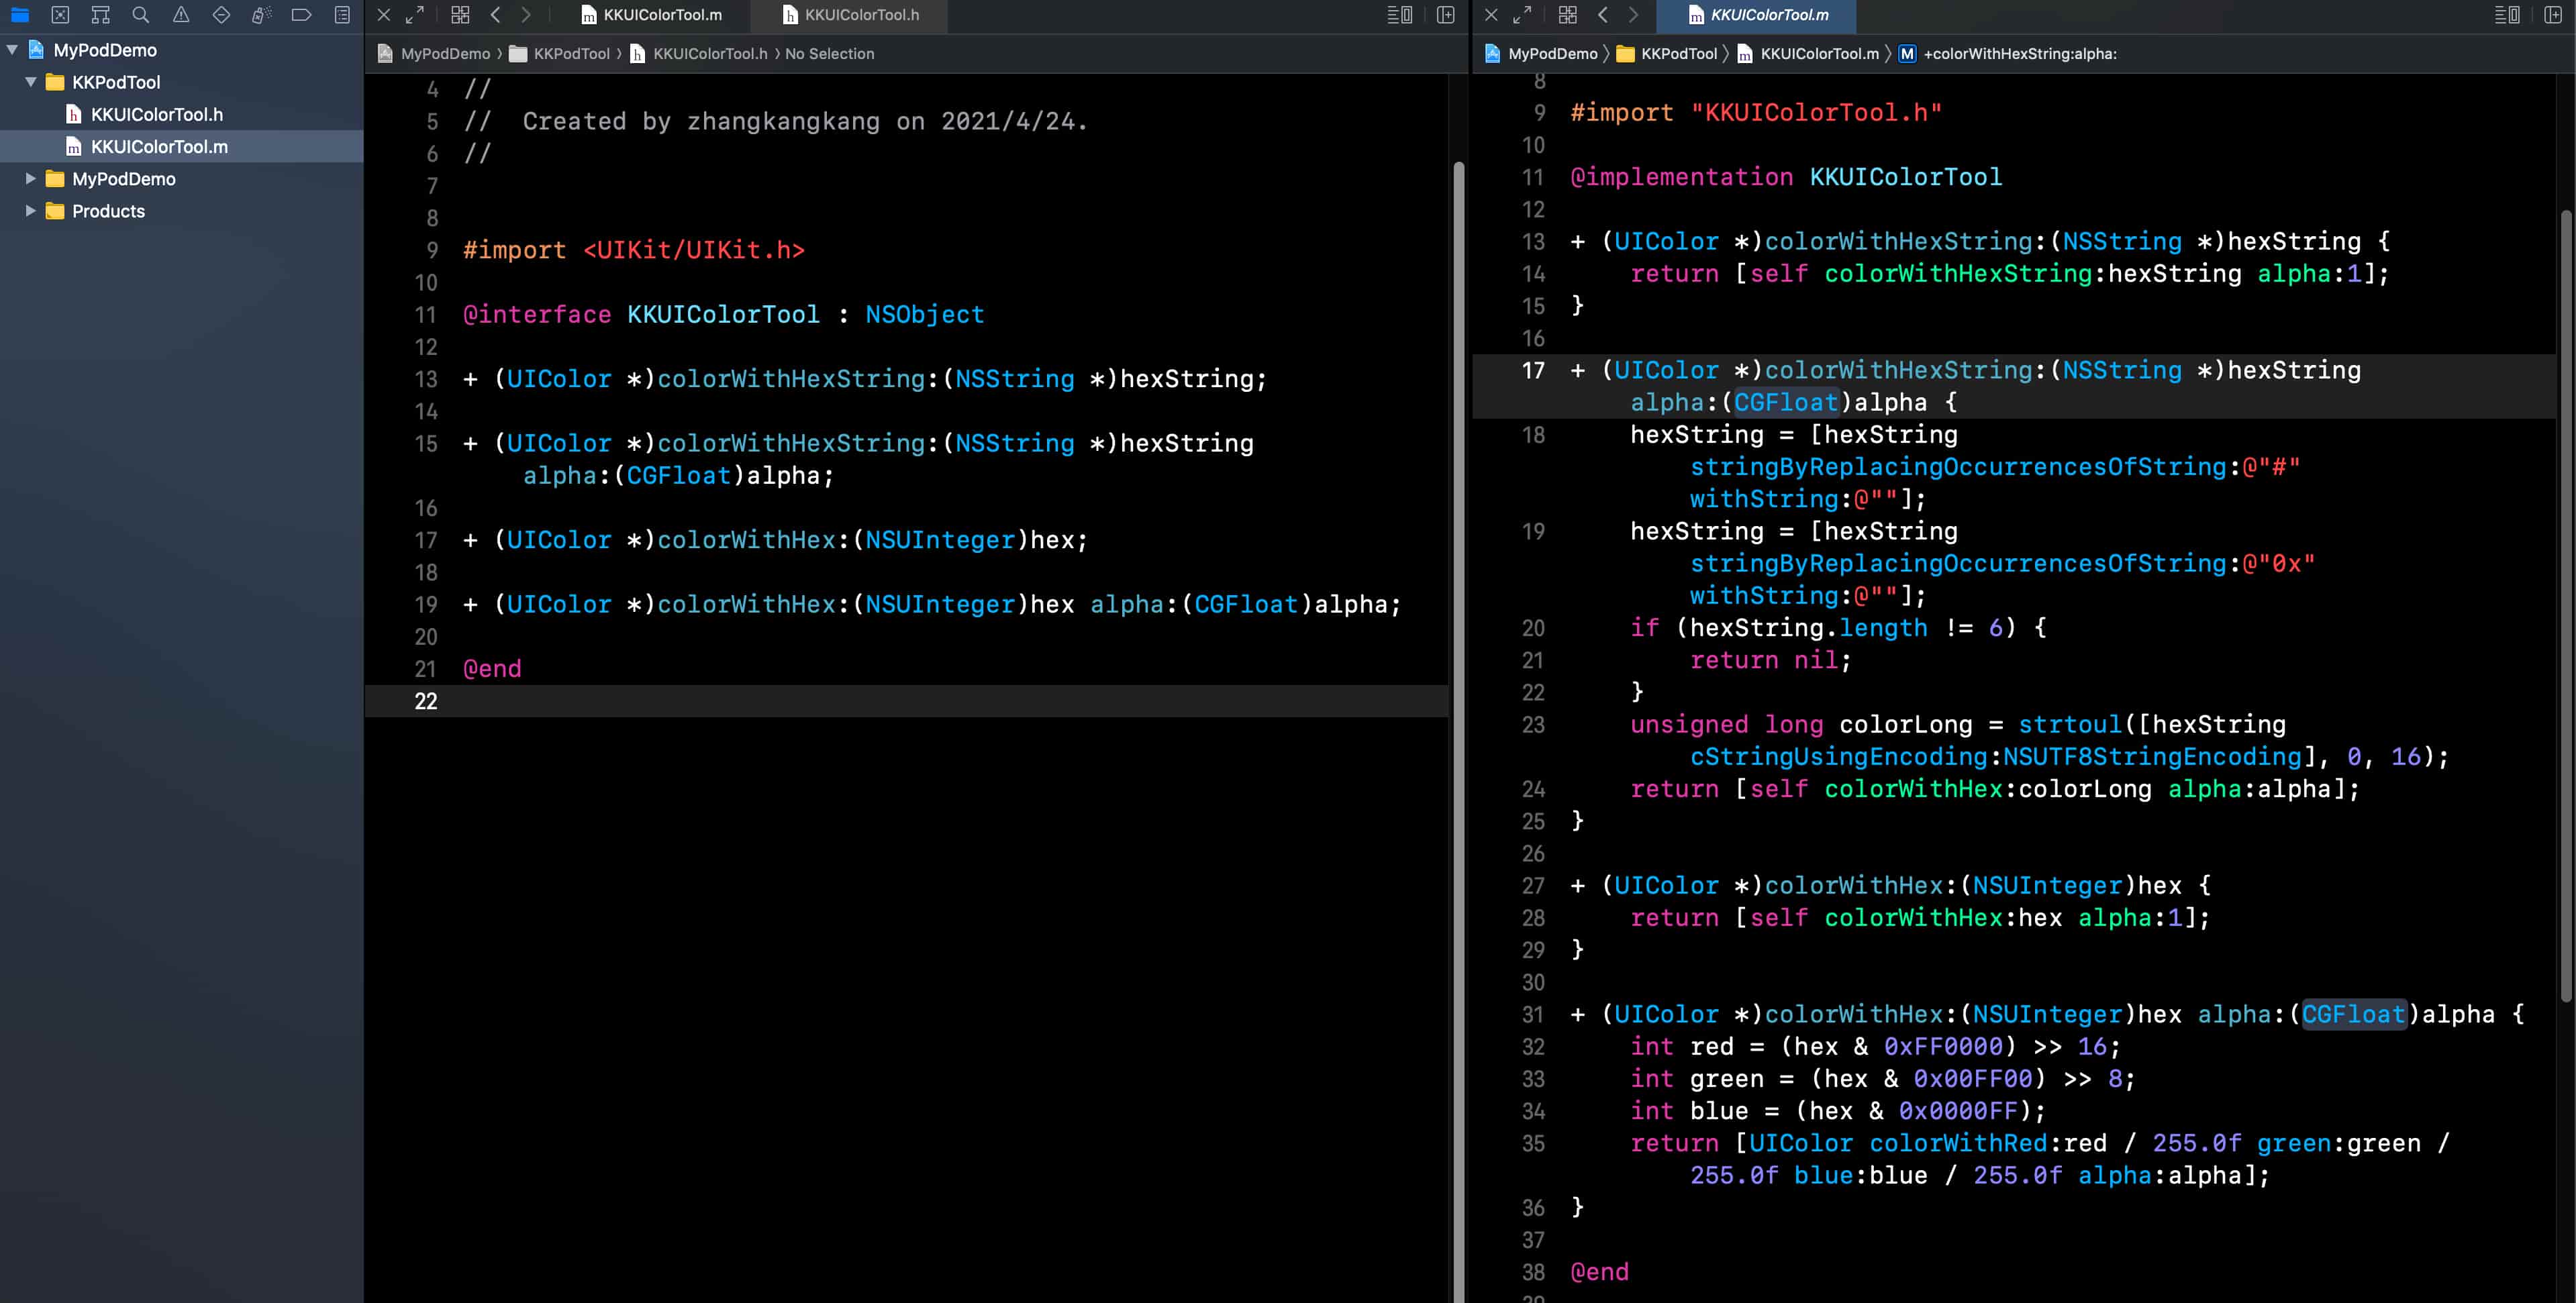
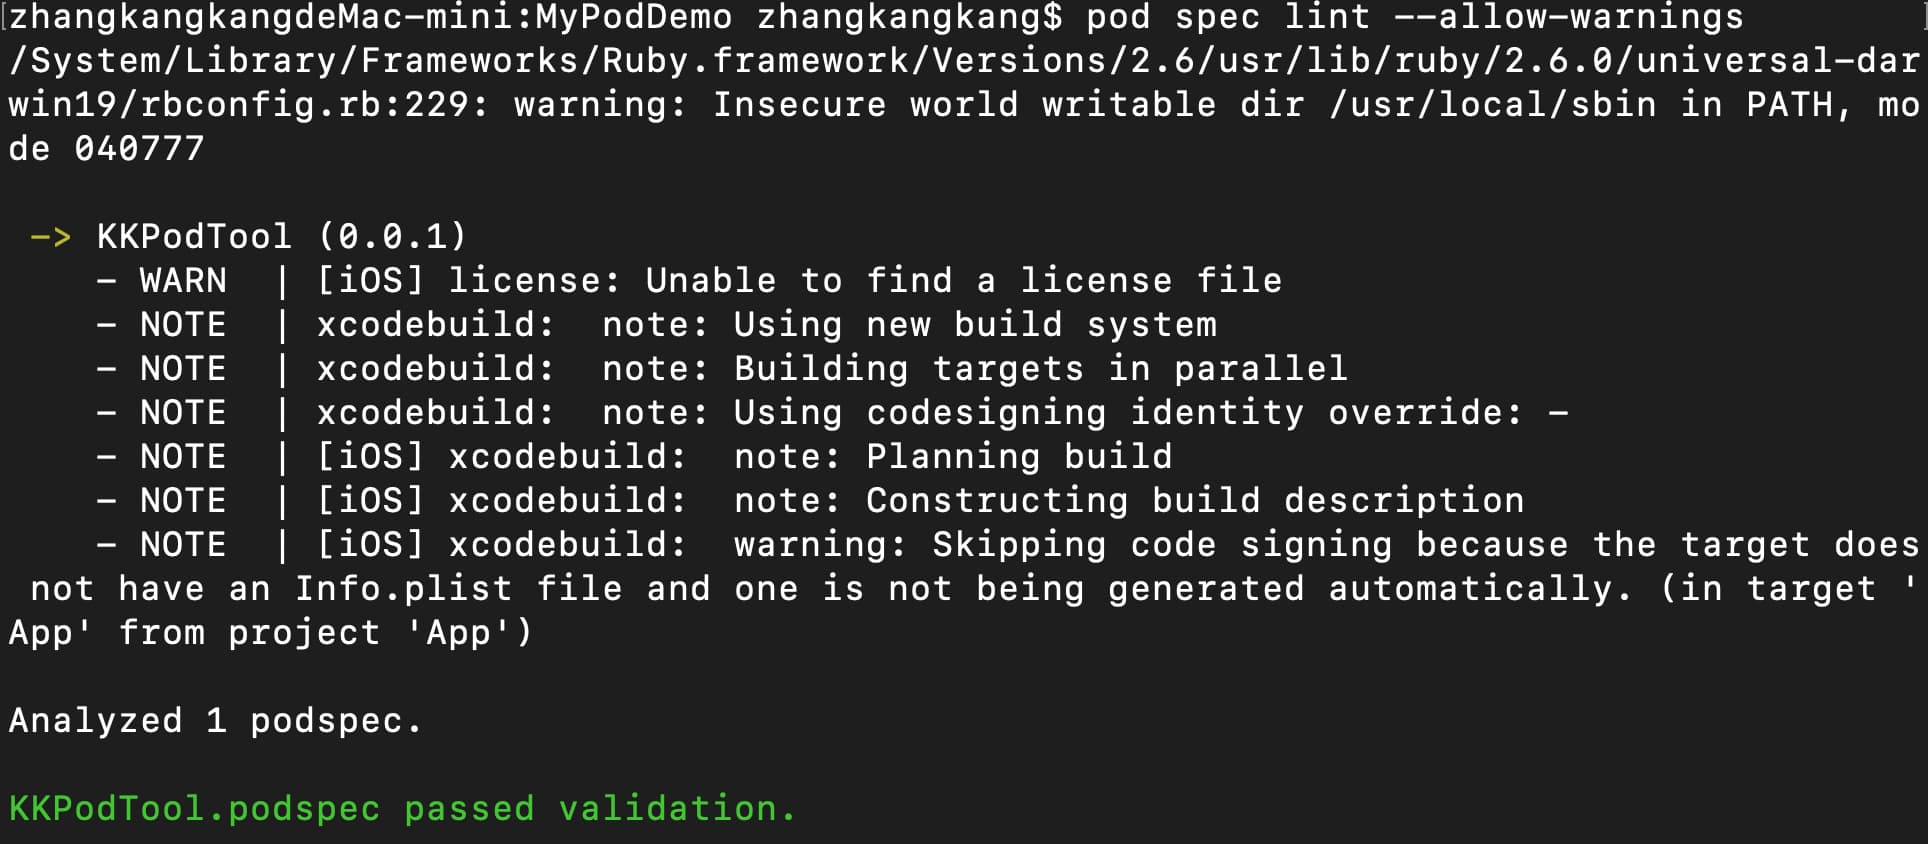
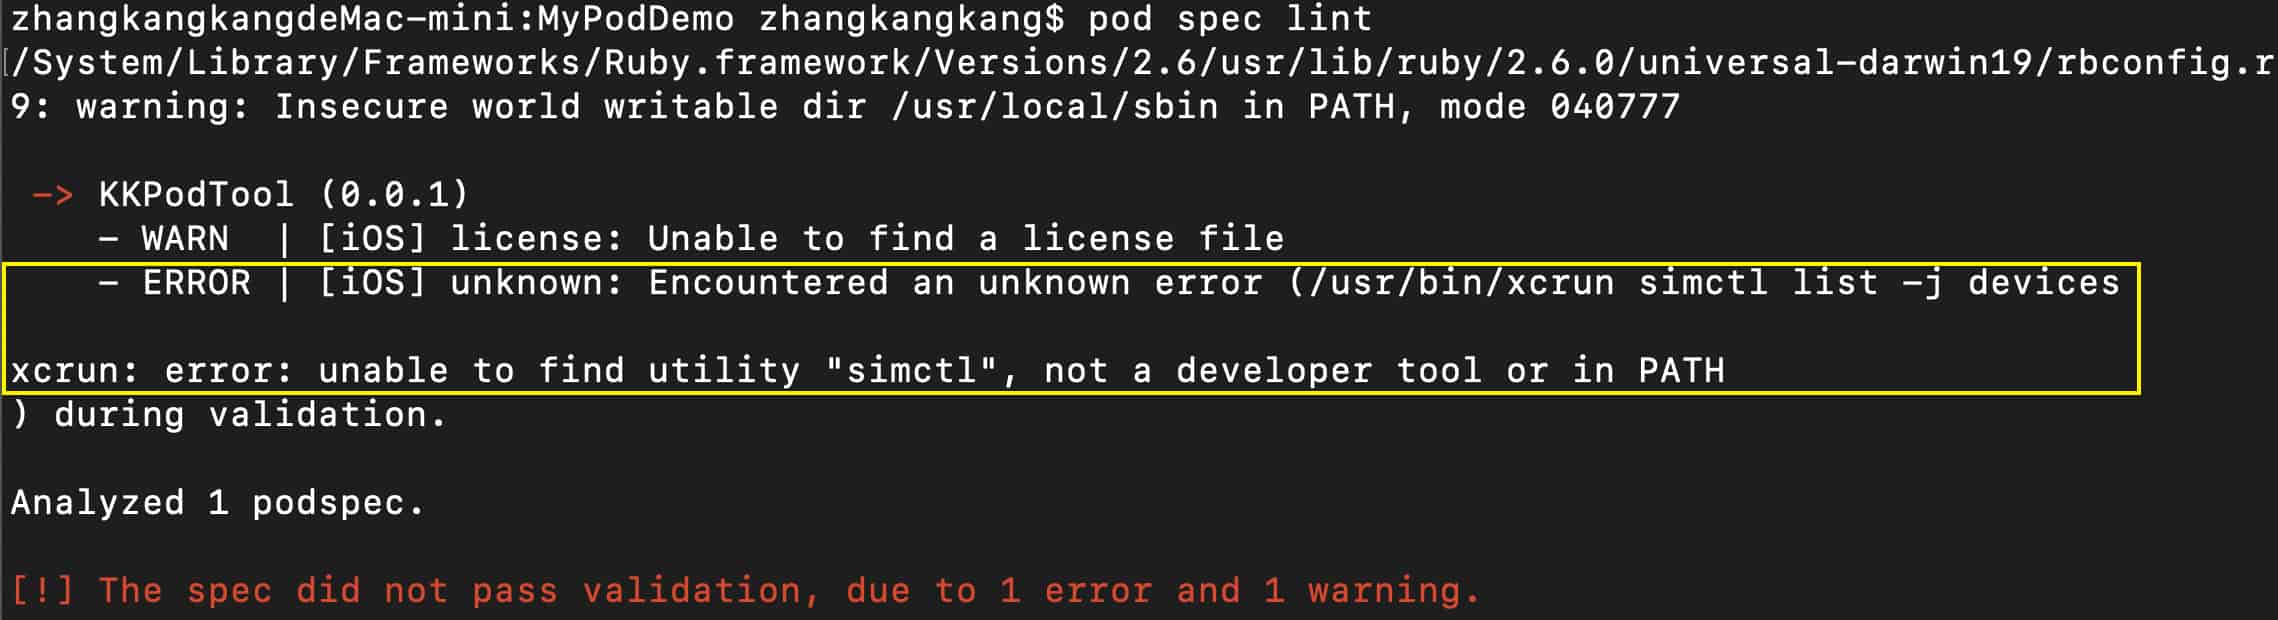
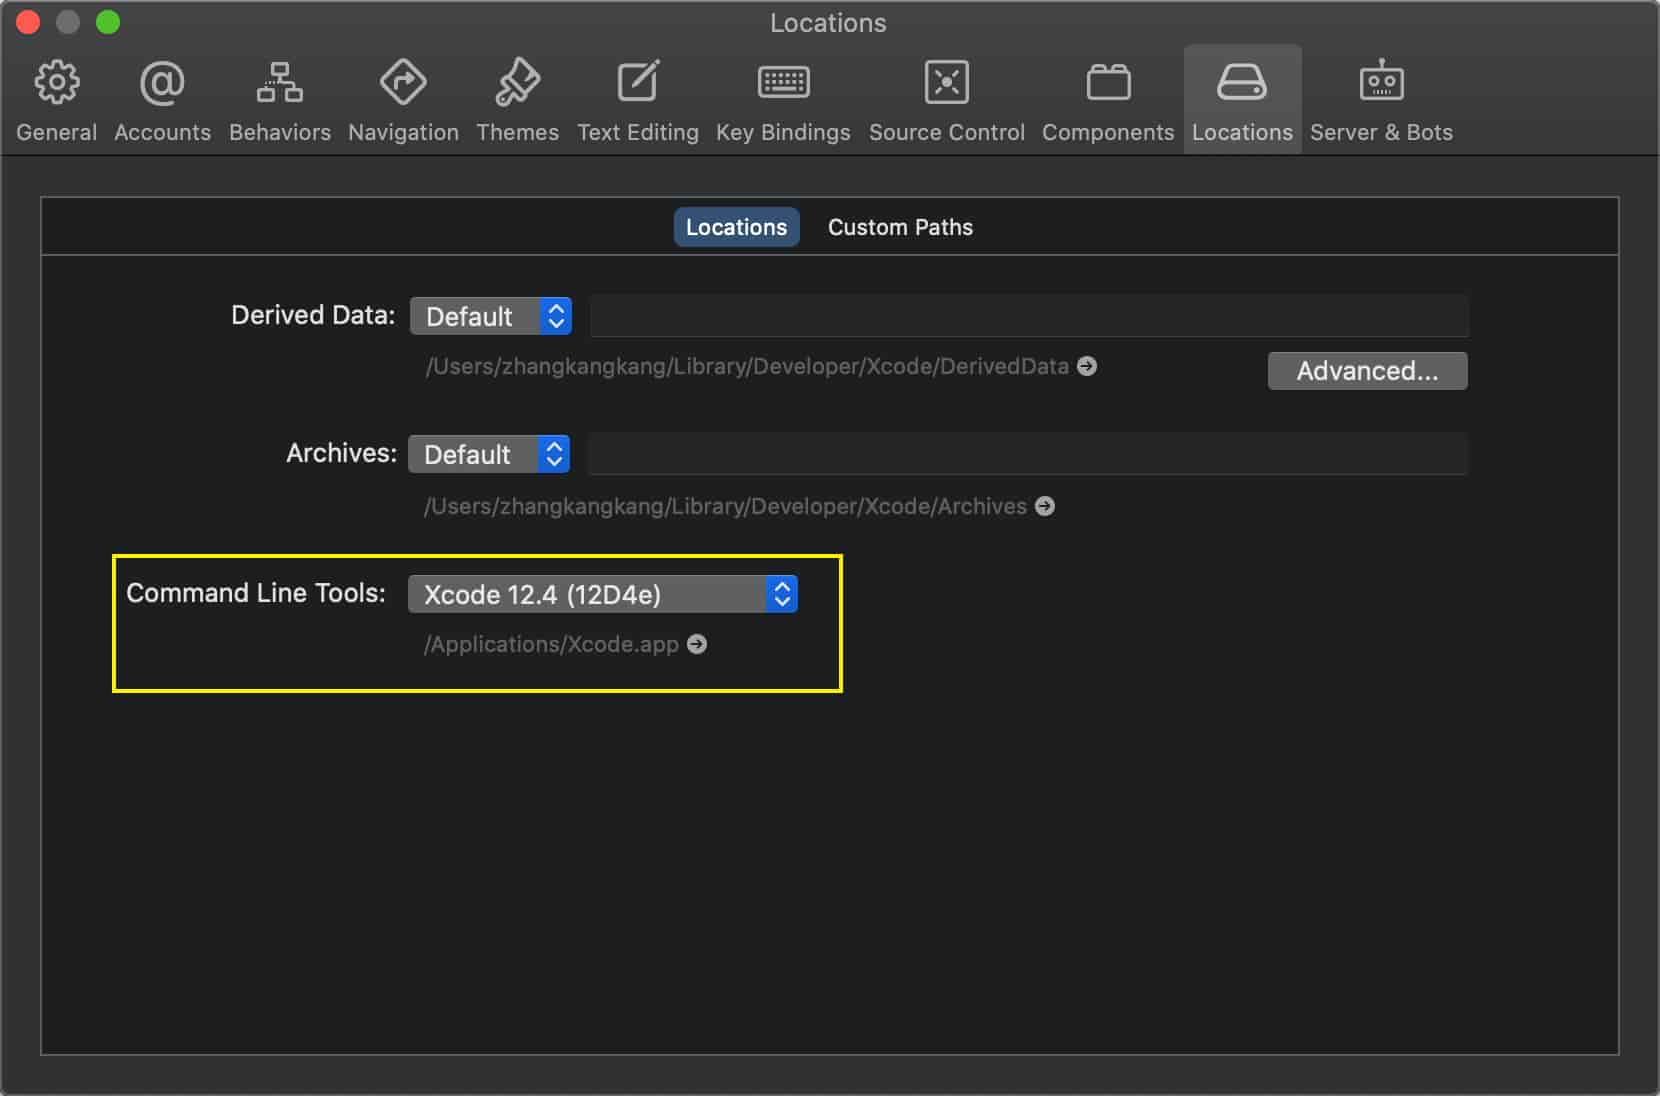
    <content type="html"><![CDATA[<p>在日常的开发过程中总会用到一些第三方的pod库，有提供网络请求的、有提供数据解析的、有UI工具等等库，今天我也来尝试制作一个pod库。经过在网上查询教程，已经成功制作出了pod库，很简单，这里记录一下过程。<span id="more"></span></p><h2 id="创建pod仓库"><a href="#创建pod仓库" class="headerlink" title="创建pod仓库"></a>创建pod仓库</h2><ol><li>创建一个git仓库如下，仓库名MyPodDemo<a href="/img/003c/003c-1.png"><img src="/img/003c/003c-1.png"></a></li><li>在此库中新建一个Xcode项目，添加代码如下，在KKPodTool目录下增加了一个KKUIColorTool类，如图所示<a href="/img/003c/003c-1.1.jpg"><img src="/img/003c/003c-1.1.jpg"></a></li><li>将添加好的代码提交后，在提交点打一个<code>0.0.1</code>的tag，并推送标签到远程仓库</li></ol><h2 id="编辑podspec文件"><a href="#编辑podspec文件" class="headerlink" title="编辑podspec文件"></a>编辑podspec文件</h2><p>1.如果电脑上没有安装cocoapods，可以参考<a href="https://note.zkk.me/0x0034.html" title="CocoaPods安装">CocoaPods安装</a>进行安装2.安装好cocoapods后，来到项目的根目录下创建podspec文件（这里命名为KKPodTool）</p><div class="code-wrapper"><pre><code class="hljs shell">pod spec create KKPodTool</code></pre></div><p>执行完这个命令后，当前目录下会多出一个<code>KKPodTool.podspec</code>文件3.编辑这个spec文件</p><div class="code-wrapper"><pre><code class="hljs shell">vi KKpodTool.podspec</code></pre></div><p>文件内容如下，根据自己项目的情况进行一些修改，有一些不是必填项</p><div class="code-wrapper"><pre><code class="hljs shell">Pod::Spec.new do |spec|  spec.name         = &quot;KKPodTool&quot;<span class="hljs-meta prompt_">#</span><span class="language-bash"><span class="hljs-comment"># pod库的版本，对应于pod仓库的tag</span></span>  spec.version      = &quot;0.0.1&quot;  spec.summary      = &quot;summary:KKPodTool is my common tools.&quot;  spec.description  = &lt;&lt;-DESCdescription:KKPodTool is my common tools.                   DESC  spec.homepage     = &quot;https://gitee.com/deepwidth/my-pod-demo&quot;  spec.license      = &#123; :type =&gt; &quot;MIT&quot;, :file =&gt; &quot;FILE_LICENSE&quot; &#125;<span class="hljs-meta prompt_"></span><span class="hljs-meta prompt_">  # </span><span class="language-bash"> pod库作者信息</span>  spec.author             = &#123; &quot;zhangkangkang&quot; =&gt; &quot;zhang.kangkang@outlook.com&quot; &#125;<span class="hljs-meta prompt_"></span><span class="hljs-meta prompt_">  # </span><span class="language-bash">spec.platform     = :ios</span>  spec.platform     = :ios, &quot;10.0&quot;<span class="hljs-meta prompt_"></span><span class="hljs-meta prompt_">  # </span><span class="language-bash"> When using multiple platforms</span><span class="hljs-meta prompt_">  # </span><span class="language-bash">spec.ios.deployment_target = <span class="hljs-string">&quot;10.0&quot;</span></span><span class="hljs-meta prompt_">  # </span><span class="language-bash">spec.osx.deployment_target = <span class="hljs-string">&quot;10.7&quot;</span></span><span class="hljs-meta prompt_">  # </span><span class="language-bash">spec.watchos.deployment_target = <span class="hljs-string">&quot;2.0&quot;</span></span><span class="hljs-meta prompt_">  # </span><span class="language-bash">spec.tvos.deployment_target = <span class="hljs-string">&quot;9.0&quot;</span></span><span class="hljs-meta prompt_"></span><span class="hljs-meta prompt_">  # </span><span class="language-bash">pod库代码的下载地址</span>  spec.source       = &#123; :git =&gt; &quot;https://gitee.com/deepwidth/my-pod-demo&quot;, :tag =&gt; &quot;#&#123;spec.version&#125;&quot; &#125;<span class="hljs-meta prompt_"></span><span class="hljs-meta prompt_">  # </span><span class="language-bash">pod库代码的路径</span>  spec.source_files  = &quot;KKPodTool/**/*.&#123;h,m&#125;&quot;  spec.exclude_files = &quot;&quot;<span class="hljs-meta prompt_">  #</span><span class="language-bash"></span><span class="language-bash">  <span class="hljs-comment">#  A list of resources included with the Pod. These are copied into the</span></span><span class="hljs-meta prompt_">  # </span><span class="language-bash"> target bundle with a build phase script. Anything <span class="hljs-keyword">else</span> will be cleaned.</span><span class="hljs-meta prompt_">  # </span><span class="language-bash"> You can preserve files from being cleaned, please don<span class="hljs-string">&#x27;t preserve</span></span><span class="hljs-meta prompt_">  # </span><span class="language-bash"><span class="hljs-string"> non-essential files like tests, examples and documentation.</span></span><span class="hljs-meta prompt_">  #</span><span class="language-bash"><span class="hljs-string"></span></span><span class="hljs-string"><span class="language-bash"></span></span><span class="hljs-meta prompt_"></span><span class="hljs-meta prompt_">  # </span><span class="language-bash"><span class="hljs-string">spec.resource  = &quot;icon.png&quot;</span></span><span class="hljs-meta prompt_">  # </span><span class="language-bash"><span class="hljs-string">spec.resources = &quot;Resources/*.png&quot;</span></span><span class="hljs-meta prompt_"></span><span class="hljs-meta prompt_">  # </span><span class="language-bash"><span class="hljs-string">spec.preserve_paths = &quot;FilesToSave&quot;, &quot;MoreFilesToSave&quot;</span></span><span class="hljs-meta prompt_"></span><span class="hljs-meta prompt_">  # </span><span class="language-bash"><span class="hljs-string">――― Project Linking ―――――――――――――――――――――――――――――――――――――――――――――――――――――――――― #</span></span><span class="hljs-meta prompt_">  #</span><span class="language-bash"><span class="hljs-string"></span></span><span class="hljs-string"><span class="language-bash">  #  Link your library with frameworks, or libraries. Libraries do not include</span></span><span class="hljs-meta prompt_">  # </span><span class="language-bash"><span class="hljs-string"> the lib prefix of their name.</span></span><span class="hljs-meta prompt_">  #</span><span class="language-bash"><span class="hljs-string"></span></span><span class="hljs-string"><span class="language-bash"></span></span>  spec.framework  = &quot;UIKit&quot;<span class="hljs-meta prompt_">  # </span><span class="language-bash"><span class="hljs-string">spec.frameworks = &quot;SomeFramework&quot;, &quot;AnotherFramework&quot;</span></span><span class="hljs-meta prompt_"></span><span class="hljs-meta prompt_">  # </span><span class="language-bash"><span class="hljs-string">spec.library   = &quot;iconv&quot;</span></span><span class="hljs-meta prompt_">  # </span><span class="language-bash"><span class="hljs-string">spec.libraries = &quot;iconv&quot;, &quot;xml2&quot;</span></span><span class="hljs-meta prompt_"></span><span class="hljs-meta prompt_">  # </span><span class="language-bash"><span class="hljs-string">――― Project Settings ――――――――――――――――――――――――――――――――――――――――――――――――――――――――― #</span></span><span class="hljs-meta prompt_">  # </span><span class="language-bash"><span class="hljs-string">在ARC环境下工作</span></span>  spec.requires_arc = true<span class="hljs-meta prompt_"></span><span class="hljs-meta prompt_">  # </span><span class="language-bash"><span class="hljs-string">spec.xcconfig = &#123; &quot;HEADER_SEARCH_PATHS&quot; =&gt; &quot;$(SDKROOT)/usr/include/libxml2&quot; &#125;</span></span><span class="hljs-meta prompt_">  # </span><span class="language-bash"><span class="hljs-string">依赖的其他pod库</span></span><span class="hljs-meta prompt_">  # </span><span class="language-bash"><span class="hljs-string">spec.dependency &quot;JSONKit&quot;, &quot;~&gt; 1.4&quot;</span></span>end</code></pre></div><p>4.编辑完podsepc文件后需要验证一下是否正确</p><div class="code-wrapper"><pre><code class="hljs shell">pod spec lint KKPodTool.podspec</code></pre></div><p>如果有错误，会有error的提示，同时也可能会有很多警告(warning)。如果有error的话需要根据报错去解决error，如果只是有warning的话可以不进行修改，也会发布成功。如果验证时需要忽视warning的话需要在命令后面加个参数<code>--allow-warnings</code>，如下</p><div class="code-wrapper"><pre><code class="hljs shell">pod spec lint KKPodTool.podspec --allow-warnings</code></pre></div><p>5.验证结果如下看到一行绿色的字表示验证成功，可以发布<a href="/img/003c/003c-1.3.jpg" title="验证成功"><img src="/img/003c/003c-1.3.jpg" alt="验证成功" title="验证成功"></a></p><h2 id="发布pod库"><a href="#发布pod库" class="headerlink" title="发布pod库"></a>发布pod库</h2><ol><li>发布pod库前需要注册账户<div class="code-wrapper"><pre><code class="hljs shell">pod trunk register &quot;email@example.com&quot; username</code></pre></div>执行这个注册命令会有一个邮件发到你填写的邮箱中，点击邮件中的链接进行验证。</li><li>验证通过之后就可以进行发布了<div class="code-wrapper"><pre><code class="hljs shell">pod trunk push KKPodTool.podspec</code></pre></div>如果你的podspec文件有警告，可以在发布命令后面加上允许包含警告的参数，如下<div class="code-wrapper"><pre><code class="hljs shell">pod trunk push KKPodTool.podspec --allow-warnings</code></pre></div>看到如下的输出则表示发布成功<a href="/img/003c/003c-6.jpg" title="发布成功"><img src="/img/003c/003c-6.jpg" alt="发布成功" title="发布成功"></a></li></ol><h2 id="遇到的问题"><a href="#遇到的问题" class="headerlink" title="遇到的问题"></a>遇到的问题</h2><ol><li>发布完成后不能立马搜到？pod库发布成功后使用命令搜索<div class="code-wrapper"><pre><code class="hljs shell">pod search KKPodTool</code></pre></div>搜索结果中搜不到刚刚发布成功的pod库，需要过一段时间才能搜到，尝试了网上说的几个方法都无效</li><li>验证podspec文件时遇到错误如下<a href="/img/003c/003c-7.jpghttp://" title="错误"><img src="/img/003c/003c-7.jpg" alt="错误" title="错误"></a>报错内容:<div class="code-wrapper"><pre><code class="hljs shell">-ERROR | [iOS] unknown: Encountered an unknown error (/usr/bin/xcrun simctl list -j devicesxcrun: error: unable to find utility &quot;simctl&quot;, not a developer tool or in PATH</code></pre></div>我的解决方法是，打开Xcode-&gt;Preferences-&gt;Locations，设置一下<code>Command Line Tools</code><a href="/img/003c/003c-8.jpg" title="解决问题"><img src="/img/003c/003c-8.jpg" alt="解决问题" title="解决问题"></a></li><li>在制作以及使用pod库的过程中还会遇到很多其他问题，需要根据错误类型寻找解决方法。</li></ol><hr><blockquote><p>REFERENCE</p><ul><li><a href="https://juejin.cn/post/6844903871718883342" title="iOS制作cocoapods公共库以及私有库">iOS制作cocoapods公共库以及私有库</a></li><li><a href="https://stackoverflow.com/questions/34089153/swift-org-issue-with-open-source-swift-project-error-xcrun-error-unable-to-f" title="Swift.org issue with open source swift project. Error: xcrun: error: unable to find utility “launch-with-toolchain”, not a developer tool or in PATH">Swift.org issue with open source swift project. Error: xcrun: error: unable to find utility “launch-with-toolchain”, not a developer tool or in PATH</a></li></ul></blockquote>]]></content>
    
    
    <summary type="html">&lt;p&gt;在日常的开发过程中总会用到一些第三方的pod库，有提供网络请求的、有提供数据解析的、有UI工具等等库，今天我也来尝试制作一个pod库。经过在网上查询教程，已经成功制作出了pod库，很简单，这里记录一下过程。</summary>


    <category term="iOS" scheme="https://note.zkk.me/categories/iOS/"/>
    
    
  </entry>
  
  <entry>
    <title>UIView与CALayer的关系</title>
    <link href="https://note.zkk.me/0x003b.html"/>
    <id>https://note.zkk.me/0x003b.html</id>
    <published>2021-01-15T23:31:00.000Z</published>
    <updated>2026-06-29T03:05:06.496Z</updated>
    
    <content type="html"><![CDATA[<p>平常在开发的时候，如果要呈现一个视图经常会用到UIView，但有时需要对这个UIView做一些工作的时候，比如设置圆角、添加动画等，又会用到UIView中的layer，layer是UIView的一个属性，是CALayer类。CALayer是什么类？与UIView有什么关系？<span id="more"></span></p><h2 id="CALayer与UIView的关系"><a href="#CALayer与UIView的关系" class="headerlink" title="CALayer与UIView的关系"></a>CALayer与UIView的关系</h2><p>从苹果的<a href="https://developer.apple.com/documentation/quartzcore/calayer" title="文档">文档</a>可以看到，CALayer类负责管理图像内容(image-based content)，并且可以对图像执行动画。CALayer类直接继承自NSObject类，所以只是负责显示内容，不会对交互事件做出响应。苹果文档中有这样一句话</p><blockquote><p>For layers you create yourself, you can assign a delegate object and use that object to provide the contents of the layer dynamically and perform other tasks.</p></blockquote><p>意思是你可以为自己创建的CALayer实例指定一个delegate类，并且用这个类为layer提供视图内容，这个delegate类需要实现<code>CALayerDelegate</code>协议。还有一句话，如果layer是由UIView创建的，UIView会自动把自己设为layer的delegate。</p><blockquote><p>If the layer object was created by a view, the view typically assigns itself as the layer’s delegate automatically</p></blockquote><p>关系一下子就清楚了，CALayer是负责显示内容的、与图像显示有关的类，而UIView类本身没有显示图像的功能，但是它有个CALayer类属性layer，UIView实例通过管理自己的layer来显示内容。layer的delegate类就是创建layer的UIView实例，UIView类实现了<code>CALayerDelegate</code>协议来为自己的layer提供图像内容。同时，UIView类继承自UIResponder类，所以它可以对交互事件做出响应。关系明确了，具体view是怎么管理自己的layer的，还有待后续研究。</p><p>再来看一下<code>UIView.h</code>文件。<code>UIView.h</code>文件中对于layer这个属性的描述是这样的。</p><div class="code-wrapper"><pre><code class="hljs objective-c">@property(nonatomic,readonly,strong)   CALayer  *layer;// returns view&#x27;s layer. Will always return a non-nil value. view is layer&#x27;s delegate</code></pre></div><p>注释中说明view是layer的delegate，这与苹果文档中的描述相符。</p><h2 id="其他收获"><a href="#其他收获" class="headerlink" title="其他收获"></a>其他收获</h2><p>在搜集与CALayer和UIView相关描述的过程中，get了一个知识点</p><blockquote><p>修改非 RootLayer的属性（譬如位置、背景色等）会默认产生隐式动画</p></blockquote><p>之前有听过隐式动画，顾名思义，我猜是不用开发者手动实现的、被动触发的动画。不过从没确认过什么是隐式动画。为此，我写了个demo确认了一下，创建一个UIView *view，在view的layer中添加一个subLayer。然后点击某个按钮时去修改subLayer的frame和backgroundColor。果然，神奇的一幕发生了，改动会以动画的方式呈现。这个动画是自动进行的，很神奇啊。</p><hr><blockquote><p>REFERENCE</p><ul><li><a href="https://developer.apple.com/documentation/quartzcore/calayer" title="CALayer">CALayer</a></li><li><a href="https://developer.apple.com/documentation/uikit/uiview" title="UIView">UIView</a></li><li><a href="https://juejin.cn/post/6844903593682665479" title="iOS 浅谈UIView 和 CAlayer">iOS 浅谈UIView 和 CAlayer</a></li></ul></blockquote>]]></content>
    
    
    <summary type="html">&lt;p&gt;平常在开发的时候，如果要呈现一个视图经常会用到UIView，但有时需要对这个UIView做一些工作的时候，比如设置圆角、添加动画等，又会用到UIView中的layer，layer是UIView的一个属性，是CALayer类。CALayer是什么类？与UIView有什么关系？</summary>


    <category term="iOS" scheme="https://note.zkk.me/categories/iOS/"/>
    
    
  </entry>
  
  <entry>
    <title>iOS应用生命周期</title>
    <link href="https://note.zkk.me/0x003a.html"/>
    <id>https://note.zkk.me/0x003a.html</id>
    <published>2021-01-15T07:30:00.000Z</published>
    <updated>2026-06-29T03:05:06.496Z</updated>
    
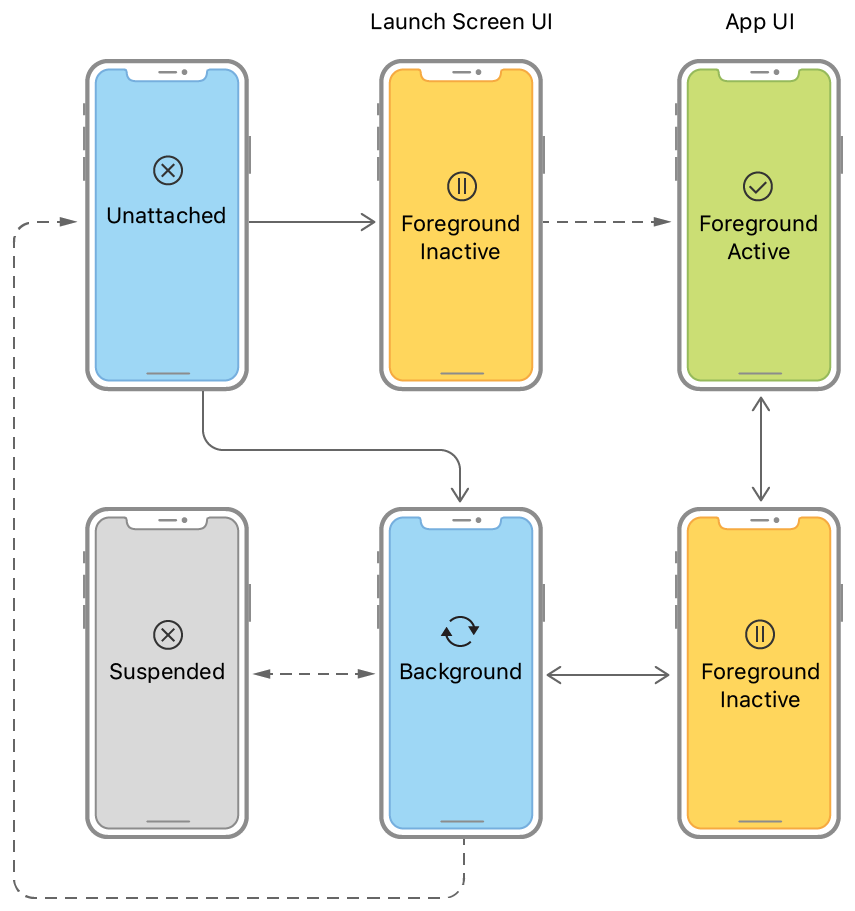
    <content type="html"><![CDATA[<p>今天学习了一下iOS应用生命周期的相关知识，这里记录一下iOS应用可能所处的5种状态以及各状态之间的切换。<span id="more"></span></p><h2 id="5种状态"><a href="#5种状态" class="headerlink" title="5种状态"></a>5种状态</h2><ol><li>Not Running应用没有运行</li><li>Inactive非活跃状态，应用在活跃状态和后台状态之间切换时会先进入这个状态。</li><li>Active活跃状态，应用可以与用户进行交互的状态。</li><li>Background后台运行状态。在此状态下，应用应该尽量释放内存和占用的资源，保存一些数据。当内存资源紧张时，系统会将挂起的应用从内存中清除来释放更多内存。所以在后台运行时减少内存占用很重要。当把后台运行状态下的可执行代码执行完后应用就会被挂起（Suspended）。系统会限制后台运行的时间，如果达到了限制时间应用还没执行完代码，则直接将应用关闭（不是挂起）。苹果文档中说明Background的限制执行时间是5秒钟，但是可以通过调用<code>beginBackgroundTaskWithName: expirationHandler: </code>方法来延长时间。</li><li>Suspended应用被挂起状态。在这个状态下，应用不会执行任何代码。如果内存不足，应用会被从内存中清除。</li></ol><p>对于这5种状态之间的切换，这里有一张图<a href="/img/003a/003a-1.png" title="状态切换"><img src="/img/003a/003a-1.png" alt="状态切换" title="状态切换"></a></p><p>应用启动后，首先会处于Inactive或者Background状态，这取决于应用是否要展示界面。如果是一个没有界面的应用则直接进入Background状态。当应用加载到前台后，状态会由Inactive切换到Active。</p><p>当在应用中双击Home键打开后台应用切换界面，应用会进入Inactive状态，如果从此界面再回到应用，则会回到Active状态；如果从后台应用切换界面离开了app，则会直接进入Background状态。</p><p>Background状态结束后，如果应用支持后台运行，则会进入Suspended被挂起状态；如果不支持则进入Not Running状态（app被关闭）。</p><p>当从应用返回到桌面，应用会先进入Inactive状态，然后再切换到Background状态。从桌面再返回应用，也会先进入Inactive状态，再进入Active状态。</p><h2 id="生命周期方法"><a href="#生命周期方法" class="headerlink" title="生命周期方法"></a>生命周期方法</h2><p>应用状态切换的时候系统会调用AppDelegate的几个方法。这里简单记录一下每个方法的调用时机，更加详细的说明可以去看苹果的官方文档。</p><ol><li><p><strong>application: willFinishLaunchingWithOptions:</strong>应用启动后进入Inactive状态时调用。</p></li><li><p><strong>application: didFinishLaunchingWithOptions:</strong>在应用启动即将进入到Active状态之前调用此方法。在此方法结束运行之前app会一直处于开屏状态，所以尽快结束此方法可以给用户app启动很快的感觉。如果你开屏开了20秒还在开，系统会直接杀掉进程。</p></li><li><p><strong>applicationDidBecomeActive:</strong>从Inactive状态切换到Active状态时调用</p></li><li><p><strong>applicationWillResignActive:</strong>从Active状态进入Inactive状态时调用</p></li><li><p><strong>applicationDidEnterBackground:</strong>进入Background状态时调用，系统限制这个方法执行时间为5秒，苹果认为对于大多数app而言，5秒钟足以完成任何重要任务。</p><blockquote><p>When your app moves to the background, the system calls your app delegate’s applicationDidEnterBackground: method. That method has five seconds to perform any tasks and return. Shortly after that method returns, the system puts your app into the suspended state. For most apps, five seconds is enough to perform any crucial tasks, but if you need more time, you can ask UIKit to extend your app’s runtime.</p></blockquote></li></ol><p> 但是我写了一个demo测试了一下发现这个方法可以执行到9秒。</p><ol start="5"><li><p><strong>applicationWillEnterForeground:</strong>从Background状态切换到Inactive状态时调用（从桌面返回APP）</p></li><li><p><strong>applicationWillTerminate:</strong>app被关闭时（进入Not Running状态）调用。如果应用不支持后台运行，则在按下Home键返回桌面时，应用会先进入Inactive状态，然后正常进入Background状态，当Background状态结束后此方法会被调用，应用直接被关闭，不会进入Suspended状态；如果应用支持后台运行，则在应用被用户手动关闭或者被系统从内存中清除时会调用此方法。苹果文档中说系统会限制此方法的执行时间为5秒钟，如果达到时间后此方法仍没有返回，则系统可能杀掉进程。</p><blockquote><p>Your implementation of this method has approximately five seconds to perform any tasks and return. If the method does not return before time expires, the system may kill the process altogether.</p></blockquote></li></ol><p> 但是我写了个demo测了几次发现这个方法可以运行7~13秒，达到时间还没结束就直接被系统杀掉进程了。</p><p> 如何配置应用是否支持后台运行？ 在<code>info.plist</code>中配置键值对<code>UIApplicationExitsOnSuspend</code>。<code>UIApplicationExitsOnSuspend</code>值为<code>YES</code>表示不支持后台运行（Application does not run in background ），但是这个不支持后台运行不是说不会进入Background状态，而是说应用不会在后台挂着（Suspended）。也就是说退出应用后应用就会被系统关闭。<code>UIApplicationExitsOnSuspend</code>值为<code>NO</code>表示支持后台运行。应用可以在后台挂着（Suspended）。</p><hr><p>如果是支持scenes的应用，生命周期会与上面所说的有所不同，具体的可以看苹果的官方文档。</p><hr><blockquote><p>REFERENCE</p><ul><li><a href="https://developer.apple.com/documentation/uikit/app_and_environment/managing_your_app_s_life_cycle" title="Managing Your App&#39;s Life Cycle">Managing Your App’s Life Cycle</a></li><li><a href="https://developer.apple.com/documentation/uikit/app_and_environment/scenes/preparing_your_ui_to_run_in_the_background/extending_your_app_s_background_execution_time" title="Using Extended Runtime Sessions">Using Extended Runtime Sessions</a></li></ul></blockquote>]]></content>
    
    
    <summary type="html">&lt;p&gt;今天学习了一下iOS应用生命周期的相关知识，这里记录一下iOS应用可能所处的5种状态以及各状态之间的切换。</summary>


    <category term="iOS" scheme="https://note.zkk.me/categories/iOS/"/>
    
    
  </entry>
  
  <entry>
    <title>泰山游记</title>
    <link href="https://note.zkk.me/0x0039.html"/>
    <id>https://note.zkk.me/0x0039.html</id>
    <published>2021-01-08T07:58:00.000Z</published>
    <updated>2026-06-29T03:05:06.496Z</updated>
    
    <content type="html"><![CDATA[<p>元旦跟朋友去山东泰安爬泰山，这是一次难忘的经历，这里简要记录一下这次行程。</p><span id="more"></span><p>我们的登山路线大致是红门、中天门、十八盘、南天门、玉皇顶，然后第二天原路下山。全程用两条腿，每公里油耗一条士力架。路上不建议带太多水，一是太沉增加负担；二是登山路上常有卖水的，农夫山泉一般是5元一瓶。我们是冬天登山，也用不了太多水。</p><p>登泰山一路上能看到很多石刻，各种石刻。大部分刻于清朝时期和民国时期，也有一些是建国之后的。</p><p>泰山正上方有一条民航航线，经常有客机经过，而且飞得也不高。如果你带了一台好相机和适合的镜头，当飞机从泰山上空经过时找好时机和角度应该能拍出很好看的图片。这是一张我用iPhone拍到的飞机照片，可以看出飞得并不高。<a href="/img/0039/0039-0.png" title="飞机过泰山"><img src="/img/0039/0039-0.png" alt="飞机过泰山" title="飞机过泰山"></a></p><p>我们到南天门的时候已经是下午六点，那里风很大，很冷，再加上我们很累，吃了晚饭后就一直待在宾馆里没有出去了。这里建议登山时自带一些干粮，山顶的饭店不好吃而且贵。这么说吧，感觉山顶最好吃的是泡面。</p><p>冬天泰山是枯水期，宾馆的水龙头没有水，不能洗澡。想用热水都要提着桶去指定地方打，这个很不方便。</p><p>第二天早晨六点左右宾馆的工作人员会挨个房间敲门，叫你起床。大家在宾馆大厅集结完毕后列队去宾馆工作人员指定的地方看日出。为什么是去他们指定的地方？自己去其他地方不行吗？由于季节不同，日出的地方也不同，有时太阳偏南，有时偏北，所以去错了位置就有可能日出的地方被其他山头挡住了，你就看不到了。这一点我对宾馆的工作人员还是比较信任的，他们常年在山顶宾馆工作，会比较了解不同时节观日出的位置。如果你想自己去其他地方也是可以的。</p><p>从红门登山到南天门，我们用了近6个小时。第二天原路下山，由于我的右腿不太舒服，所以拖慢了下山进程，本来应该能快一些，但是也用了6个小时。在此提醒大家，登山注意保护好腿部膝关节。</p><p>千言万语一句话，泰山大，大泰山。最后贴一张泰山日出的照片。<a href="/img/0039/0039-1.png" title="泰山日出"><img src="/img/0039/0039-1.png" alt="泰山日出" title="泰山日出"></a></p>]]></content>
    
    
    <summary type="html">&lt;p&gt;元旦跟朋友去山东泰安爬泰山，这是一次难忘的经历，这里简要记录一下这次行程。&lt;/p&gt;</summary>


    <category term="旅行" scheme="https://note.zkk.me/categories/%E6%97%85%E8%A1%8C/"/>
    
    
  </entry>
  
  <entry>
    <title>iOS开发pch文件使用</title>
    <link href="https://note.zkk.me/0x0038.html"/>
    <id>https://note.zkk.me/0x0038.html</id>
    <published>2021-01-05T07:27:00.000Z</published>
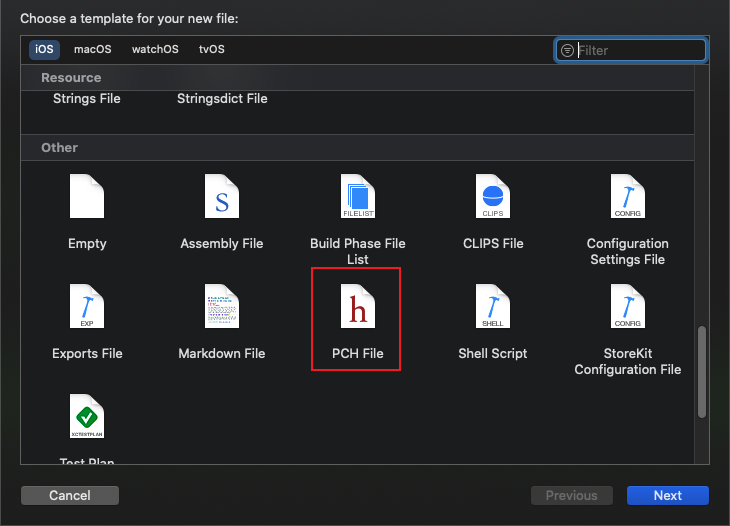
    <updated>2026-06-29T03:05:06.496Z</updated>
    
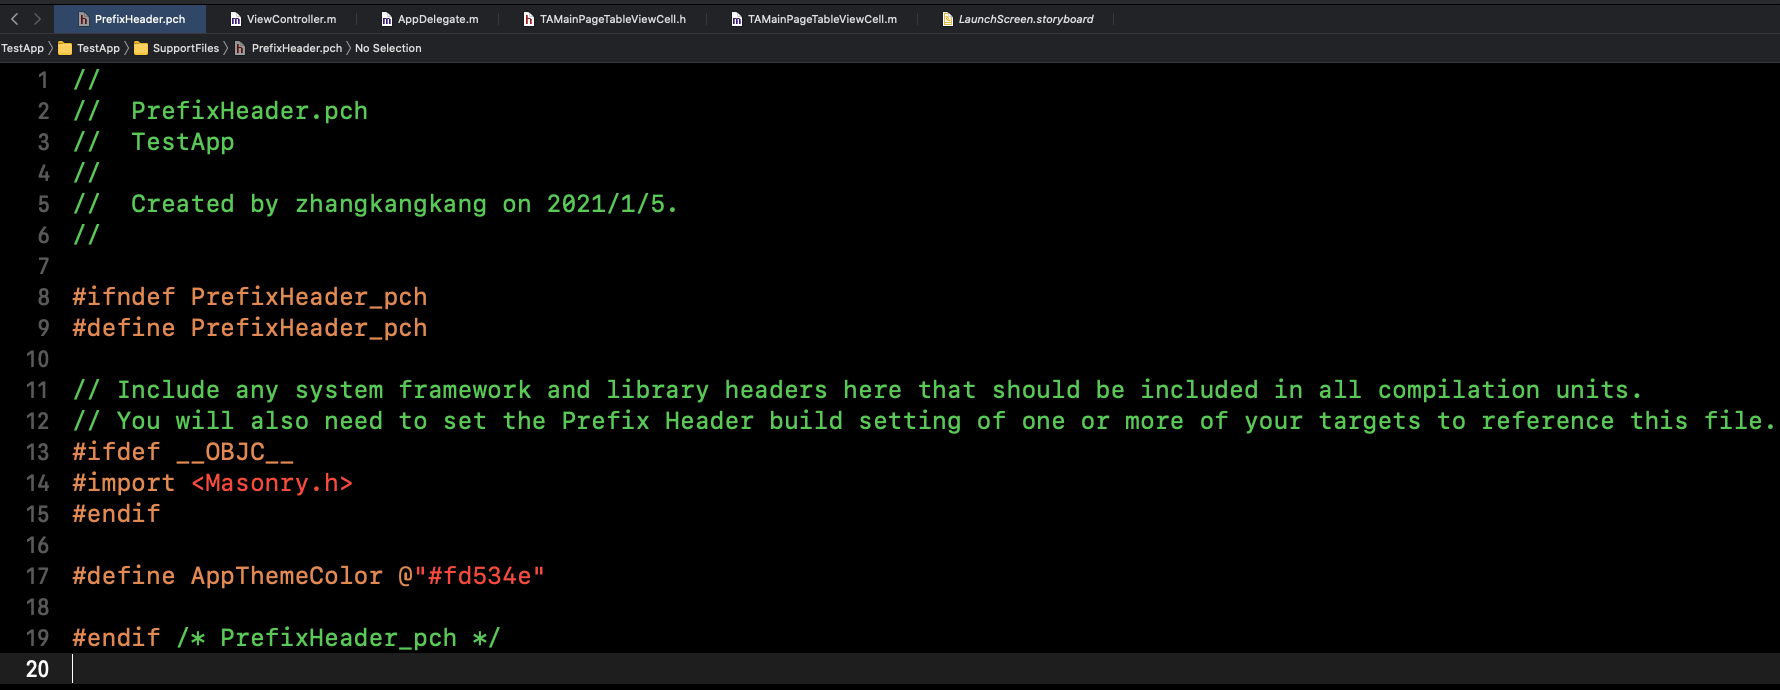
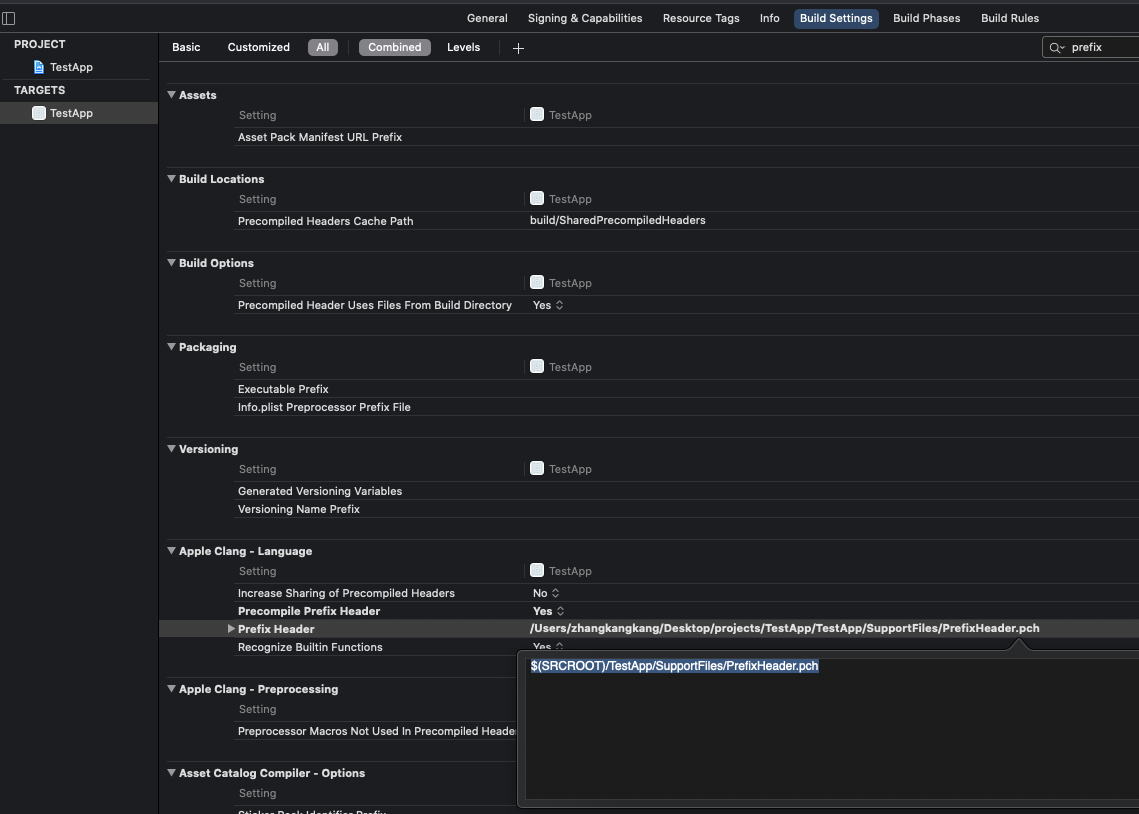
    <content type="html"><![CDATA[<p>pch文件是一个预编译头文件，可以在这个文件里导入一些头文件，存放一些宏定义，然后给一个target配置一个pch文件，这个target就可以直接使用pch文件里面导入的头文件和宏定义。</p><span id="more"></span><h2 id="创建pch文件"><a href="#创建pch文件" class="headerlink" title="创建pch文件"></a>创建pch文件</h2><p><a href="/img/0038/0038-1.png" title="创建pch文件"><img src="/img/0038/0038-1.png" alt="创建pch文件" title="创建pch文件"></a></p><h2 id="pch文件"><a href="#pch文件" class="headerlink" title="pch文件"></a>pch文件</h2><p>pch文件内部见图片<a href="/img/0038/0038-2.png" title="pch文件"><img src="/img/0038/0038-2.png" alt="pch文件" title="pch文件"></a></p><h2 id="配置"><a href="#配置" class="headerlink" title="配置"></a>配置</h2><p>配置方式：Target-&gt;Build Settings-&gt;Prefix Header.在Prefix Header中填写pch文件的路径（<strong>修改为实际路径</strong>）：</p><div class="code-wrapper"><pre><code class="hljs arcade">$(SRCROOT)/TestApp/SupportFiles/PrefixHeader.pch</code></pre></div><p><code>$(SRCROOT)</code>表示的是项目的根目录。填写完后Xcode会自动显示出其对应的实际路径<a href="/img/0038/0038-3.png" title="配置pch文件"><img src="/img/0038/0038-3.png" alt="配置pch文件" title="配置pch文件"></a>配置好后编译试一下。</p><hr><p>配置的pch文件不是整个项目都可以用，而是在配置了使用此pch文件的target中才可以用。</p>]]></content>
    
    
    <summary type="html">&lt;p&gt;pch文件是一个预编译头文件，可以在这个文件里导入一些头文件，存放一些宏定义，然后给一个target配置一个pch文件，这个target就可以直接使用pch文件里面导入的头文件和宏定义。&lt;/p&gt;</summary>


    <category term="iOS" scheme="https://note.zkk.me/categories/iOS/"/>
    
    
  </entry>
  
  <entry>
    <title>iOS开发strong、weak、unsafe_unretained区别</title>
    <link href="https://note.zkk.me/0x0037.html"/>
    <id>https://note.zkk.me/0x0037.html</id>
    <published>2020-12-28T07:05:00.000Z</published>
    <updated>2026-06-29T03:05:06.496Z</updated>
    
    <content type="html"><![CDATA[<p>在iOS开发中weak、strong都是ARC下常用的属性关键字，那unsafe_unretained又表示什么呢？它们有什么区别呢？</p><span id="more"></span><h2 id="strong"><a href="#strong" class="headerlink" title="strong"></a>strong</h2><p>strong表示对一块内存强引用，当strong类型的指针指向一块内存，这块内存的引用计数就加1，相反则减1。当一块内存的引用计数为0时则销毁这块内存。看个例子：</p><div class="code-wrapper"><pre><code class="hljs objective-c">__strong NSURL *url1 = [[NSURL alloc] initWithString:@&quot;https://zkk.me&quot;];__strong NSURL *url2 = url1;url1 = nil;NSLog(@&quot;url2 is %@&quot;, url2.absoluteString);</code></pre></div><p>输出内容为</p><div class="code-wrapper"><pre><code class="hljs actionscript">url2 <span class="hljs-keyword">is</span> https:<span class="hljs-comment">//zkk.me</span></code></pre></div><p><code>[NSURL alloc]</code>分配了一块内存A（假设它叫A），strong类型的指针url1对内存A强引用，所有A的引用计数为1，后面strong类型的指针url2也指向了url1指向的内存A，所以A的引用计数再增加1，变为2。然后给url1赋值为nil，不再指向A，所以A的引用计数减1，变成了1，此时输出url2指向的内存A的内容。</p><h2 id="weak"><a href="#weak" class="headerlink" title="weak"></a>weak</h2><p>weak表示一个指针对一块内存进行弱引用。弱引用就是不增加所指向内存的引用计数。看个例子：</p><div class="code-wrapper"><pre><code class="hljs objective-c">__strong NSURL *url1 = [[NSURL alloc] initWithString:@&quot;https://zkk.me&quot;];__weak NSURL *url2 = url1;url1 = nil;NSLog(@&quot;url2 is %@&quot;, url2.absoluteString);</code></pre></div><p>输出内容为</p><div class="code-wrapper"><pre><code class="hljs actionscript">url2 <span class="hljs-keyword">is</span> (<span class="hljs-literal">null</span>)</code></pre></div><p>由于url2是弱引用，所以不会增加引用计数，当url1被赋值为nil时，原来分配的内存的引用计数为0，则销毁这块内存，同时给url2指针也赋值为nil。所以输出为<code>(null)</code></p><h2 id="unsafe-unretained"><a href="#unsafe-unretained" class="headerlink" title="unsafe_unretained"></a>unsafe_unretained</h2><p>unsafe_unretained类型指针指向一块内存时，内存的引用计数也不会增加，这一点与weak一致。但是与weak类型不同的是，当其所指向的内存被销毁时，unsafe_unretained类型的指针并不会被赋值为nil，也就是变成了一个野指针。对野指针指向的内存进行读写，程序就会crash。</p><h2 id="声明"><a href="#声明" class="headerlink" title="声明"></a>声明</h2><p>在声明一个属性（property）时，可以直接用strong、weak、unsafe_unretained关键词，例如：</p><div class="code-wrapper"><pre><code class="hljs objective-c">@property (nonatomic, strong) NSString *name;@property (nonatomic, weak) NSString *address;@property (nonatomic, unsafe_unretained) NSString *number;</code></pre></div><p>但是当声明一个局部变量时，使用方式就有点区别，要在关键词前面加双下划线<code>__</code>，就像上面的例子中那样。</p><hr><blockquote><p>REFERENCE</p><ul><li><a href="https://www.jianshu.com/p/bd6aa1e62717" title="__unsafe_unretained 的理解和使用">__unsafe_unretained 的理解和使用</a></li></ul></blockquote>]]></content>
    
    
    <summary type="html">&lt;p&gt;在iOS开发中weak、strong都是ARC下常用的属性关键字，那unsafe_unretained又表示什么呢？它们有什么区别呢？&lt;/p&gt;</summary>


    <category term="iOS" scheme="https://note.zkk.me/categories/iOS/"/>
    
    
  </entry>
  
  <entry>
    <title>MacOS安装Homebrew报错curl: (7) </title>
    <link href="https://note.zkk.me/0x0036.html"/>
    <id>https://note.zkk.me/0x0036.html</id>
    <published>2020-11-07T20:25:00.000Z</published>
    <updated>2026-06-29T03:05:06.496Z</updated>
    
    <content type="html"><![CDATA[<p>想在Mac上安装Homebrew在Homebrew<a href="https://brew.sh/" title="网站">网站</a>查到可以用下面命令安装<span id="more"></span></p><div class="code-wrapper"><pre><code class="hljs shell">/bin/bash -c &quot;$(curl -fsSL https://raw.githubusercontent.com/Homebrew/install/master/install.sh)&quot;</code></pre></div><p>复制命令，执行后终端报错如下</p><div class="code-wrapper"><pre><code class="hljs pgsql">curl: (<span class="hljs-number">7</span>) Failed <span class="hljs-keyword">to</span> <span class="hljs-keyword">connect</span> <span class="hljs-keyword">to</span> raw.githubusercontent.com port <span class="hljs-number">443</span>: <span class="hljs-keyword">Connection</span> refused</code></pre></div><p>这是由DNS污染造成的问题<!-- more --></p><h2 id="方法一：修改host"><a href="#方法一：修改host" class="headerlink" title="方法一：修改host"></a>方法一：修改host</h2><p>打开Mac终端，输入下面指令</p><div class="code-wrapper"><pre><code class="hljs shell">sudo vi /etc/hosts</code></pre></div><p>输入密码之后在hosts文件中追加以下内容</p><div class="code-wrapper"><pre><code class="hljs shell">199.232.68.133 raw.githubusercontent.com199.232.68.133 user-images.githubusercontent.com199.232.68.133 avatars2.githubusercontent.com199.232.68.133 avatars1.githubusercontent.com</code></pre></div><p>追加内容完毕，保存文件退出</p><h3 id="安装Homebrew"><a href="#安装Homebrew" class="headerlink" title="安装Homebrew"></a>安装Homebrew</h3><p>终端执行以下命令安装Homebrew</p><div class="code-wrapper"><pre><code class="hljs shell">/bin/bash -c &quot;$(curl -fsSL https://raw.githubusercontent.com/Homebrew/install/master/install.sh)&quot;</code></pre></div><p><strong>虽然修改了host可以安装了，但是下载的速度非常慢，所以有了第二种解决方法，使用国内的镜像安装。</strong></p><h2 id="方法二：使用国内的镜像"><a href="#方法二：使用国内的镜像" class="headerlink" title="方法二：使用国内的镜像"></a>方法二：使用国内的镜像</h2><p>输入自动化安装脚本，使用的全是国内资源，速度非常快</p><div class="code-wrapper"><pre><code class="hljs shell">/bin/zsh -c &quot;$(curl -fsSL https://gitee.com/cunkai/HomebrewCN/raw/master/Homebrew.sh)&quot;</code></pre></div><p>这个还是比较方便的</p><hr><blockquote><p>REFERENCE</p><ul><li><a href="https://blog.csdn.net/timtian008/article/details/108465820" title="Mac 安装 Homebrew及处理报错 curl: (7) Failed to connect to raw.githubusercontent.com port 443: Connection r">Mac 安装 Homebrew及处理报错 curl: (7) Failed to connect to raw.githubusercontent.com port 443: Connection r</a></li></ul></blockquote>]]></content>
    
    
    <summary type="html">&lt;p&gt;想在Mac上安装Homebrew
在Homebrew&lt;a href=&quot;https://brew.sh/&quot; title=&quot;网站&quot;&gt;网站&lt;/a&gt;查到可以用下面命令安装</summary>


    <category term="实用" scheme="https://note.zkk.me/categories/%E5%AE%9E%E7%94%A8/"/>
    
    
  </entry>
  
  <entry>
    <title>删除Xcode项目的SceneDelegate</title>
    <link href="https://note.zkk.me/0x0035.html"/>
    <id>https://note.zkk.me/0x0035.html</id>
    <published>2020-11-07T05:36:55.000Z</published>
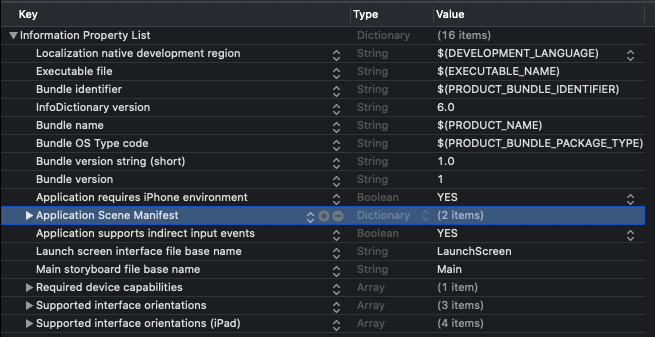
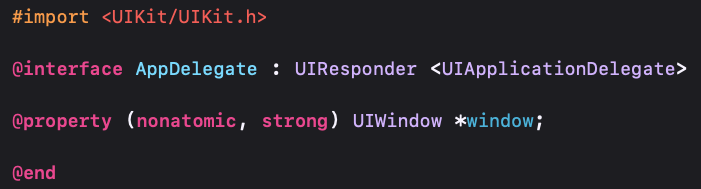
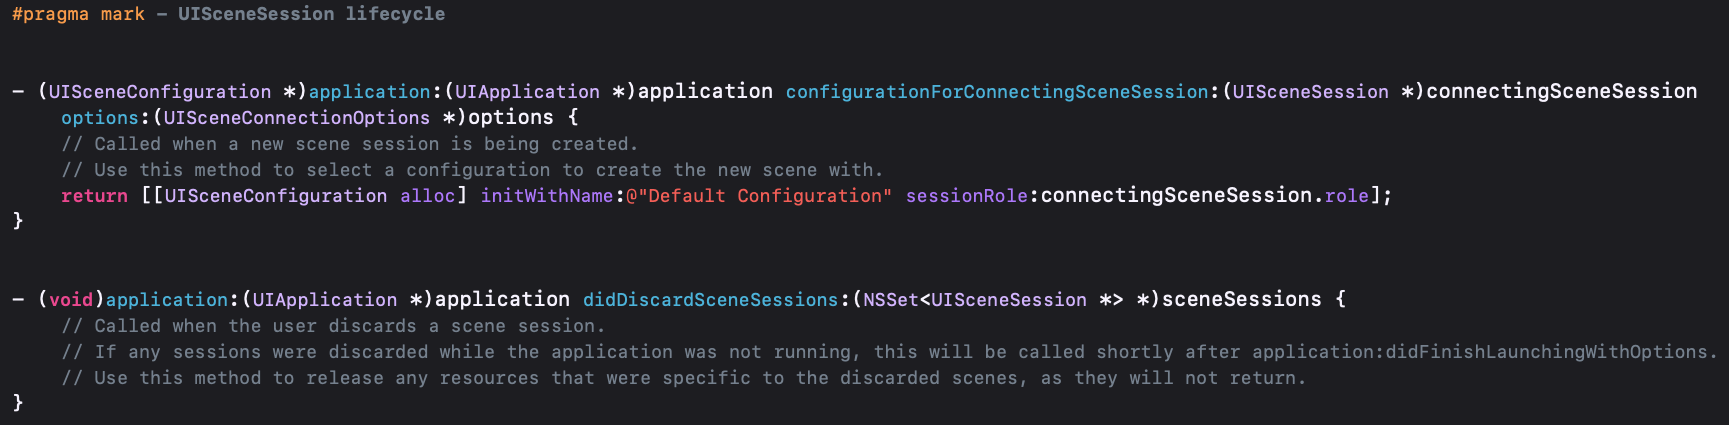
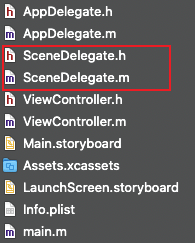
    <updated>2026-06-29T03:05:06.496Z</updated>
    
    <content type="html"><![CDATA[<p>新建Xcode项目的时候发现项目中有个叫SceneDelegate的东西，搜了一下是Xcode11新增的，作用是iPad分屏用到的，我开发iPhone应用应该用不到这玩意儿，于是就搜了一下怎么删除这个东西。<span id="more"></span></p><h2 id="删除SceneDelegate"><a href="#删除SceneDelegate" class="headerlink" title="删除SceneDelegate"></a>删除SceneDelegate</h2><ol><li>修改info.plist文件，删除<code>Application Scene Manifest</code>，如图<a href="/img/0035/0035-1.png" title="修改info.plist"><img src="/img/0035/0035-1.png" alt="修改info.plist" title="修改info.plist"></a></li><li>给<code>AppDelegate</code>类增加一个<code>UIWindow</code>属性<a href="/img/0035/0035-2.png" title="增加window"><img src="/img/0035/0035-2.png" alt="修改info.plist" title="增加window"></a></li><li>删除<code>AppDelegate.m</code>文件中的两个管理SceneDelegate生命周期的代理方法，如图<a href="/img/0035/0035-3.png" title="删除代理方法"><img src="/img/0035/0035-3.png" alt="删除代理方法" title="删除代理方法"></a></li><li>删除<code>SceneDelegate.h</code>和<code>SceneDelegate.m</code>文件，如图<a href="/img/0035/0035-4.png" title="删除代码文件"><img src="/img/0035/0035-4.png" alt="删除代码文件" title="删除代码文件"></a></li></ol><hr><blockquote><p>REFERENCE</p><ul><li><a href="https://www.jianshu.com/p/25b37bd40cd7" title="Xcode 11新建项目多了Scenedelegate？">Xcode 11新建项目多了Scenedelegate？</a></li></ul></blockquote>]]></content>
    
    
    <summary type="html">&lt;p&gt;新建Xcode项目的时候发现项目中有个叫SceneDelegate的东西，搜了一下是Xcode11新增的，作用是iPad分屏用到的，我开发iPhone应用应该用不到这玩意儿，于是就搜了一下怎么删除这个东西。</summary>


    <category term="iOS" scheme="https://note.zkk.me/categories/iOS/"/>
    
    
  </entry>
  
  <entry>
    <title>CocoaPods安装</title>
    <link href="https://note.zkk.me/0x0034.html"/>
    <id>https://note.zkk.me/0x0034.html</id>
    <published>2020-11-06T21:31:00.000Z</published>
    <updated>2026-06-29T03:05:06.496Z</updated>
    
    <content type="html"><![CDATA[<h1> 什么是CocoaPods</h1>CocoaPods是一个为Xcode项目管理库依赖关系的工具。<p>项目的依赖关系在名为Podfile的单个文本文件中指定。 CocoaPods将解析库之间的依赖关系，获取源代码，然后将其连接到Xcode工作区中以构建项目。</p><p>最终目标是通过创建更加集中的生态系统来提高第三方开源库的可发现性和参与度。<span id="more"></span>–<a href="https://cocoapods.org/" title="CocoaPods官网">CocoaPods官网</a></p><h2 id="安装"><a href="#安装" class="headerlink" title="安装"></a>安装</h2><p>CocoaPods是使用Ruby构建的，可以使用macOS上默认的Ruby来安装。</p><ol><li>首先查看本地的gem软件源<div class="code-wrapper"><pre><code class="hljs shell">gem source -l</code></pre></div>可以看到gem默认的软件源<div class="code-wrapper"><pre><code class="hljs asciidoc"><span class="hljs-bullet">*** </span>CURRENT SOURCES <span class="hljs-strong">***</span>https://rubygems.org/</code></pre></div>由于默认的软件源在国外，链接的稳定性和速度可能较差，这里需要把它替换成国内的软件源。移除默认软件源<div class="code-wrapper"><pre><code class="hljs shell">gem sources --r https://rubygems.org/</code></pre></div>添加国内软件源<div class="code-wrapper"><pre><code class="hljs shell">gem sources --a https://gems.ruby-china.com</code></pre></div>再次执行<code>gem source -l</code>看到国内软件源添加成功即可。</li><li>安装CocoaPods<div class="code-wrapper"><pre><code class="hljs shell">sudo gem install cocoapods</code></pre></div>输入密码，等待安装完成<div class="code-wrapper"><pre><code class="hljs subunit">Password:Fetching concurrent-ruby<span class="hljs-string">-1</span>.1.7.gemFetching i18n<span class="hljs-string">-1</span>.8.5.gemFetching thread_safe<span class="hljs-string">-0</span>.3.6.gemFetching tzinfo<span class="hljs-string">-1</span>.2.7.gemFetching activesupport<span class="hljs-string">-5</span>.2.4.4.gemFetching nap<span class="hljs-string">-1</span>.1.0.gem............Installing ri documentation for cocoapods<span class="hljs-string">-1</span>.10.0Done installing documentation for concurrent-ruby, i18n, thread_safe, tzinfo, activesupport, nap, fuzzy_match, httpclient, algoliasearch, ffi, ethon, typhoeus, netrc, public_suffix, addressable, cocoapods-core, claide, cocoapods-deintegrate, cocoapods-downloader, cocoapods-plugins, cocoapods-search, cocoapods-trunk, cocoapods-try, molinillo, atomos, colored2, nanaimo, xcodeproj, escape, fourflusher, gh_inspector, ruby-macho, cocoapods after 28 seconds33 gems installed</code></pre></div>安装完成（关于安装过程中出现的问题，可以去官网<a href="https://guides.cocoapods.org/using/getting-started.html#getting-started" title="guide网页">guide网页</a>查看详细说明）</li></ol><h2 id="卸载CocoaPods"><a href="#卸载CocoaPods" class="headerlink" title="卸载CocoaPods"></a>卸载CocoaPods</h2><p>在安装CocoaPods的同时还安装了CocoaPods相关的软件，所以卸载CocoaPods的时候最好把相关软件也卸载。首先查看本地有哪些CocoaPods的相关安装</p><div class="code-wrapper"><pre><code class="hljs shell">gem list --local | grep cocoapods</code></pre></div><p>可以看到输出如下</p><div class="code-wrapper"><pre><code class="hljs shell">cocoapods (1.10.0)cocoapods-core (1.10.0)cocoapods-deintegrate (1.0.4)cocoapods-downloader (1.4.0)cocoapods-plugins (1.0.0)cocoapods-search (1.0.0)cocoapods-trunk (1.5.0)cocoapods-try (1.2.0)</code></pre></div><p>然后对于以上每一个安装都执行一下uninstall</p><div class="code-wrapper"><pre><code class="hljs shell">sudo gem uninstall cocoapodssudo gem uninstall cocoapods-core... ...</code></pre></div><p>卸载完成</p><hr><blockquote><p>REFERENCE</p><ul><li><a href="https://juejin.im/post/6844903993215303688" title="Cocoapods的安装与使用">Cocoapods的安装与使用</a></li></ul></blockquote>]]></content>
    
    
    <summary type="html">&lt;h1&gt; 什么是CocoaPods&lt;/h1&gt;CocoaPods是一个为Xcode项目管理库依赖关系的工具。

&lt;p&gt;项目的依赖关系在名为Podfile的单个文本文件中指定。 CocoaPods将解析库之间的依赖关系，获取源代码，然后将其连接到Xcode工作区中以构建项目。&lt;/p&gt;
&lt;p&gt;最终目标是通过创建更加集中的生态系统来提高第三方开源库的可发现性和参与度。</summary>


    <category term="iOS" scheme="https://note.zkk.me/categories/iOS/"/>
    
    
  </entry>
  
  <entry>
    <title>Xcode无线真机调试</title>
    <link href="https://note.zkk.me/0x0033.html"/>
    <id>https://note.zkk.me/0x0033.html</id>
    <published>2020-08-22T04:14:00.000Z</published>
    <updated>2026-06-29T03:05:06.496Z</updated>
    
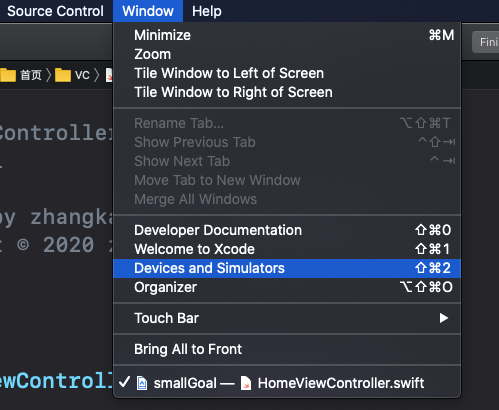
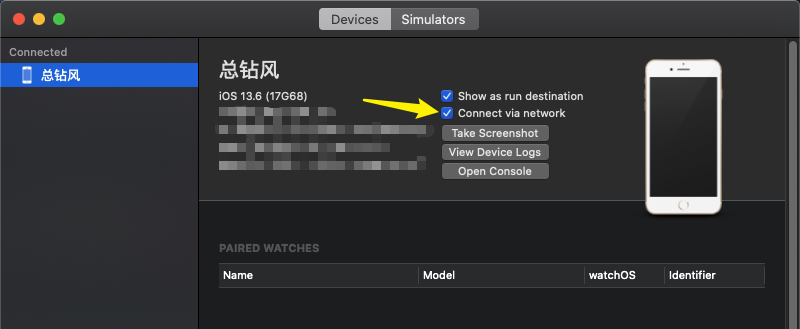
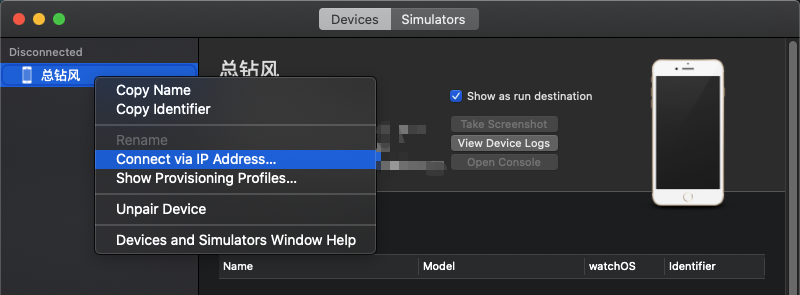
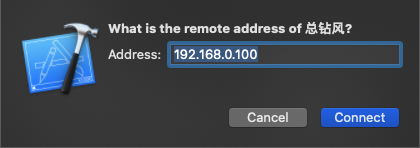
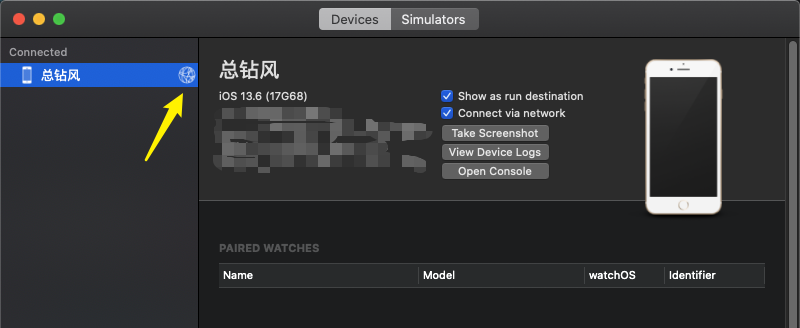
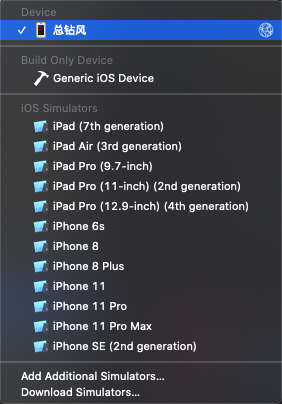
    <content type="html"><![CDATA[<p>感觉每次真机调试都要用数据线把iPhone插在Mac上不太方便，就查了一下Xcode怎么无线真机调试。<span id="more"></span></p><h2 id="演示环境"><a href="#演示环境" class="headerlink" title="演示环境"></a>演示环境</h2><ul><li>iOS13.6</li><li>macOS Catalina(10.15.6)</li><li>Xcode 11.6</li><li>Mac与iPhone在同一网络中（通过ip可以直接找到）</li></ul><h2 id="步骤"><a href="#步骤" class="headerlink" title="步骤"></a>步骤</h2><ol><li>将真机使用数据线连在Mac上，打开Xcode点击顶部导航栏<code>Window</code>，然后选择<code>Devices and Simulators</code><a href="/img/0033/0033-1.png" title="进入设备管理"><img src="/img/0033/0033-1.png" alt="进入设备管理" title="进入设备管理"></a></li><li>在弹出的弹窗内可以看到你连接的真机设备选择你连接的设备，将<code>Connect via network</code>勾选<a href="/img/0033/0033-2.png" title="开启无线连接"><img src="/img/0033/0033-2.png" alt="开启无线连接" title="开启无线连接"></a></li><li><strong>拔掉数据线</strong>，在左侧找到刚刚勾选通过网络连接的设备。右键点击设备，点击<code>Connect via IP Address</code><a href="/img/0033/0033-3.png" title="通过ip找设备"><img src="/img/0033/0033-3.png" alt="通过ip找设备" title="通过ip找设备"></a></li><li>在弹出的弹窗内输入真机的ip，然后点击<code>Connect</code><a href="/img/0033/0033-4.png" title="输入IP"><img src="/img/0033/0033-4.png" alt="输入IP" title="输入IP"></a></li><li>连接成功后，左侧你的真机会带有一个地球图标，表示已经通过网络连接真机<a href="/img/0033/0033-5.png" title="网络连接成功"><img src="/img/0033/0033-5.png" alt="网络连接成功" title="网络连接成功"></a></li><li>在选择调试设备的列表里，你的真机也会带有一个地球图标<a href="/img/0033/0033-6.png" title="选择设备"><img src="/img/0033/0033-6.png" alt="选择设备" title="选择设备"></a></li></ol><p>然后你就可以无线真机调试了，以后也不再需要连接数据线，只需要Mac和真机在同一个无线网络内，打开Xcode项目，等待设备选择列表中你的真机出现地球图标即可。</p>]]></content>
    
    
    <summary type="html">&lt;p&gt;感觉每次真机调试都要用数据线把iPhone插在Mac上不太方便，就查了一下Xcode怎么无线真机调试。</summary>


    <category term="iOS" scheme="https://note.zkk.me/categories/iOS/"/>
    
    
  </entry>
  
  <entry>
    <title>蓝天碧水画中游-千岛湖之行</title>
    <link href="https://note.zkk.me/0x0032.html"/>
    <id>https://note.zkk.me/0x0032.html</id>
    <published>2020-08-14T09:30:00.000Z</published>
    <updated>2026-06-29T03:05:06.496Z</updated>
    
    <content type="html"><![CDATA[<p>8月2日，我跟同学一起去了杭州淳安县的千岛湖游玩。这里记叙一下游览经历。<span id="more"></span></p><hr><p>8月1日晚上，我与同学乘坐高铁从杭州东站到达千岛湖站。到千岛湖站的时候已经是晚上十点钟，我们乘坐穿梭巴士从高铁站到了提前预定好的宾馆附近，吃了晚饭，就去宾馆睡觉了。</p><p>2号一早，我们八点钟起床，在宾馆附近的开封菜（KFC）吃了早餐就乘坐公共汽车出发了。结果坐过了一站，下车后我们顶着烈日往回走了一站地，来到千岛湖景区。</p><p>我们买了门票，进入了景区，上了336号游船。从上午十点钟到大约下午三点之间，我们先后去了梅峰岛、渔乐岛和龙山岛。其中，我们上梅峰观景台是乘坐的缆车，下去是通过滑草。说实话，感觉梅峰岛的缆车和滑草让我有点失望，不过梅峰观景台的景色还是很不错的。</p><hr><p><a href="/img/0032/0032-1.JPG"><img src="/img/0032/0032-1.JPG"></a></p><p><a href="/img/0032/0032-2.JPG"><img src="/img/0032/0032-2.JPG"></a></p><p><a href="/img/0032/0032-3.JPG"><img src="/img/0032/0032-3.JPG"></a></p>]]></content>
    
    
    <summary type="html">&lt;p&gt;8月2日，我跟同学一起去了杭州淳安县的千岛湖游玩。这里记叙一下游览经历。</summary>


    <category term="旅行" scheme="https://note.zkk.me/categories/%E6%97%85%E8%A1%8C/"/>
    
    
  </entry>
  
</feed>